Getting started
- Who is Midsummer?
- Connecting to Midsummer
- Setting financial defaults
- Setting up your Automatic Pricing Calculator
- Performance task preferences
Who is Midsummer?
![]()
Easy PV is brought to you by Midsummer's in-house development team. Midsummer is one the UK’s leading distributors of solar PV, batteries, EV chargers and Heat Pump systems. With over 20 years of experience in the industry, our wholesale distribution and digital tools allow us to support you from design to installation.
- National reach, local support: Over 150 staff across multiple sites in Cambridge, Glasgow and Leeds, plus a subsidiary in Dublin.
- Fast, accurate logistics: We offer next-day delivery and maintain over 99% picking accuracy on our dedicated vehicles.
- Technical expertise: Our team is technically savvy and includes former installers. We provide free technical support and training.
- Specialist sales teams: We have dedicated teams to support customers across C&I, high volume sales, residential and off grid projects.
- Competitive pricing: We offer best-in-market pricing across our entire
range.
Already installing heat pumps or looking to get started? Take a look at Easy PV's sister software Heatpunk.
Get the most out of your account
Whether you're a regular customer or just getting started, linking your account to Easy PV is the best way to simplify your work.
Easy PV generates a complete kit list based on your design, from the panels and inverters down to specific mounting and electrical components. You can see the kit list on the project overview page for each of your projects.

Add to cart in one-click
Just click Add to cart and we'll take you to the Midsummer Wholesale website and load all the products into your cart.
You can then:
- Place an order.
- Save cart as a quote to come back to later.
- Add or remove items and change quantities.
- Combine saved quotes to order kit for multiple projects.
Connecting your account
To make sure your pricing is accurate when designing, you can link your Midsummer and Easy PV accounts.
- If you already have a Midsummer account, just follow these steps.
- Don't have an account yet? Apply here to see our full range of kit and unlock trade-only pricing.
- Have an account but haven't used it lately: Get in touch with our team and we'll make sure you're getting the best pricing we can offer. Email our sales team or call 01223851535.
Connecting to Midsummer
Connecting your Easy PV and Midsummer account will allow Easy PV to display your correct prices. This means you do not have to make changes to your goods prices in the financial task and you can be confident your jobs are being priced correctly.
To connect your Midsummer account
For Easy PV Pro teams, each member will need to connect their wholesale account for discounts to apply.
Setting financial defaults
Financial defaults set here will be automatically applied to your projects so you do not have to input them each time. These defaults can be overridden on a per-project basis.
For standard Easy PV users, you can set up financial defaults in My Account > Preferences > Financial. For Pro teams wishing to set team defaults, these can be found in Pro account settings > Financial. If you are a member of a Pro team, you may not be able to set these defaults as they will be configured by your team owner or admins.
Main settings
-
Projection term: The number of years you wish to make financial projections. This should be approximately the expected lifespan of the equipment.
-
Inflation rate: this is the inflation rate for your financial projection.
-
Panel degradation rate: panels gradually reduce in output as they degrade over time. Set the rate at which the output of the panels decreases each year.
-
Discount rate: a discount rate is a means of determining the current value of something (like income or savings from a PV system) that you'll receive in the future.
Important information about inflation rates
There are two ways to set inflation rates in Easy PV. Understanding the difference is important and will affect the accuracy of the financial projections and the calculated benefits.
General inflation
This is the base inflation rate that will be applied to all project projections by default. This should be a sensible economic inflation rate that is realistic to apply across the full project term.
-
You can set the default value in your account preferences (this can be overwritten in the financial task settings on a per-project basis)
- You should refer to relevant government guidance for setting this value, for example data published by the ONS in the UK or by CSE in Ireland.
Energy inflation
Energy inflation can be configured separately for your default tariffs or on a per project basis in the financial task and is specific to import and export tariffs. This distinction is crucial: energy prices often rise faster than general inflation. By setting the indexing on tariffs you can model scenarios where electricity costs increase more steeply than other household expenses, or where export payments might not grow as quickly due to wider market influences.
Choose how energy inflation should be indexed by selecting from the following options:
- Indexed to inflation - this means it will increase in line with the general inflation rate applied to the project.
- Indexed above inflation - this means the energy price will increase by a percentage amount on top of the general inflation rate. For example, if your general inflation rate is 3% and you set 2% above inflation, the inflation applied to the tariff rates will be 5%.
- Fixed indexing - this will let you choose a different fixed inflation rate to apply.
- None - this will keep the rate the same for the full projection term.
Here you can also select the default value of self-consumption. Self-consumption is the proportion of electricity generated from a solar array that is used in a property can significantly affect financial returns. Easy PV has several different methods you can use:
- (For UK) MCS: this can only be used with flat tariffs and properties with annual consumption between 1500 - 6000 kWh, battery storage below 15.1 kWh and generation below 6000kWh.
- Easy PV: this can be used for a project of any size and can be used with variable tariffs. Information on setting up variable tariffs can be found in the consumption task guide.
- Custom percentage: this contains significantly less information than the above methods. When using a custom percentage the 'Battery Storage' section in the Customer Proposal will not generate. If you would like this to generate, select the MCS or Easy PV self-consumption.
Tariffs
Here you can set default tariffs for the Easy PV and (for UK) MCS consumption calculations. They can be indexed to inflation, above inflation, fixed or none.
For more detail on how to create and edit these tariffs, have a look at our tariffs guide.
Pricing calculation
Here you can select whether you want to use the automatic pricing calculation or, alternatively, what default pricing mark up you want to use.
Automatic pricing calculator
This is where you can tailor the financial settings so you do not have to make significant adjustments on each project. You can set up rules based on look-up tables or a set markup and then set costs for the delivery and installation and optionally scaffolding, roofing, electrical, travel costs and any additional services you provide.
A full guide on how to set this up can be found here in the automatic pricing guide.
Manual pricing markup
If you are not using the pricing calculator, you can set a default markup which is applied to the cost of goods.
Tax settings
Here you can set defaults for the tax rate for material and services and select whether the customer will be able to reclaim the tax. Business customers can usually reclaim tax paid on an installation, but domestic customers typically can't reclaim tax. Tax rates may be different for domestic and business customers.
Running cost rules
Add lines for costs you expect to be incurred in the future. You can choose whether costs are applied on an annual basis (for example a maintenance contract) or as one-off costs (for example an inverter replacement).
Saving rules
Create savings rules which can be used in the financial task. You can set them to appear on every project or only be applied if a given accessory is present and can add savings based on a percentage of bills, percentage of annual generation, fixed monetary amount or a saving in kWh each year.
Payment options
Here you can create finance options that will show on your projects – set up the reserve interest, payment options and payment providers.
For more detail on how to set up finance options, have a look at our guide on setting up finance options.
If you have any additional questions about setting up your financial defaults, please reach out at help@easy-pv.co.uk or help@easy-pv.ie.
Setting up your Automatic Pricing Calculator
This guide applies to the easy-pv.co.uk and easy-pv.ie versions of Easy PV. The information provided here may not be accurate for easy-pv.com.
With Easy PV you can configure pricing rules to automatically calculate project prices. Rather than having to amend and change your service costs on each project, you can spend time setting up your pricing rules so the automatic pricing calculator will do it for you.
Pricing settings can be accessed via My Account > Preferences > Financial > Change pricing settings or if you are part of a Pro team, the owner/admin can do this via Pro Account settings > Financial > Change pricing settings.
To turn off automatic pricing click on the use pricing calculator toggle. You can also switch between automatic pricing and manual pricing on a per-project basis via the financial task.
Configuring for your project
You can set material pricing based on the cost of materials plus a markup (best for complex pricing depending on the number of panels, roof dimensions, travel distance, etc.) or based on custom lookup tables (ideal for simpler pricing using only a few panels/inverters combinations).
On top of the cost of materials, you can set up additional charges for the delivery and installation. The installation cost can be further specified with costs for scaffolding, electrical, roof type, and travel to the site.
-
Choose if you use a markup or lookup table for calculating the cost of materials.
-
Tick the box for each additional cost you want to include in your pricing (information on configuring each of these is below).
-
Choose the format in which you want to display the price of goods in the quote.
Lookup tables or markup
Option 1: Lookup tables
When you have chosen lookup tables on the first price settings page, before clicking next you can also choose to use a markup-based pricing for any designs that don’t match one of the lookup tables you have entered.
When you click Next, you can then create your lookup tables for different combinations of solar panels, inverters and batteries. Different costs can be specified within each combination for different numbers of panels.

Lookup tables are most useful if you install just a few different system combinations (i.e always use Trina with Growatt). If you need more than a few lookup tables, it’s probably more efficient to use the ‘markup’ method.
Option 2: Cost of materials plus a markup
When Markup has been chosen on the first pop up screen, clicking Next will bring you through to the following page where you can input levels of markup for different sizes of projects.
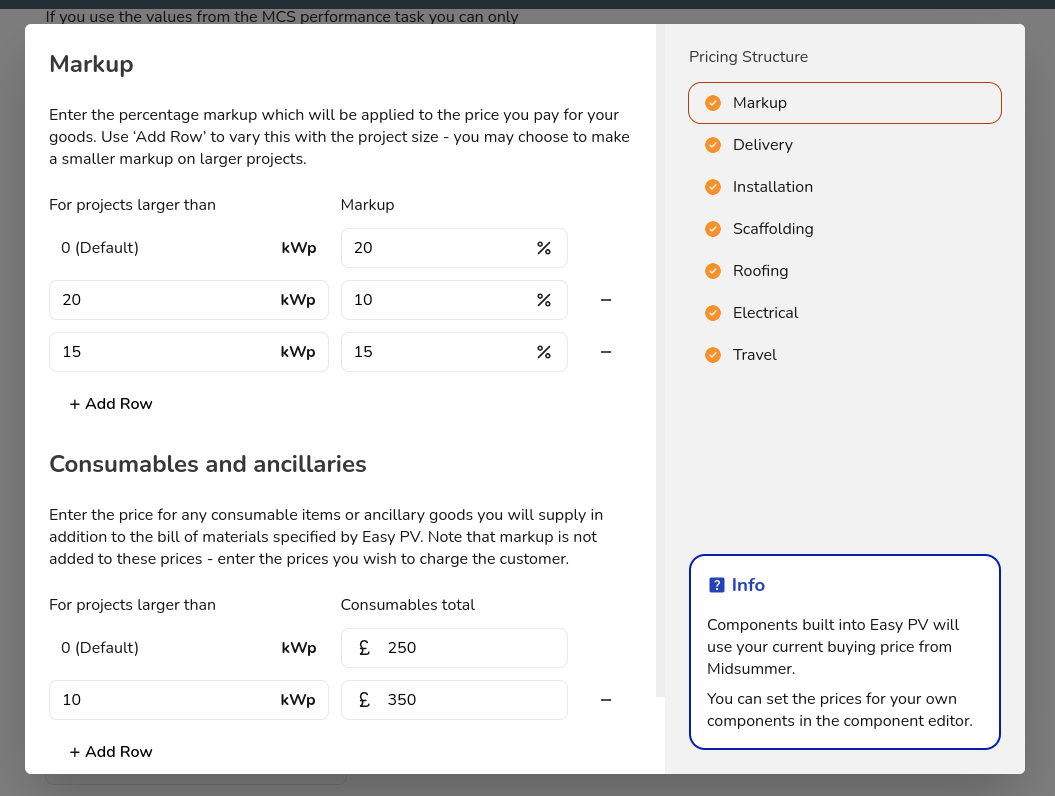
You will also notice a section for Consumables and ancillaries. This includes items not included with the PV kit such as zip ties. Throughout this calculator, you will be able to click +Add Row to create rules and changes to your costs depending on project size or travel distance.
Configure required costs
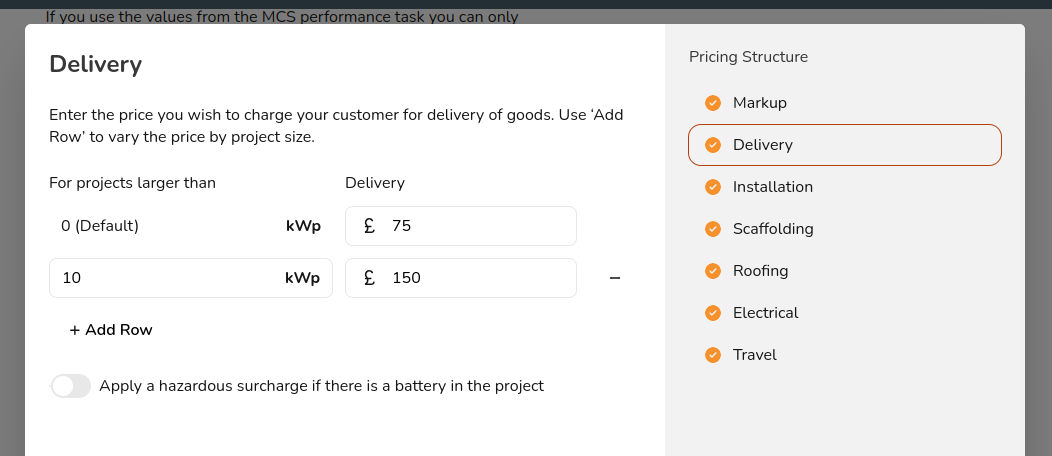
Delivery
You can determine an appropriate default delivery cost and hazardous surcharge fee (when a battery is added to a project) for various project sizes.
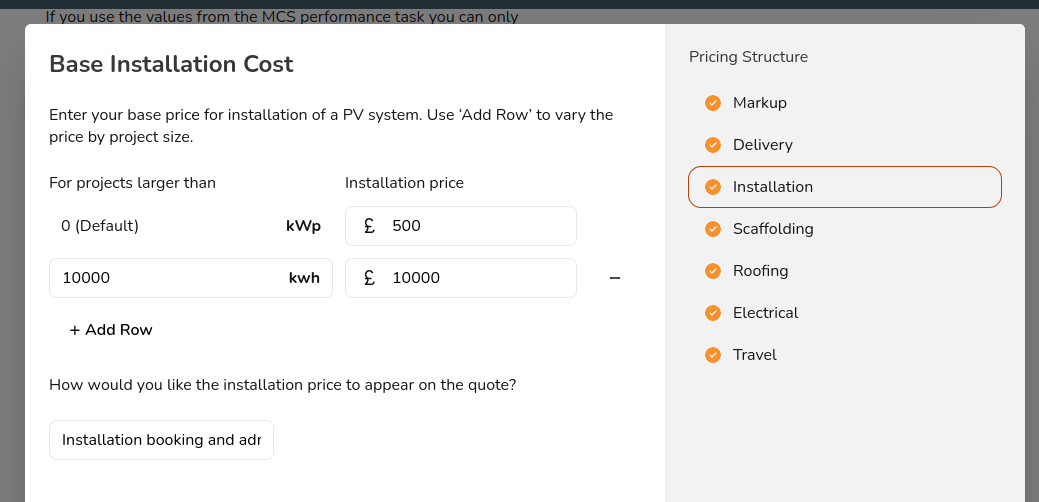
Installation
Here you can add a base installation cost which may cover all of your services (scaffolding, electrical, etc.) or you can set those up separately. You can also choose what text is displayed on the quote for this line item.
Configure optional costs
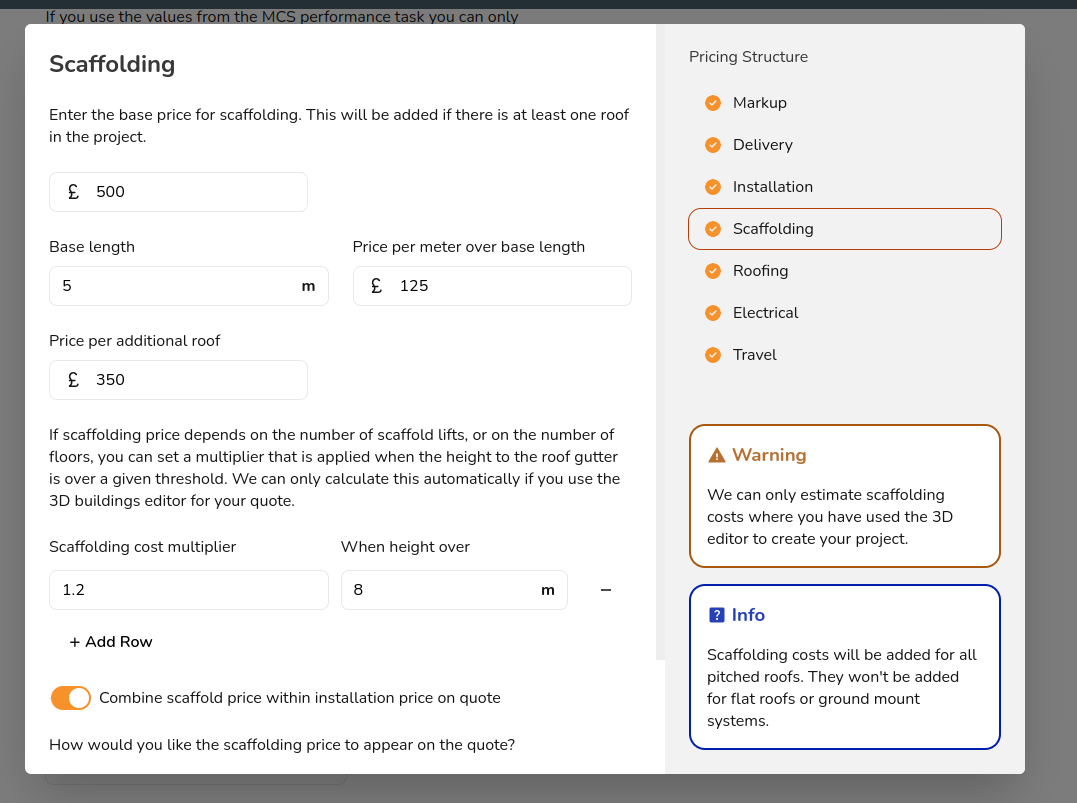
Scaffolding
In this section, you can set a base scaffolding fee and an extra cost for each additional roof. You can also set parameters for max length and height and have an additional charge or multiplier if those parameters are exceeded.
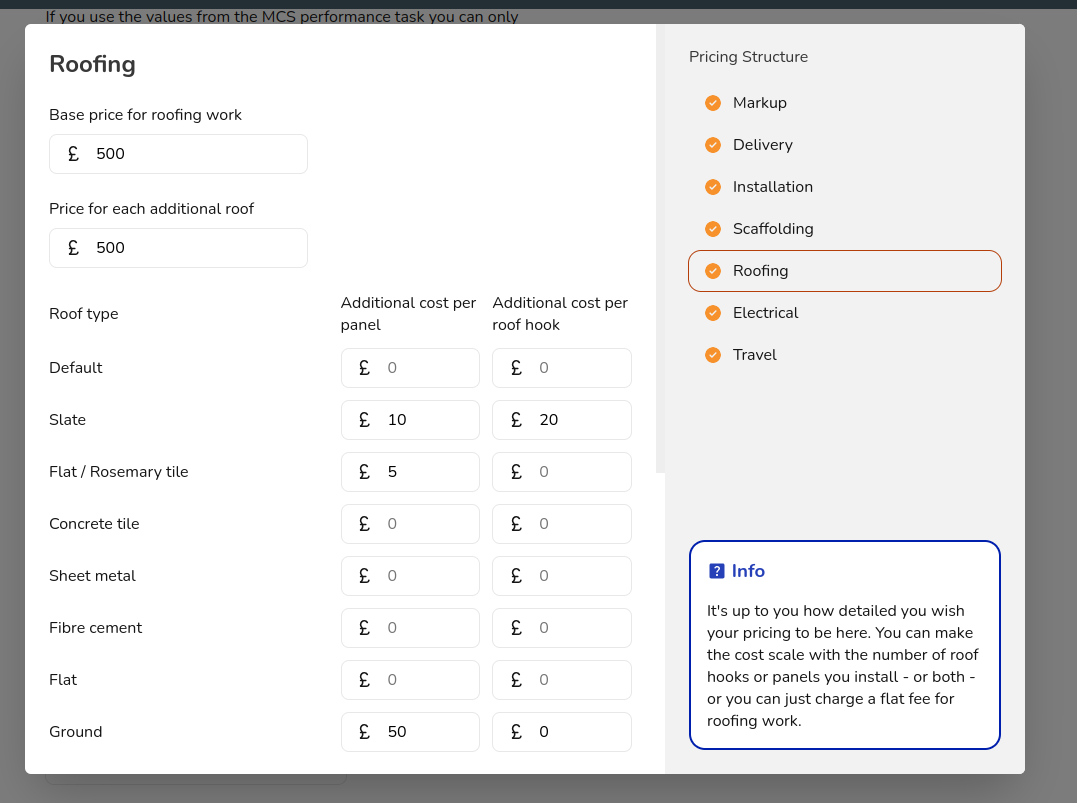
Roofing
For roofing , you can add a base cost and fee for each additional roof. You can set additional charge per solar panel depending on the roof type. Finally, you can add a cost for per each extra such as in-roof panel, optimiser, etc.
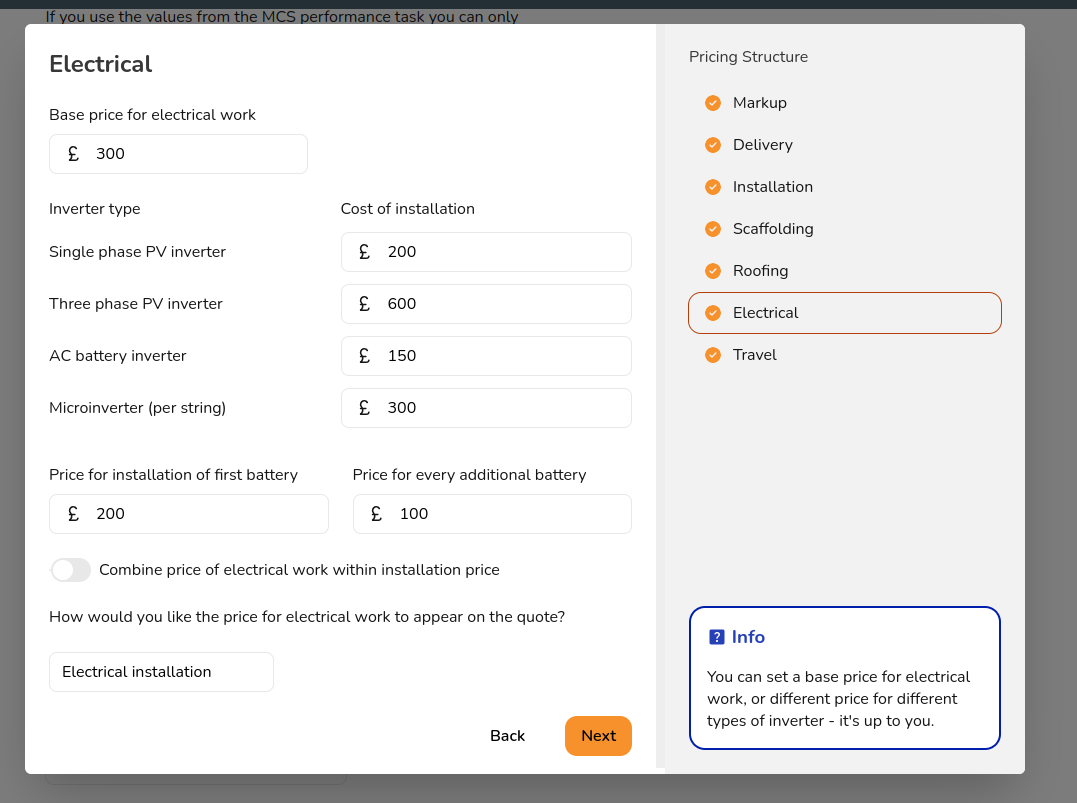
Electrical
Similarly, you can add a base electrical cost, additional fees for the installation of different inverters, and a cost for the installation of a battery.
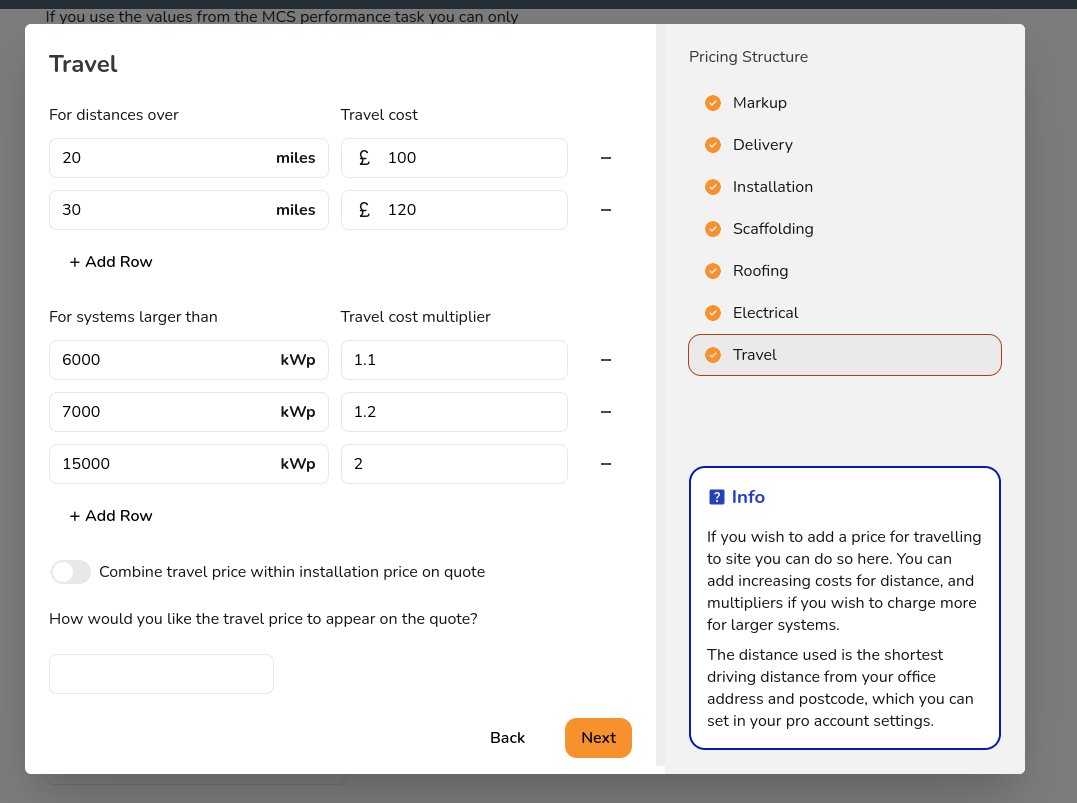
Travel
You can add costs for travel to site based on the distance (which Easy PV automatically calculates if you have input the project location and your company location!). You can also set up a travel cost multiplier for larger systems.
Configure other costs
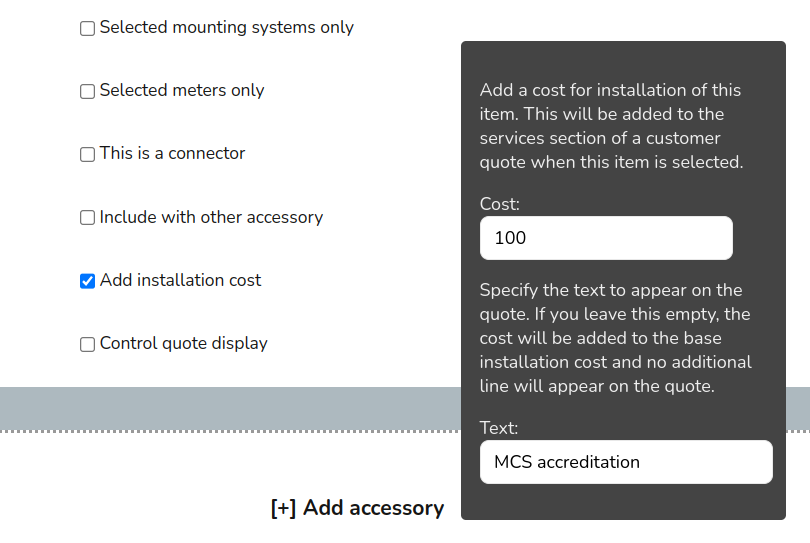
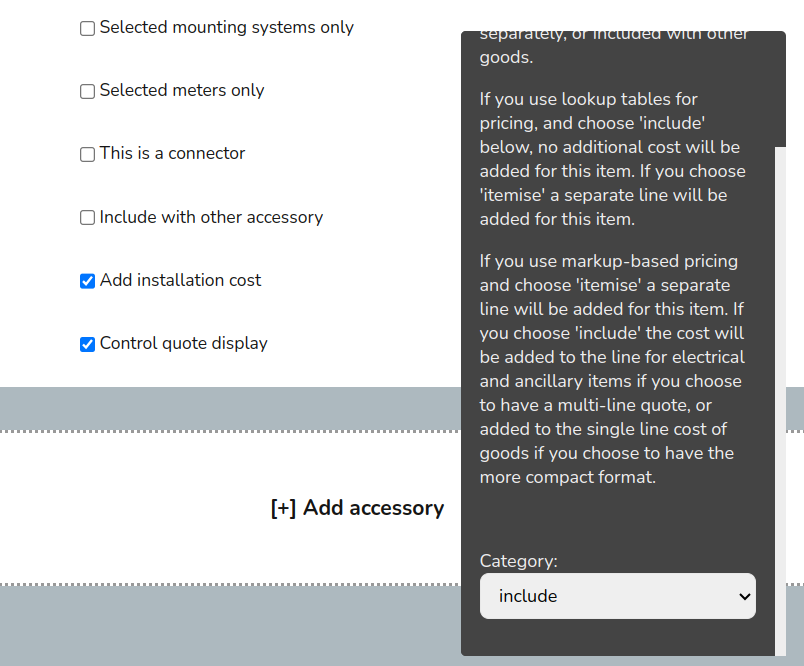
If there are costs you want to include on every project that you can't factor into any of the above sections then you can do so by adding a new accessory custom component.
- Create a new accessory, name it with whatever additional service you want to include
- Do not fill in the 'price' box
- If you would like the item or service to be included on all projects, then select the second option 'Include by default' in the rules. If you do not want to include by default you will be able to select it on a per-project basis in the electrical task.
- Then scroll to bottom of 'rules' and check the following options:
- Add installation cost - this is where you fill in the price and name of the item or service

-
Control quote display - this is where you can decide how it will display on the quote

- Add installation cost - this is where you fill in the price and name of the item or service
- You can also have a look at the other rules available on accessories and decide whether you would like to include or not include the item (for example, only include with specific inverters).
Performance task preferences
The Performance task can be streamlined by configuring your settings in My account > Preferences > Performance. Here you have the option to configure whether you want panel allocation and the generation of sunpath diagrams and shading factors to be automated.
Panel allocation
Choose between:
- Automatically allocate panels: use auto-stringing to automatically make a string plan without any input needed from you.
- Suggest allocation: use auto-stringing to make a string plan which it will suggest for you to accept or edit manually.
- Manually allocate panels: manually construct your string plan, with the option to use auto-stringing when you do so.
Sunpaths
With 3D and Magic design mode, by modelling any nearby obstructions, Easy PV can automatically calculate any shading losses. Here you can choose whether you want Easy PV to automatically calculate shading based on the terrain and 3D buildings or whether you want this to be excluded so you can set the shading manually.
Self-consumption and performance
Choose between methods to calculate the total annual generation of the system
Changing the performance mode used with affect all projects. If you would like to just use international calculations for odd jobs, we recommend doing so on a separate account so your MCS jobs are unaffected.
- MCS (UK only): This is based on the method detailed in Appendix B of MIS 3002: The Solar PV Standard (Installation) and will only work for UK postcodes.
- NREL: This method is based on NREL's PVWatts calculator, this is an international method that works for any location.
- PVGIS: This is another international option that is based on PVGIS data so will work for any location.
The following settings are only available on the UK version of Easy PV (easy-pv.co.uk).
If selecting the MCS method, you can also choose whether you want to:
- Set default values for MCS self consumption: this will let you set default values which will be used by default for each of the inputs required for the MCS consumption calculations.
- Manually enter MCS self consumption: if you select this option you will need to set the inputs required for the MCS calculations on every project.