Financial task
- Using the Financial task
- FinMatch finance option in Easy PV
- Understanding the financial projection
- Payment options
Using the Financial task
Completing the Easy PV Financial task is an important part of designing and selling a PV system. The task has two main areas of focus:
- Create an accurate quotation to give to the customer. You can fully cost the materials and services that will be included as part of the installation and set the relevant tax and apply any grants or discounts. Using the Financial task and the Customer Proposal task, you can configure how you want the quote to be presented in the final customer proposal document.
- Generate estimated financial projections for the installed system over time. This is important as it will help the customer understand if they are making a good investment by showing likely costs and benefits and how long it might take for the system to break even. You can also include loans, running costs and other custom savings and set up payment stages.
Getting started with the financial task
We recommend setting up automatic pricing rules and financial defaults via your account preferences or pro account settings. This will speed up the time it takes for you to generate an accurate quotation and projections for your project.
You can access the financial task via the 'Tasks' drop-down menu or from the task list to the left on the project overview page.
When the financial task first opens, you'll be shown a popup that lets you configure the settings you want to use for the quote and projections. It will open on 'Self-consumption' and then you can use the right hand navigation to choose the settings you want to edit:
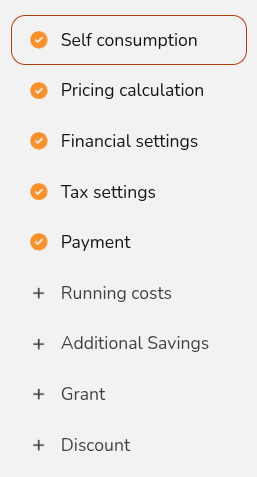
If you have set defaults via your account preferences, these will be automatically applied here. More information on each of the settings is available below.
When you have finished updating the settings, click Save & Exit. This will then allow you to view and modify the quotation and view the projection.
Navigating the financial task
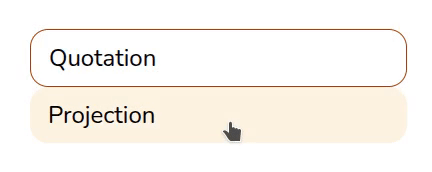
The right hand sidebar contains options to switch between the quotation and the projection view:
You also have the following actions:
|
|
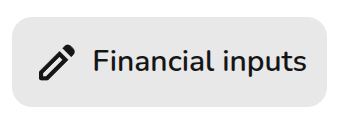
Financial inputs Click to edit the financial settings used in the projection |
|
|
Open help page |
|
|
Refresh pricing Recalculate cost of goods, services or both reflect any changes you've made to the project via other tasks. |
|
|
Export quotation as a CSV. Customise the CSV file that will be downloaded. Line items will be based on the quotation in Financial Task. |
|
|
Auto-pricing settings Adjust settings used in automatic pricing calculator directly from the financial task. |
|
|
Go to user preferences |


Quotation view
In the quotations view, you can view and edit the quotation under the following headings:
- Goods: Here you can see the full kit list and add or delete any items. To the right is the option to display or hide the markup and edit the quote view.
- Services: If using automatic pricing, you will see your service totals and can then make any adjustment. If not using automatic pricing, you can add your services costs here.
- Total: Below, you will be able to see the total cost of the system for the customer, including any grants or discounts applied via the financial settings you've applied to the project.
Projections view
For more details on the financial projection and how you can improve it, see Understanding the Financial Projection.
At the top of this page you will see the annual generation, payback period, internal rate of return and net present value. A positive net present value is a good indication that the project is financially worthwhile. You will also see the following details about the projection:
- Income and savings: This graph shows the projected income from the system over the project lifetime in payments for generated and exported electricity, along with electricity savings.
- Running costs and loan: If a running cost is included or finance option is selected, then these will show up in these graphs.
- Bottom line: This graph will then indicate the cumulative costs and benefits of the system. When these two lines intersect is when the system benefits become equal to the cumulative costs, after this time the customer is projected to gain from their solar system.
- Payment options: On the right-hand side you can view and the payment options on this project. Switch between them to see the impact they have on the financials for this project.
Configuring the financial settings
The following sections explain all the settings you can configure. Click Financial inputs in the top right of the financial task to open these settings.
Self consumption
The proportion of electricity generated from a solar array that is used in a property can significantly affect financial returns. Easy PV has multiple methods you can use to calculate self-consumption which you can select from. Read here about the differences between the MCS and Easy PV methods.
- MCS (UK): this can only be used with flat tariffs, can be used for projects with consumption between 1500-6000kWh, generation below 6000kWh and usable batter capacity below 15.1kWh.
- Easy PV: this can be used for a project of any size and can be used with variable tariffs. Information on setting up variable tariffs can be found in our tariffs guide. Set up export limits and configure battery charging.
- Custom percentage: Input a self-consumption fraction directly. This will not model the impacts of a battery and is just calculated based on the total estimated annual generation.
When using a custom percentage the Battery Storage section in the Customer Proposal will not generate. If you would like this to generate, select the MCS or Easy PV self-consumption.
Pricing calculation
Here you can select which pricing calculation to use, with the option of selecting between the following:
- Manual pricing: set a default markup on goods and input service costs on each project
- Automatic pricing: set a default markup on goods and automatically configure service costs for each project. Service costs will be calculated according to rules that you set.
Guidance on how to set up your own automatic pricing settings can be found in the automatic pricing guide.
Financial settings
See how these settings impact the financial projection. You can set default values for this section in your account or pro financial settings or adjust them on a project by project basis.
-
Projection term: the number of years you wish to make financial projections. This should be approximately the expected lifespan of the equipment.
- Inflation rate: this is the inflation rate for your financial projection.
This base inflation rate will be applied to all costs and savings, you can set a different inflation rate for tariffs.
-
Panel degradation rate: panels gradually reduce in output as they degrade over time. Set the rate at which the output of the panels decreases each year.
-
Discount rate: a discount rate is a means of determining the current value of something (like income or savings from a PV system) that you'll receive in the future. Set this to 0 if you would like no mention of discount rate in the proposal.
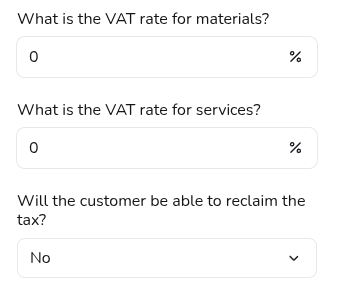
Tax settings
You can set default values for this section in your financial settings. Configure the following:
- VAT rate for materials: this will apply to all costs included in the goods section.
- VAT rate for services: this will apply to all costs included in the services section.
- Whether the customer can reclaim VAT: selecting that the tax can be reclaimed will mean VAT is excluded from the loan total (if applicable) and the cost on the front of the proposal, but not the cost used in the financial projection.
Payment
In this section you can configure how the customer will pay for the system, with the option to either pay in full or with finance. Any discounts or grants are configured in later sections but will be automatically factored in.
Select from your preset payment options for this project or create new ones. You can set default values for this section in your financial settings, If you'd like to amend an existing one for this project, you can just duplicate to project and edit any details or navigate to your financial settings by clicking the Edit option at the top to edit the default option.
Running costs
Add rows for costs you expect to be incurred in the future. You can choose whether costs are applied on an annual basis (for example a maintenance contract) or as one-off costs (for example an inverter replacement).

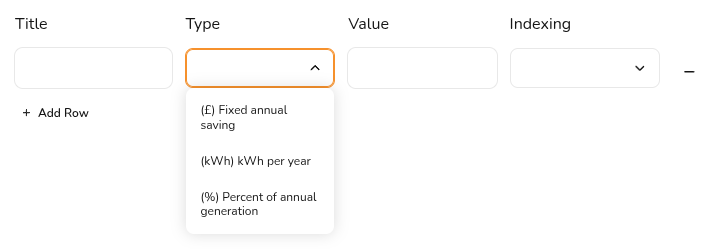
Additional savings
Add rows for additional savings, such as from immersion diversion systems or from night charging from batteries. Set the name for the saving, what the saving is (this can be in terms of £, kWh per year or a % of annual generation) and how it should scale with inflation.
Grant
If the project is eligible for a grant that will pay for some or all of the cost of the system, you can add it here. Set the description, the value and whether this is claimed before or after the installation.

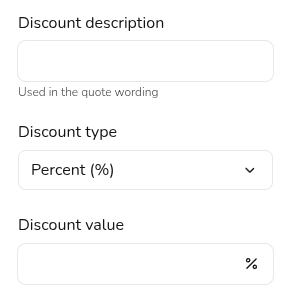
Discount
If you want to apply a discount to your quote to reduce the cost for your customer, you can do so here. Input a description and choose the type of discount you want to apply. This can be a fixed discount or a percentage of the total cost.
If you have any additional questions about the financial task take a look at our financial FAQs or reach out at help@easy-pv.co.uk or help@easy-pv.ie.
FinMatch finance option in Easy PV
Setting up with FinMatch in Easy PV
Step 1: Sign up for FinMatch
You can apply through Easy PV to FinMatch to offer finance through Easy PV. FinMatch offers access to finance plans from multiple lenders. FCA Assist helps installers get authorised quickly and efficiently.
FinMatch Finance Assistant enables your customers to click from an Easy PV quote and apply for finance instantly.
To get started:
- Standard users: Go to My Account > Preferences > Financial. Scroll down to Providers and click Apply now.
- Pro users: Go to Pro Account Settings > Financial. Scroll down to Providers and click Apply now.
If you are in a Pro team, only team owners can apply via Pro account settings.
Step 2: Approval from FinMatch
Once approved, we will link your FinMatch account with your Easy PV account.
Step 3: Configure in Easy PV
In your financial settings, you can configure your FinMatch settings:
- Standard users: My account > Preferences > Financial. Scroll down to Providers.
- Pro users: Pro Account Settings > Financial. Scroll down to Providers.
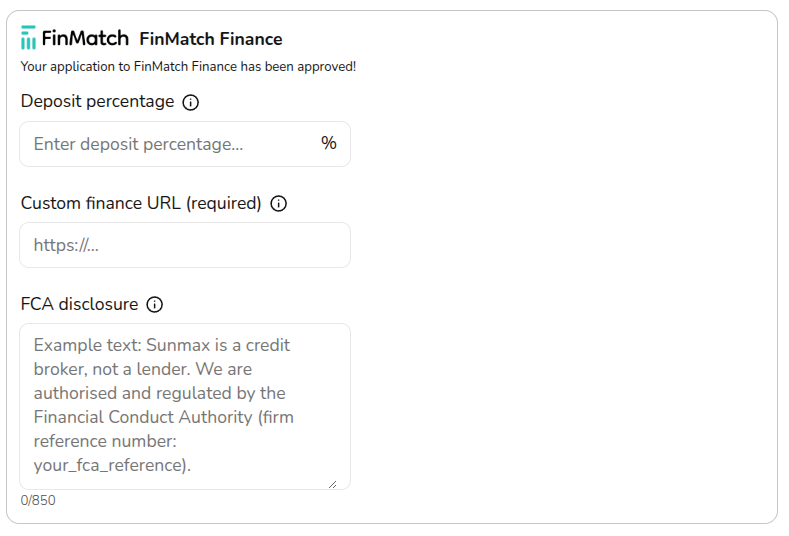
Deposit percentage
Enter the percentage of the total system cost that the customer must pay as a deposit. This amount will not be included in the financed total.
This amount can be edited on a per project basis.
Custom finance URL
Enter the full URL of the finance page on your website (for example: https://www.yoursite.co.uk/finance). This link will be shared with FinMatch.
A custom link to the FinMatch Finance Assistant will then be generated for each FinMatch finance option included in a customer proposal. Read more about this in Step 5.
FCA disclosure
Enter the customised text of your required FCA Disclosure which will be displayed on each finance option generated through FinMatch that is included in the customer proposal.
Example disclosure text
[Your Company Name] is a credit broker, not a lender. We are authorised and regulated by the Financial Conduct Authority (FCA) (firm reference number: XXXXXX). We do not provide financial advice but offer credit products from a carefully selected panel of lenders, all of whom are authorised and regulated by the FCA. We do not charge customers a fee or earn a commission for our credit broking services. Details of our regulated credit products are explained on our website. Credit is subject to age, status and affordability. Borrowing more than you can afford or paying late may affect your financial status and ability to obtain credit. You are not obliged to use the lender we suggest. You are free at any time to explore and secure financing independently, and it is possible that you may find a better offer elsewhere.
Note: there is an 850 character limit on this disclosure text.
Using FinMatch finance options in a project
Step 4: Enable FinMatch in a project
Navigate to Financial task > Financial inputs > Payment options. You will then see FinMatch as a finance option alongside any other payment options you have configured.
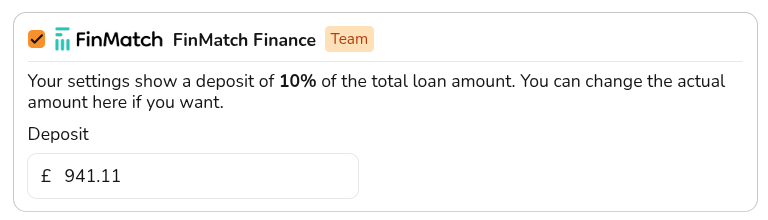
Tick the FinMatch Finance option and (optionally) edit the deposit amount. Some finance options will have a minimum deposit value so this may be overridden.
Select Save & Exit in the bottom right or navigate to the next section in the menu on the left.
On the Projection tab, you can navigate between the available finance options from FinMatch on the right-hand sidebar to see the payback for each option.
Step 5: Generate proposal
In the customer proposal, the Payment Options pages that detail finance options generated through FinMatch will include a “Learn More” link. When clicked, this link will direct the customer to a finance details page on your website. This link can be accessed from an e-signing link or from a saved PDF.
Understanding the financial projection
The financial projection is determined by the system cost, system output and your financial settings. Correctly configuring these settings is crucial to getting an accurate financial projection.
Where do I find the financial projection?
The financial projection is found in the financial task. Navigate between the quotation and the projection page on the left. Select between payment options to see the impact on the financial projection.

Income and savings
This section shows the income and savings across the projection period. Income is made up of export payments and savings are made up of electricity savings and any additional savings configured.
Electricity savings
This is how much we project the customer will be able to save now they will not be spending this on their electricity bill and will instead be using energy from the panels or battery. This is calculated using the annual generation and import tariff (using the customers old tariff if they are switching tariffs).
Determined by: import tariff, battery management, degradation rate, inflation rate
Note that if you have forced battery charging and discharging configured, you may find the electricity savings are negative. Provided the total income and savings is still greater than how much they were previously spending on electricity, this is not a problem. If your electricity savings are negative, we will just show the total benefit in this section.
Export benefits
This is how much we project that the customer will be able to earn from exporting electricity to the grid.
Determined by: export tariff, battery management, degradation rate, inflation rate
Additional savings
This models any additional savings that aren't factored into the MCS or Easy PV model.
Determined by: additional savings in financial task, inflation rate
Loan and running costs
The loan and running cost graphs will show any costs that they will incur in the first year and beyond. These will be factored into the total cost of the system across the period and used in the payback calculation.
If you have set up a finance option, you can select this from the right side bar to see the impact this has on the projection.
Bottom line
This section gives an overall indication of the benefits of the system and whether it is a worthwhile investment for the customer. Below are some key definitions.
Discount rate
Set the discount rate to zero if you would not like it used in the proposal.
A discount rate is a means of determining the current value of something (like income or savings from a PV system) that you'll receive in the future. This is set in your project financial settings.
How is this discount rate used?
Discount rate is used to reflect that money earned in the future is less valuable than money earned now. In Easy PV, we use the discount rate to calculate discounted benefits by scaling each year’s benefits down by half the discount rate to reflect the average rate across the year.
Net Present Value
Set the discount rate to zero if you would not like it used in the proposal.
This is the difference between cumulative benefits and the cumulative costs of the system across the projection period, both factoring in discount rate. When this is positive, it indicates the expected benefits (discounted to present value) exceed the expected costs (also discounted to present value).
Internal Rate of Return
This is the discount rate that, when used to calculate NPV, makes NPV 0.
How do we calculate the IRR and NPV?
The IRR is calculated for the final year of the projection period. However, this cannot be calculated exactly. For year 1, rates between 0% and 40% are tested and the value that gets the NPV closest to 0 is chosen. This year 1 value is then used to calculate the IRR of the next year until we reach the final year of the projection period.
Then to calculate the NPV we do the following:
Present year's NPV = previous year's NPV + (benefits - costs) * IRR factor
where present year refers to the current year being calculated and
IRR factor = 1/((1+IRR)^years)
To calculate the final IRR, we use the NPV calculated for the final year of the projection period, again finding the IRR that makes the NPV closest to 0.
Payback
This is how long it takes for the benefits of the system (savings on bills, earnings from exports) to outweigh the costs (initial cost, loan payments, maintenance costs). In each case, these are discounted to today's value and factor in the inflation rate and degradation rate.
The graph shows the year by year costs (red) and benefits (green) of the system, including any income, savings, running costs and finance payments. When plotted against each other, the point where cumulative benefits equal cumulative costs gives the payback period.
Payback period coming out longer than you'd expect? Read here for things you can do to help with that.
If you have any additional questions about the financial task, take a look at our guide on using the financial task and our financial FAQs or reach out at help@easy-pv.co.uk or help@easy-pv.ie.
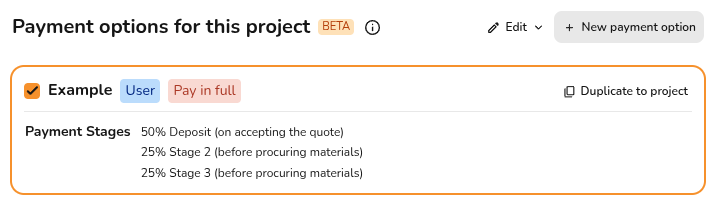
Payment options
A payment option is a method by which the customer can pay for a project. Payment options can be created, viewed and edited in the the financial task. You can also set up payments in your account financial settings. If you are a member of a Pro team, this will be set by your team admin in the Pro account financial settings.
Creating a new payment option
New payment options can be created within projects through the financial task on the Payment tab or by navigating to your financial settings. Just click + New payment option and follow the steps outlined below.
1. Overview
Name: Input the name you'd like to appear on the proposal for this payment option. 
Scope: The option will only appear if you're creating a payment option from within a project. Select whether you'd like this option to appear for just this project or to be available on future projects. If you are in a pro team, you will also see the option to make it available for you team. 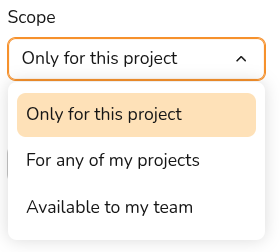
Payment type: Select between 'Pay in full' or 'Finance' depending on what payment option you need. For both options you can set up multiple payment stages and for finance options you can model paying off some or all of the cost of the system with a loan. This can be changed at any point. 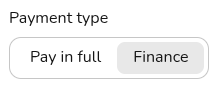
Default checkbox: This option will only appear if your scope is set to User or Team. If you check this box, this payment option will be selected on all future projects. 
2. Payment
In this section you can configure the payment stages for the quote. This is optional if you selected Finance as the payment type.
Payment format: set whether you'd like payments to be defined as percentages or as constant values. 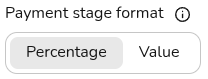
Payment stages: add rows to define additional payment stages, set the name of the stage to appear on the quote, the amount (% or £) and when the stage will be payable. If Finance was selected, the final (or only) stage will be from 'Finance Payments'. 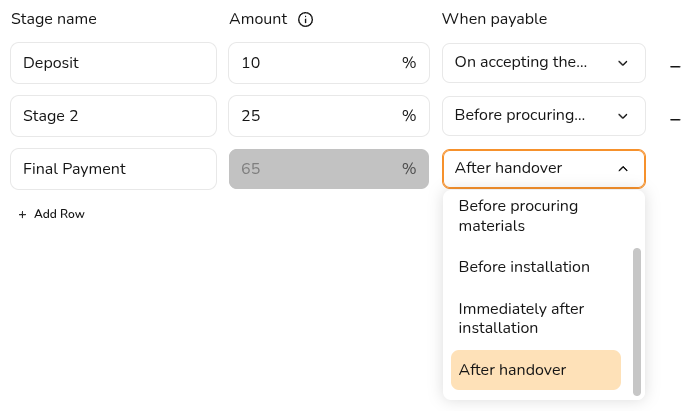
3. Finance
Here you can configure the details of the finance payments. This section will not appear if you've selected 'Pay in full'.
Finance provider: This is the organisation or lender that provides finance or a lease for a project. Select from the drop down menu from your preset finance providers or select + New provider.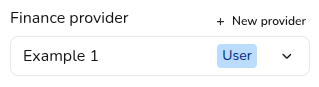
When creating a new provider you will need to input the name of the provider, the scope (if you're creating within a project) and an optional description.
Repayment: set the repayment term, the repayment frequency and the repayment type. For most domestic installations, the repayment type will be fixed. 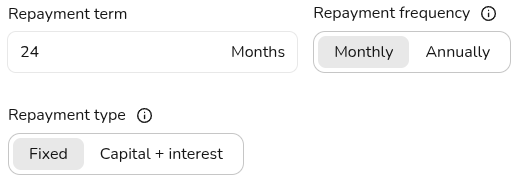
Interest: set the loan interest rate and whether you want the interest to compound monthly or annually. 
4. Disclaimer
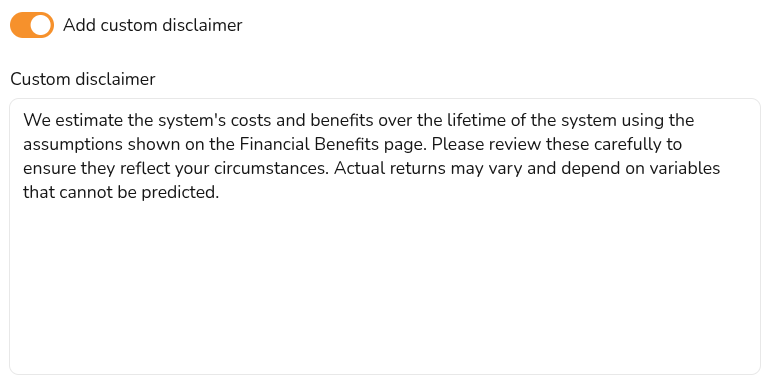
Set whether you'd like to include a custom disclaimer - this will appear next to the financial calculations for this payment option.
Editing existing payment options
If you would like to edit existing payment options, this can be done within a project or in your financial settings. All details listed above can be edited on your payment options except the scope. To change the scope of a payment option, duplicate the option within a project and set the new scope from the overview tab.
Financial settings
Payment options and providers: Here you can see all your payment options and providers and create new ones. Click the pencil to edit existing options. The three dots menu will allow you to duplicate, delete, or hide any payment options or providers.
|
|
Duplicate Copy and edit an existing payment option or provider if you need to make small changes to an existing option. |
|
|
Delete This will delete the payment option or provider and cannot be undone. Previous projects using these options will be unchanged. |
|
|
Hide This will no longer show as a payment option or provider but will still show in this menu. It can be unhidden at anytime from your financial settings. |


Within a project
In a project you can select the payment methods you'd like to make available to the customer. You can create a new payment method for your current project (or any future project by setting the scope to User or Team) using the + New Payment Option. You can update your existing methods in your settings with the Edit option at the top.
Note that project level payment options can be edited, deleted and duplicated but user and team level options cannot be edited or deleted from within a project. Navigate to your financial settings to edit user or team level payment options or duplicate to make a project level copy.
If you have any additional questions about setting up payment options, please reach out at help@easy-pv.co.uk.