Videos and guides
Explore videos and guides for the Easy PV tasks. If a specific guide you are looking for is missing please let us know on help@easy-pv.co.uk or help@easy-pv.ie.
- Setting up your account
- Connecting to Midsummer
- Setting financial defaults
- Setting up your Automatic Pricing Calculator
- Performance task preferences
- Create and manage your own components
- Buildings and roof task
- Choosing a design mode
- Quick Roof
- Irregular Building Tool in 3D design mode
- Selecting a roof in 3D design mode
- Performance and self-consumption
- Financial Task
Setting up your account
Connecting to Midsummer
This guide applies to the easy-pv.co.uk and easy-pv.ie versions of Easy PV. The information provided here may not be accurate for easy-pv.com.
Connecting your Easy PV account to your Midsummer account will allow Easy PV to set its prices to match your wholesale prices. This means you do not have to make changes to your goods prices in the financial tab except for custom components and you can be confident your jobs are being priced correctly.
To connect your Midsummer account
For Easy PV Pro teams, each member will need to connect their wholesale account for discounts to apply.
Setting financial defaults
This guide applies to the easy-pv.co.uk and easy-pv.ie versions of Easy PV. The information provided here may not be accurate for easy-pv.com.
Financial defaults set here will be automatically applied to your projects so you do not have to input them each time. These defaults can be overridden on a per-project basis.
For standard Easy PV users, you can set up financial defaults in My Account > Preferences > Financial. For Pro teams wishing to set team defaults, these can be found in Pro account settings > Financial. If you are a member of a Pro team, you may not be able to set these defaults as they will be configured by your team owner or admins.
Main settings
-
Projection term: The number of years you wish to make financial projections. This should be approximately the expected lifespan of the equipment.
-
Inflation rate: this is the inflation rate for your financial projection.
-
Panel degradation rate: panels gradually reduce in output as they degrade over time. Set the rate at which the output of the panels decreases each year.
-
Discount rate: a discount rate is a means of determining the current value of something (like income or savings from a PV system) that you'll receive in the future.
Here you can also select the default value of self-consumption. Self-consumption is the proportion of electricity generated from a solar array that is used in a property can significantly affect financial returns. Easy PV has several different methods you can use:
- (For UK) MCS: this can only be used with flat tariffs and properties with annual consumption between 1500 - 6000 kWh, battery storage below 15.1 kWh and generation below 6000kWh.
- Easy PV: this can be used for a project of any size and can be used with variable tariffs. Information on setting up variable tariffs can be found in the consumption task guide.
- Custom percentage: this contains significantly less information than the above methods. When using a custom percentage the 'Battery Storage' section in the Customer Proposal will not generate. If you would like this to generate, select the MCS or Easy PV self-consumption.
Tariffs
Here you can set default tariffs for the Easy PV and (for UK) MCS consumption calculations. They can be indexed to inflation, above inflation, fixed or none.
For more detail on how to create and edit these tariffs, have a look at our tariffs guide.
Pricing calculation
Here you can select whether you want to use the automatic pricing calculation or, alternatively, what default pricing mark up you want to use.
Automatic pricing calculator
This is where you can tailor the financial settings so you do not have to make significant adjustments on each project. You can set up rules based on look-up tables or a set markup and then set costs for the delivery and installation and optionally scaffolding, roofing, electrical, travel costs and any additional services you provide.
A full guide on how to set this up can be found here in the automatic pricing guide.
Manual pricing markup
If you are not using the pricing calculator, you can set a default markup which is applied to the cost of goods.
Tax settings
Here you can set defaults for the tax rate for material and services and select whether the customer will be able to reclaim the tax. Business customers can usually reclaim tax paid on an installation, but domestic customers typically can't reclaim tax. Tax rates may be different for domestic and business customers.
Running cost rules
Add lines for costs you expect to be incurred in the future. You can choose whether costs are applied on an annual basis (for example a maintenance contract) or as one-off costs (for example an inverter replacement).
Saving rules
Create savings rules which can be used in the financial task. You can set them to appear on every project or only be applied if a given accessory is present and can add savings based on a percentage of bills, percentage of annual generation, fixed monetary amount or a saving in kWh each year.
If you have any additional questions about setting up your financial defaults, please reach out at help@easy-pv.co.uk or help@easy-pv.ie.
Setting up your Automatic Pricing Calculator
This guide applies to the easy-pv.co.uk and easy-pv.ie versions of Easy PV. The information provided here may not be accurate for easy-pv.com.
With Easy PV you can configure pricing rules to automatically calculate project prices. Rather than having to amend and change your service costs on each project, you can spend time setting up your pricing rules so the automatic pricing calculator will do it for you.
Pricing settings can be accessed via Account settings > Financial > Change pricing settings or if you are part of a Pro team, the owner/admin can do this via Pro Account settings > Financial > Change pricing settings.
To turn off automatic pricing click on the use pricing calculator toggle. You can also switch between automatic pricing and manual pricing on a per-project basis via the financial task.
Configuring for your project
You can set material pricing based on the cost of materials plus a markup (best for complex pricing depending on the number of panels, roof dimensions, travel distance, etc.) or based on custom lookup tables (ideal for simpler pricing using only a few panels/inverters combinations).
On top of the cost of materials, you can set up additional charges for the delivery and installation. The installation cost can be further specified with costs for scaffolding, electrical, roof type, and travel to the site.
-
Choose if you use a markup or lookup table for calculating the cost of materials.
-
Tick the box for each additional cost you want to include in your pricing (information on configuring each of these is below).
-
Choose the format in which you want to display the price of goods in the quote.
Lookup tables or markup
Option 1: Lookup tables
When you have chosen lookup tables on the first price settings page, before clicking next you can also choose to use a markup-based pricing for any designs that don’t match one of the lookup tables you have entered.
When you click Next, you can then create your lookup tables for different combinations of solar panels, inverters and batteries. Different costs can be specified within each combination for different numbers of panels.

Lookup tables are most useful if you install just a few different system combinations (i.e always use Trina with Growatt). If you need more than a few lookup tables, it’s probably more efficient to use the ‘markup’ method.
Option 2: Cost of materials plus a markup
When Markup has been chosen on the first pop up screen, clicking Next will bring you through to the following page where you can input levels of markup for different sizes of projects.
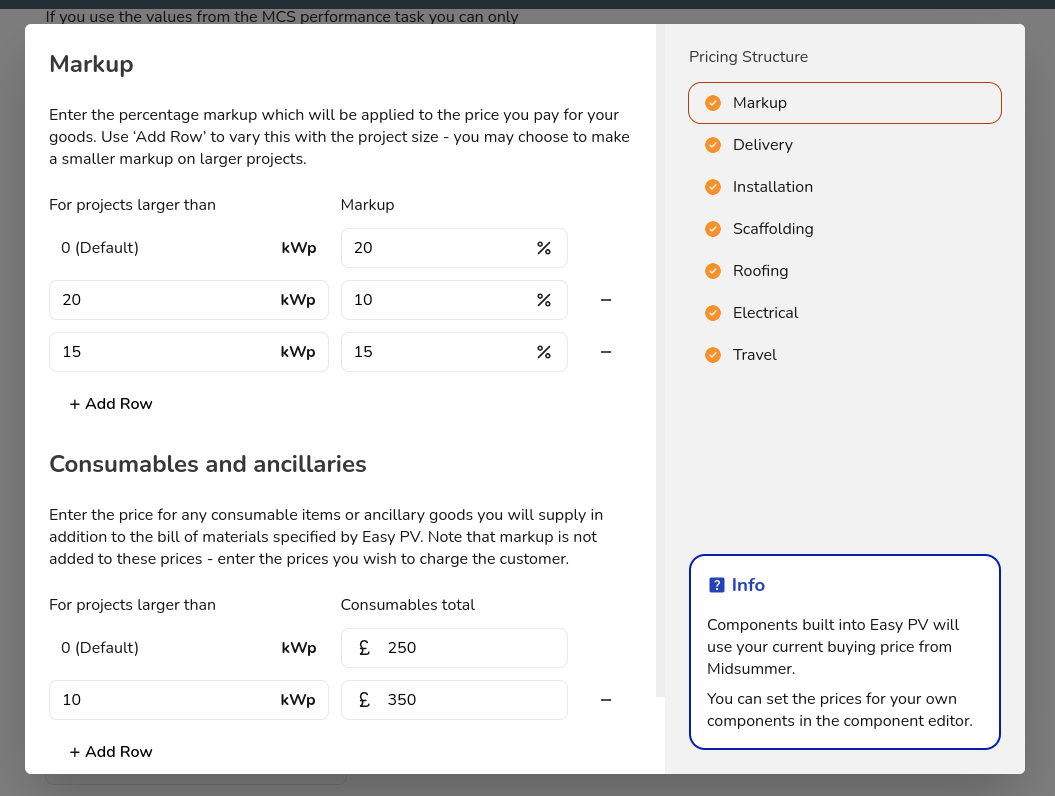
You will also notice a section for Consumables and ancillaries. This includes items not included with the PV kit such as zip ties. Throughout this calculator, you will be able to click +Add Row to create rules and changes to your costs depending on project size or travel distance.
Configure required costs
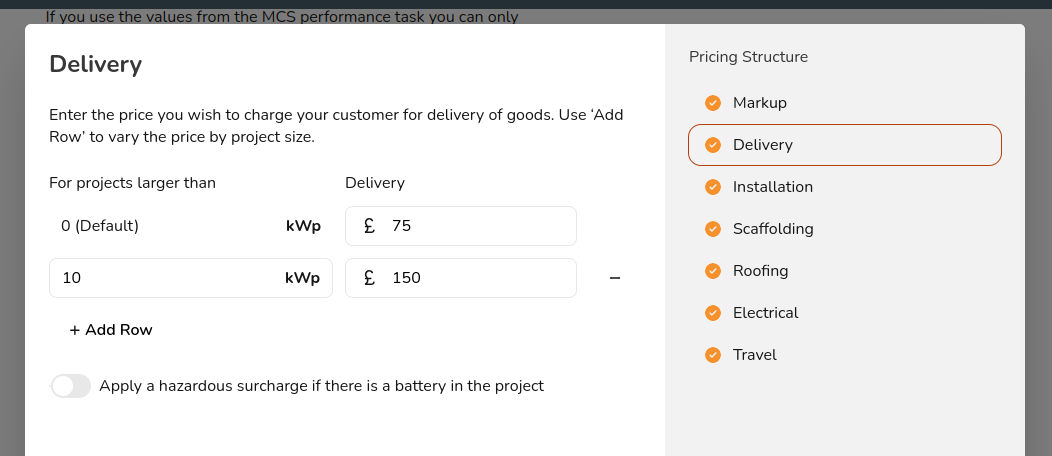
Delivery
You can determine an appropriate default delivery cost and hazardous surcharge fee (when a battery is added to a project) for various project sizes.
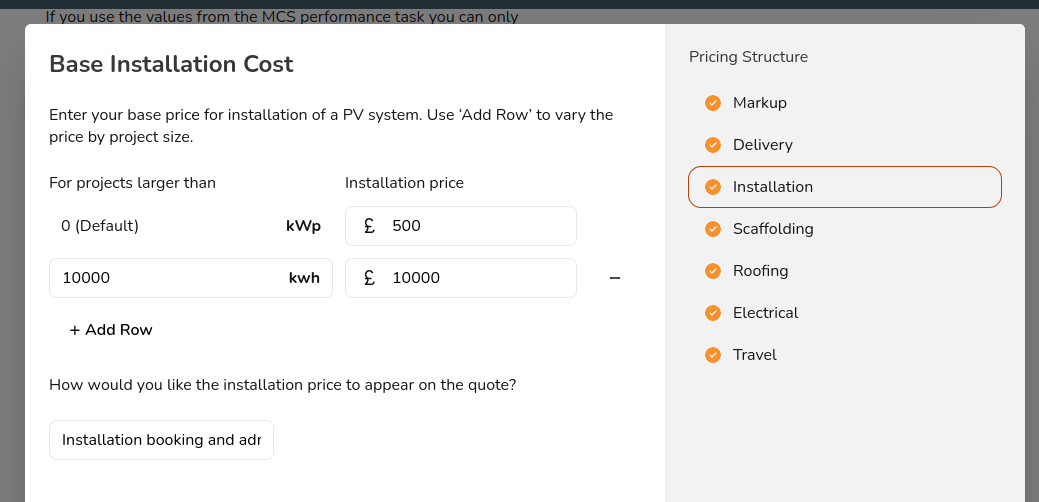
Installation
Here you can add a base installation cost which may cover all of your services (scaffolding, electrical, etc.) or you can set those up separately. You can also choose what text is displayed on the quote for this line item.
Configure optional costs
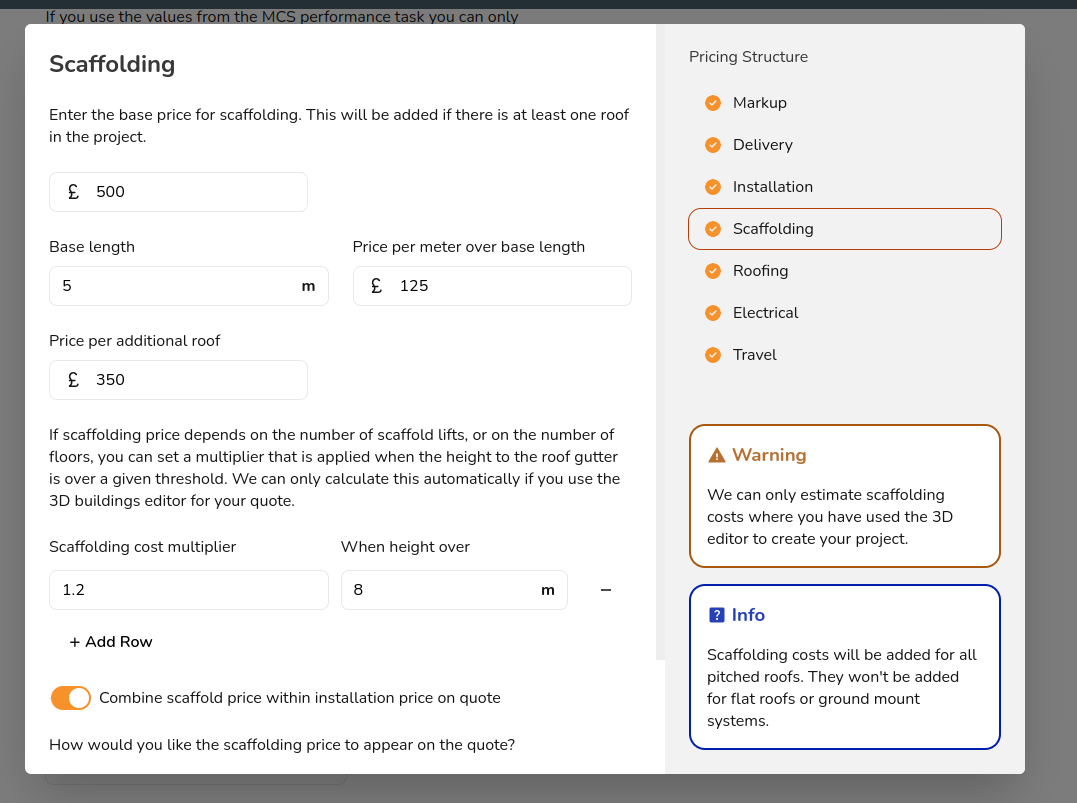
Scaffolding
In this section, you can set a base scaffolding fee and an extra cost for each additional roof. You can also set parameters for max length and height and have an additional charge or multiplier if those parameters are exceeded.
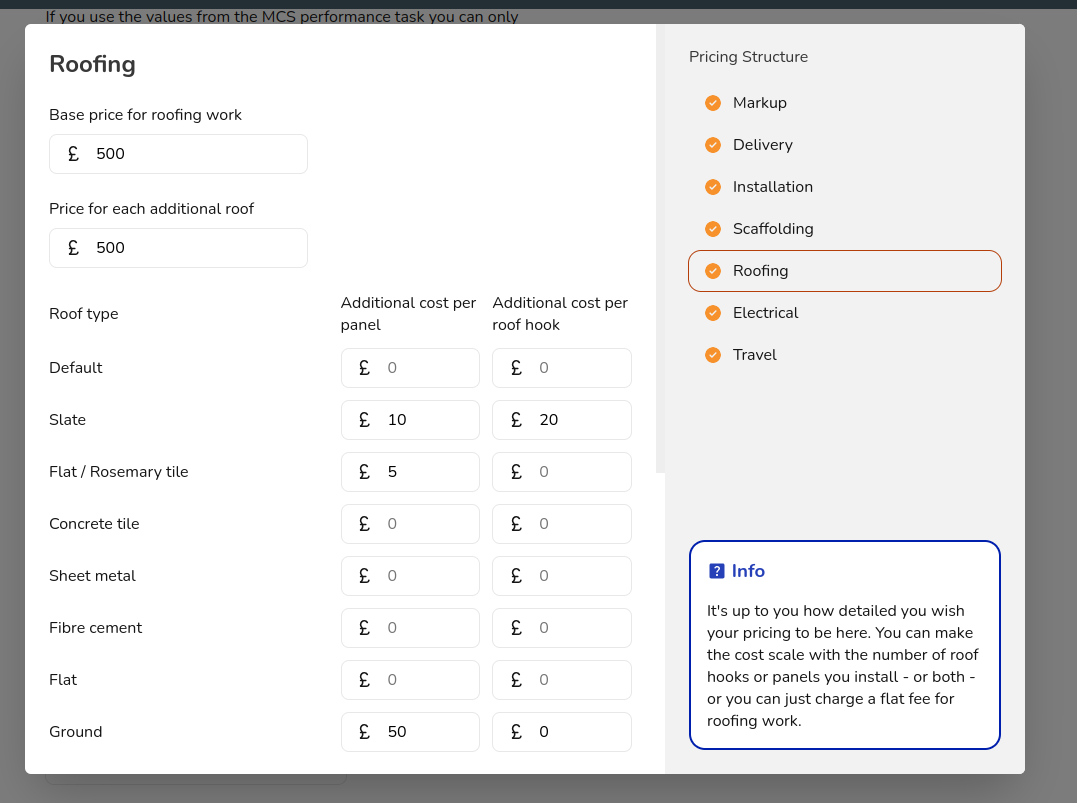
Roofing
For roofing , you can add a base cost and fee for each additional roof. You can set additional charge per solar panel depending on the roof type. Finally, you can add a cost for per each extra such as in-roof panel, optimiser, etc.
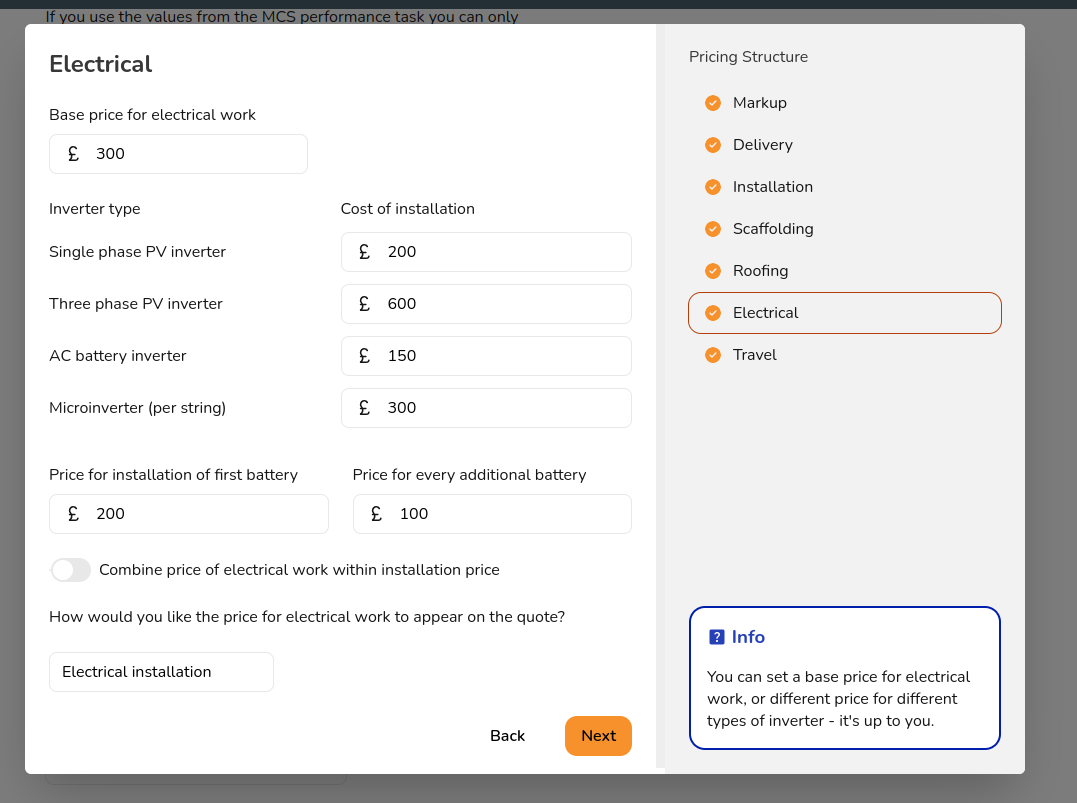
Electrical
Similarly, you can add a base electrical cost, additional fees for the installation of different inverters, and a cost for the installation of a battery.
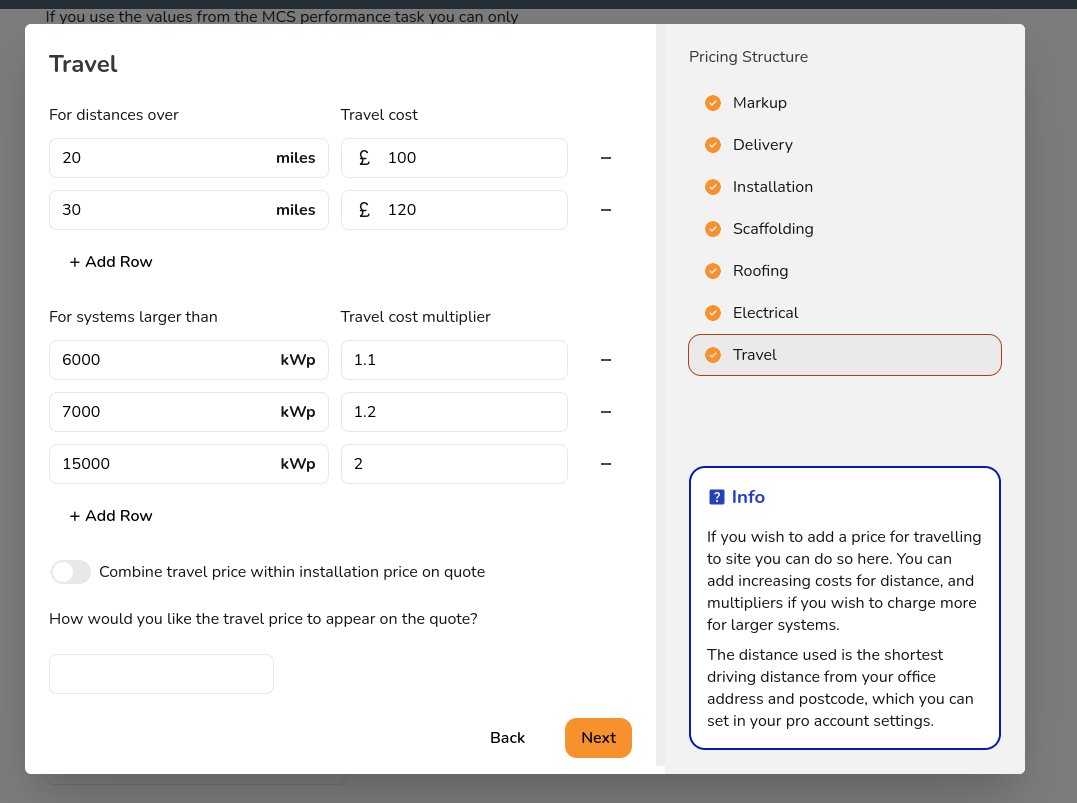
Travel
You can add costs for travel to site based on the distance (which Easy PV automatically calculates if you have input the project location and your company location!). You can also set up a travel cost multiplier for larger systems.
Configure other costs
If there are costs you want to include on every project that you can't factor into any of the above sections then you can do so by adding a new accessory custom component.
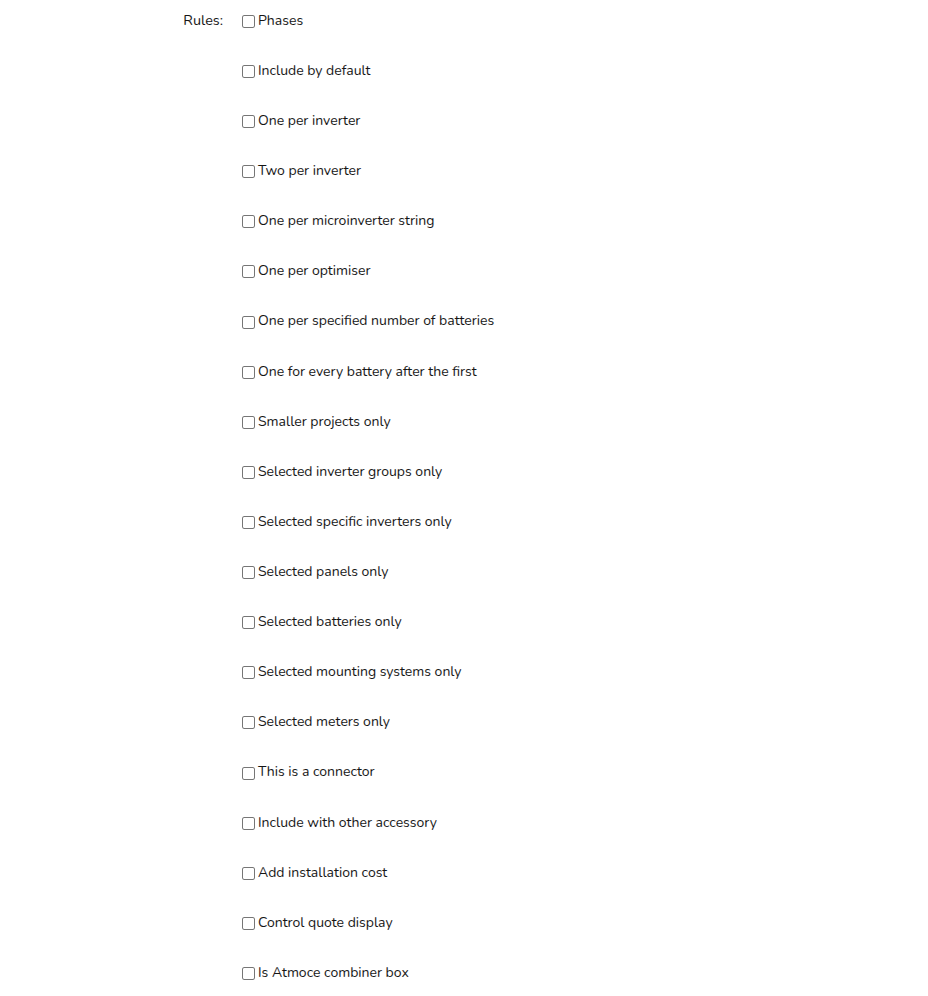
Accessories and extras
Accessories and extras can be added by creating a new component in the Edit Accessories section of Components. When adding an accessory or extra component, you can add an installation charge as well, and configure whether you want the price applied to the extra to be displayed in the quote as a line item, or grouped into the materials costs.
To do this navigate to My components > Accessories and then:
- Create a new accessory, name it with whatever additional service you want to include
- Do not fill in the 'price' box
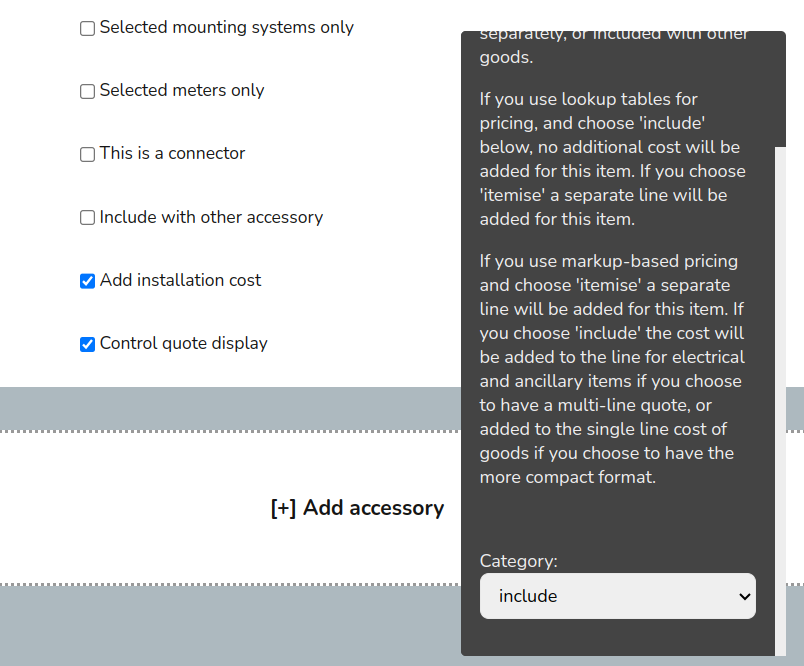
- If you would like the item or service to be included on all projects, then select the second option 'Include by default' in the rules. If you do not want to include by default you will be able to select it on a per-project basis in the electrical task.
- Then scroll to bottom of 'rules' and check the following options:
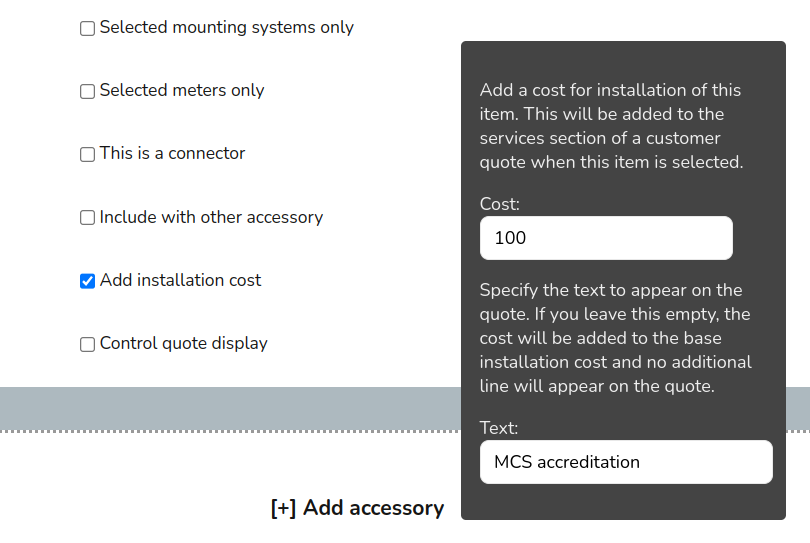
- Add installation cost - this is where you fill in the price and name of the item or service

-
Control quote display - this is where you can decide how it will display on the quote

- Add installation cost - this is where you fill in the price and name of the item or service
- You can also have a look at the other rules available on accessories and decide whether you would like to include or not include the item (for example, only include with specific inverters).
Performance task preferences
This guide applies to the easy-pv.co.uk and easy-pv.ie versions of Easy PV. The information provided here may not be accurate for easy-pv.com.
The Performance task can be streamlined by configuring your settings in My account > Preferences > Performance. Here you have the option to configure whether you want panel allocation and the generation of sunpath diagrams and shading factors to be automated.
Panel allocation
Choose between:
- Automatically allocate panels: use auto-stringing to automatically make a string plan without any input needed from you.
- Suggest allocation: use auto-stringing to make a string plan which it will suggest for you to accept or edit manually.
- Manually allocate panels: manually construct your string plan, with the option to use auto-stringing when you do so.
Sunpaths
With 3D and Magic design mode, by modelling any nearby obstructions, Easy PV can automatically calculate any shading losses. Here you can choose whether you want Easy PV to automatically calculate shading based on the terrain and 3D buildings or whether you want this to be excluded so you can set the shading manually.
Self-consumption and performance
Choose between methods to calculate the total annual generation of the system
Changing the performance mode used with affect all projects. If you would like to just use international calculations for odd jobs, we recommend doing so on a separate account so your MCS jobs are unaffected.
- MCS (UK only): This is based on the method detailed in Appendix B of MIS 3002: The Solar PV Standard (Installation) and will only work for UK postcodes.
- NREL: This method is based on NREL's PVWatts calculator, this is an international method that works for any location.
- PVGIS: This is another international option that is based on PVGIS data so will work for any location.
The following settings are only available on the UK version of Easy PV (easy-pv.co.uk).
If selecting the MCS method, you can also choose whether you want to:
- Set default values for MCS self consumption: this will let you set default values which will be used by default for each of the inputs required for the MCS consumption calculations.
- Manually enter MCS self consumption: if you select this option you will need to set the inputs required for the MCS calculations on every project.
Create and manage your own components
Below, you'll find full instructions on how to add and manage each type of component in Easy PV.
Note that Easy PV does not support adding custom optimisers or mounting systems. To use custom mounting, you will need to select no mounting in the panels task and add the mounting to the financial task, but it will not be included in any calculations or designs Easy PV generates.
Custom solar panels
This guide applies to the easy-pv.co.uk and easy-pv.ie versions of Easy PV. The information provided here may not be accurate for easy-pv.com.
To add a custom panel in Easy PV navigate to My Components > Solar Panels on the left-side menu or Components > Edit Solar Panels from the top drop down menu.
You will need the datasheet from the manufacturer so Easy PV can appropriately perform calculations for inverter sizing and system output. Below you will find guidance on how the information in the datasheet corresponds to the values Easy PV asks for.
Creating manufacturer
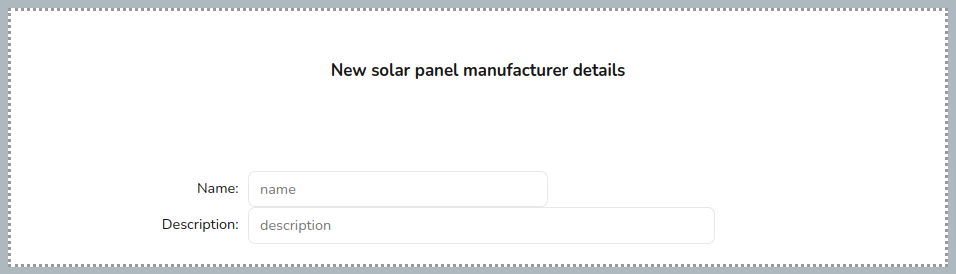
When adding any custom panel in Easy PV you first need to add a custom manufacturer category which allows you to organise your custom components. The components added will be categorised by their manufacturer when it comes to select them in a project.
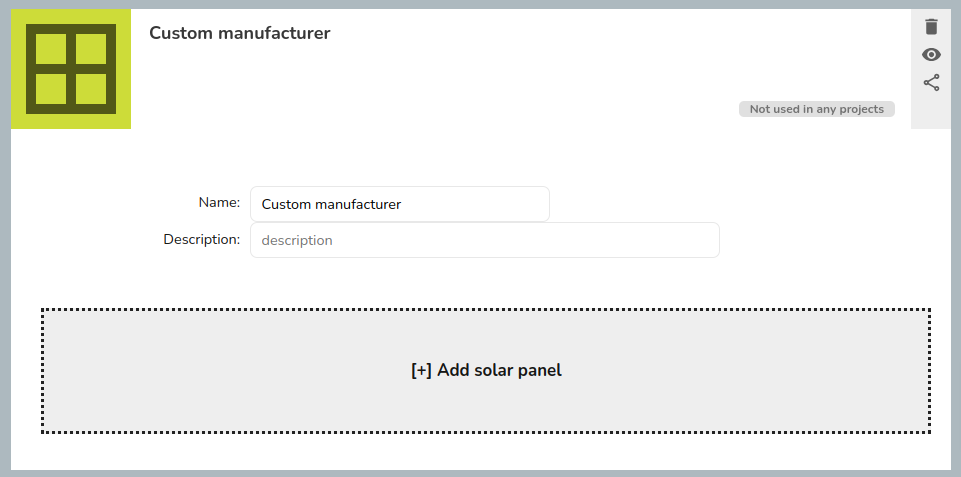
After inputting the name for the manufacturer, re-open your custom manufacturer and you will see the additional option to add a solar panel.
Inputting information from datasheet
You will then need to input the technical information found in the datasheet for the panel. If your data sheet has two sets of data you should use the values for standard test conditions (STC) not the values for Normal Module Operating Temperature (NMOT). This is a list of potential variations for each value required to add a custom panel:
|
Technical info |
Variations |
|
Power: power of the panel at STC in Watts |
|
|
Isc: short circuit current of the panel at STC in A |
|
|
Impp: maximum power point current of the panel at STC in A |
|
|
ΔIsc/°C: the temperature coefficient of the panel short circuit current |
|
|
Voc: open circuit voltage of the panel at STC |
|
|
Vmpp: maximum power point voltage of the panel at STC |
|
|
ΔVoc/°C: temperature coefficient of the open circuit voltage of the panel |
|
The panel will auto-save once all the required fields are completed. Once you have added a panel successfully, you’ll be able to select it in the list of panels when creating a new project in the panels task, listed under your custom manufacturer name.
Additional details and rules
- The photo and description for the panels will show up on your final customer proposal, to edit the image of the custom manufacturer or component, click on the default image and upload from your files.
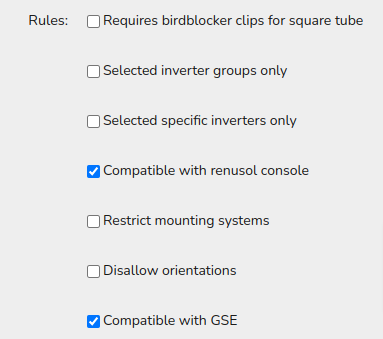
- There is a set of rules which you can select or deselect as you need, these are the default settings for new panels:

Custom inverters
This guide applies to the easy-pv.co.uk and easy-pv.ie versions of Easy PV. The information provided here may not be accurate for easy-pv.com.
To add a custom inverter in Easy PV navigate to My Components > Inverters on the left-side menu or Components > Edit Inverters from the top drop down menu.
You will need the datasheet from the manufacturer so Easy PV can appropriately perform calculations for inverter and battery sizing and system output. Below you will find guidance on how the information in the datasheet corresponds to the values Easy PV asks for.
Manage your own inverters
Step 1: Add an inverter manufacturer group
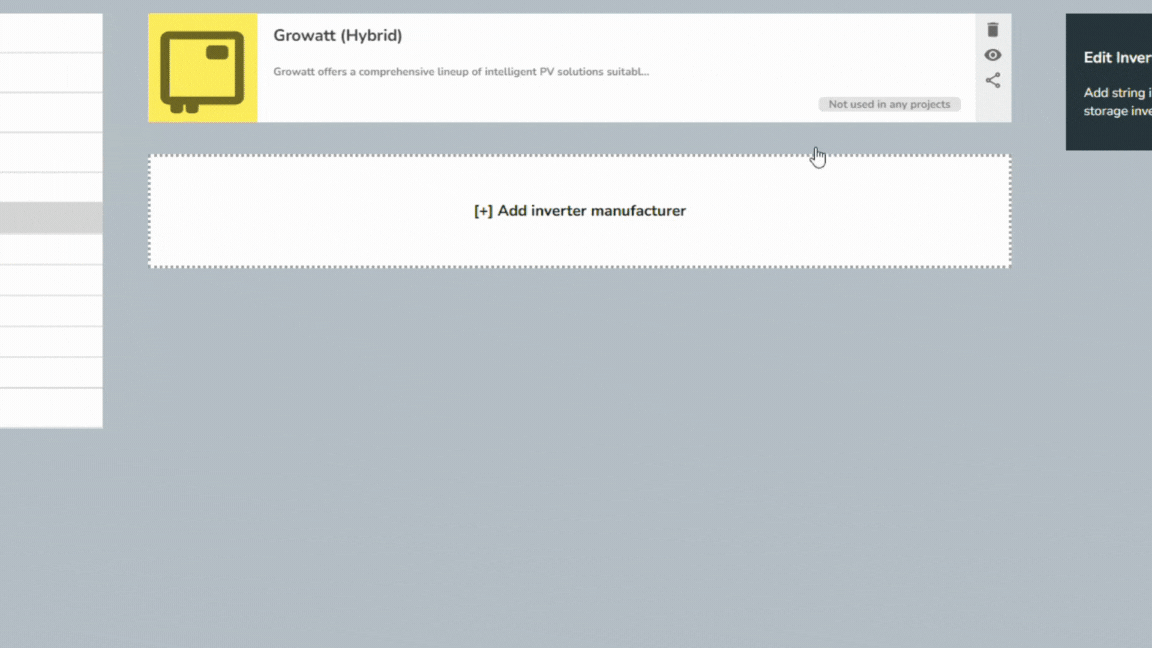
To add an inverter, you first need to ensure you have an appropriate inverter manufacturer group set up. Click on the Add inverter manufacture option and input a name for the inverter manufacturer group and then press enter on your keyboard or click out of the name field. Once you've done this the page will update to show the new manufacturer group that you've added.
Next re-open your custom manufacturer group and add a description and select the type of inverter you will add to this inverter group. You can set the type as PV inverters, hybrid inverters or AC-coupled inverters. You can only add one type of inverter to each inverter manufacturer group, so if you want to add specific PV inverters (also known as a string inverter) and hybrid inverters you will need a separate group for each.
Step 2: Add a specific inverter model
To add a specific inverter model, first navigate to the inverter manufacturer group you want to add it to. Click on the Add inverter button and add the name, description and model number. These details are displayed in the customer proposal, so add information that is useful and compelling for your customer.
You can also add the following details at this stage:
- ENA system reference - this is used for DNO applications and can be found on the ENA Connect Direct portal.
- Price - this is the price that will be used in the financial task for any projects that include this component
Step 3: Add technical information from the product's datasheet
Finally, add all the technical details for the product. These are needed in order for Easy PV to correctly use the inverter in your projects. You can normally find the data needed on the manufacturers data sheet. If data is missing please contact the manufacturer directly.
Below is a list of definitions and the potential variations for each value on different manufacturer datasheets for each section for PV, hybrid and AC-coupled inverters.
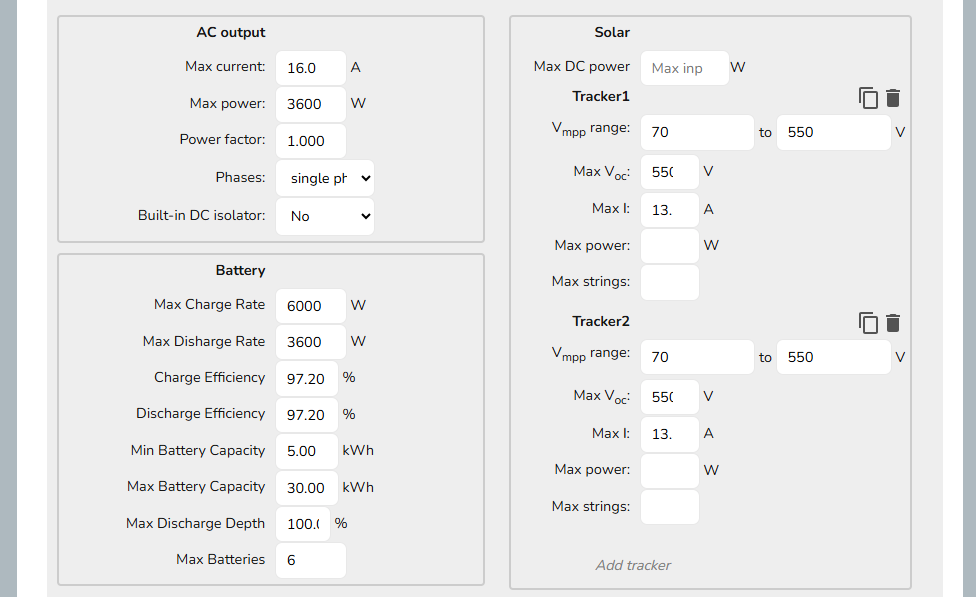
AC output
As well as whether it is a single phase or three phase inverter, other than max power for AC inverters, all inverter types you will need to input the following information:
|
Technical info |
Variations |
|---|---|
|
Max current: maximum AC current in Amps that the inverter can output |
|
|
Max power: maximum AC power output in Watts of the inverter |
|
|
Power factor |
|
Solar
For PV and Hybrid inverters you will also need to input information for the solar input:
After inputting the name, max current and max power the inverter will save and close, remember to re-open it and click Add tracker (under Solar on the right) for each MPPT input the inverter has. If the trackers are the same then you can simply click the copy icon next to the bin icon.
|
Technical info |
Variations |
|---|---|
|
Tracker, Vmpp range: the range of Vmpp values (maximum power point voltage of the panels at standard test conditions (STC)) compatible with this inverter |
|
|
Tracker, Max Voc: maximum open circuit voltage |
|
|
Max I: maximum current |
|
|
Max power: The maximum input power in W. This field is optional as not all datasheets provide this information. |
|
|
Max strings: how many strings can be connected to each MPPT. |
|
Battery
For hybrid and AC-coupled inverters you will also need to input battery compatibility information:
|
Technical info |
Variations |
|---|---|
|
Max Charge Rate: the maximum power at which the inverter can charge a battery |
|
|
Max Discharge Rate: the maximum power that the inverter can draw from a battery |
|
|
Charge Efficiency: the efficiency of the charge process |
|
|
Discharge Efficiency: the efficiency of the discharge process. |
|
|
Min Battery Capacity |
|
|
Max Battery Capacity |
|
|
Max Discharge Depth: the maximum depth to which the inverter will discharge an attached battery |
|
|
Max Batteries: maximum number of batteries that can be connected |
|
Custom battery
This guide applies to the easy-pv.co.uk and easy-pv.ie versions of Easy PV. The information provided here may not be accurate for easy-pv.com.
To add a custom battery in Easy PV navigate to My Components > Batteries on the left-side menu or Components > Edit Batteries from the top drop down menu.
You will need the datasheet from the manufacturer, below you will find guidance on how the information in the datasheet corresponds to the values Easy PV asks for.
If your custom battery is not showing up in the inverter task, see the 'Rules' section and check the compatibility is correct.
Inputting information from datasheet
Below is a list of definitions and potential variations for each value on different manufacturer data sheets:
|
Technical info |
Variations |
|---|---|
|
Battery Capacity: total battery capacity. Usable capacity may be less if there is a max permitted discharge depth. |
|
|
Max Discharge: maximum depth to which the manufacturer recommends that this battery is discharged. Typically 80 or 90%. |
|
|
Round Trip Efficiency: percentage of electricity recovered from the battery in a charge-discharge cycle. Around 95% is typical for lithium ion batteries. |
|
The battery will auto-save once all the required fields are completed.
Rules
Notice you can select a variety of rules for the battery. Some key points:
- It is important you select which inverter groups or which specific inverters the battery is compatible with - either by checking 'Selected inverter groups only' or 'Selected specific inverts only' and selecting from the menu which inverters it is compatible with.
- If your hybrid inverter is an all-in-one system and you would like it to appear in one line in the quote then make sure to input the price in the inverter and then select 'exclude from shopping cart' in the battery rules - this means it will only include and list the cost of the inverter and not the batteries. Note that this will mean additional batteries will not be priced if more than one battery can be included.
Custom accessories and other components
This guide applies to the easy-pv.co.uk and easy-pv.ie versions of Easy PV. The information provided here may not be accurate for easy-pv.com.
To add a custom accessory in Easy PV navigate to My Components > Accessories on the left-side menu or Components > Edit Accessories from the top drop down menu.
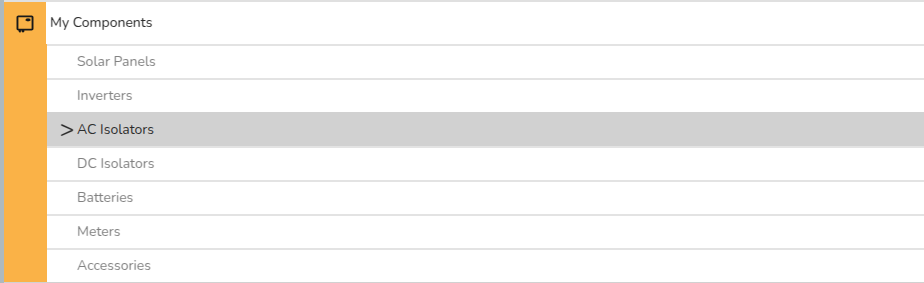
In Easy PV you can also add custom AC isolators, DC isolators and meters. Each of these will be available to select in the electrical task, with accessories in the Extras section of the electrical task.
These are largely more straight forward than other components in Easy PV. However, when adding a custom accessory, there are many different rules you can select. To determine what each rule changes, select the rule and a window will appear which details what the rule will change about how the component can be used
.
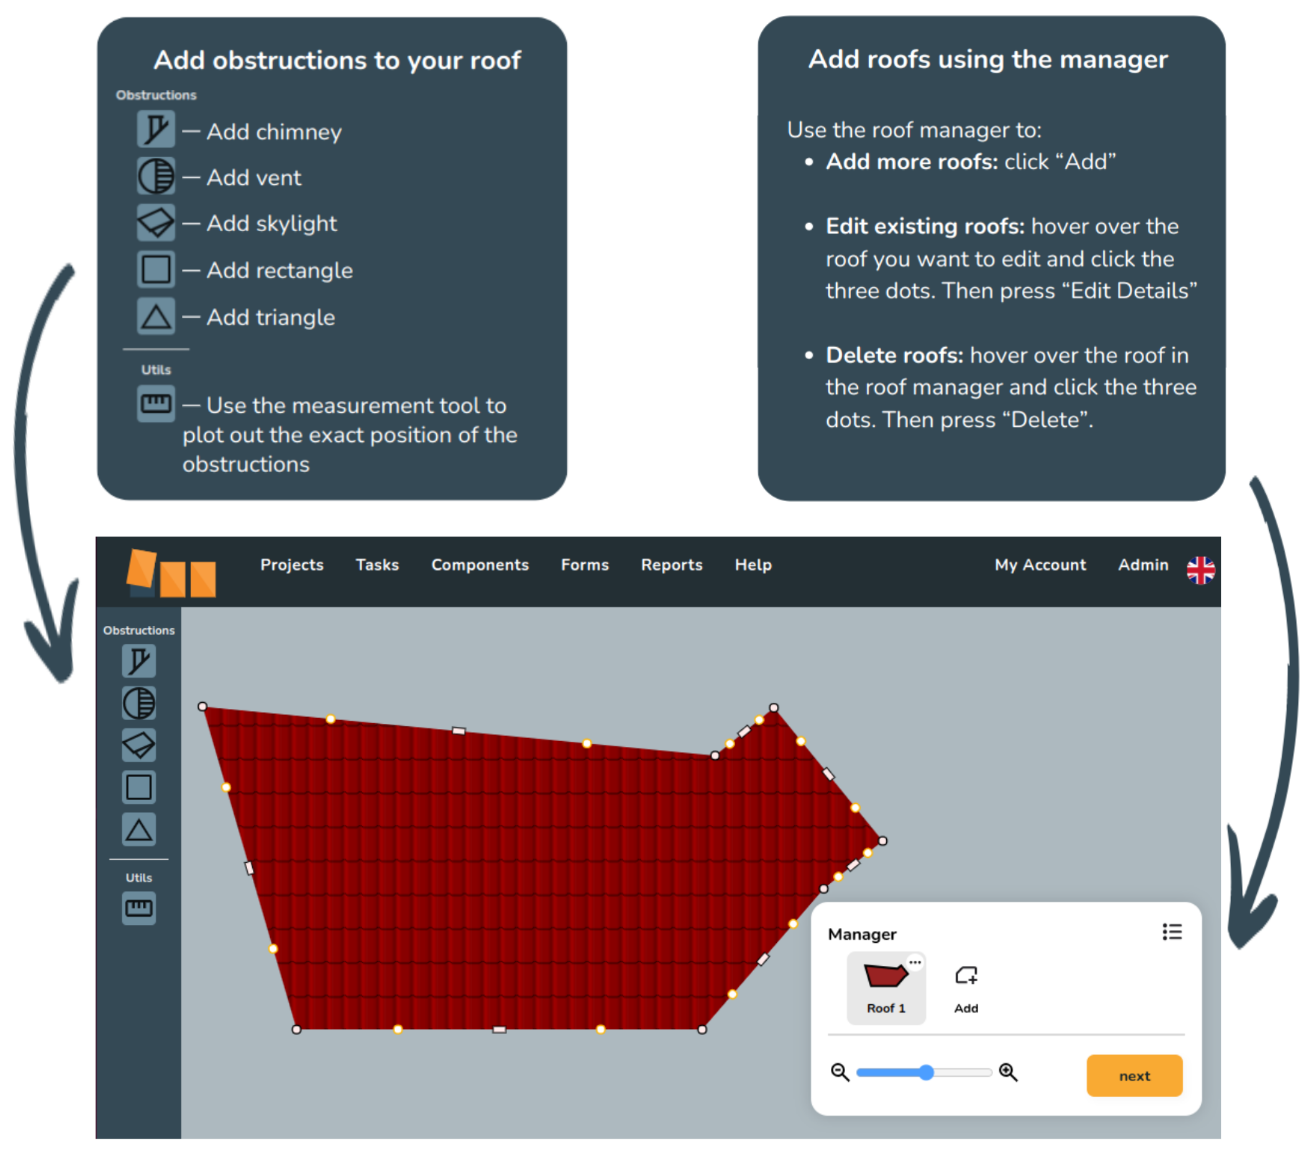
Buildings and roof task
Choosing a design mode
This guide applies to the easy-pv.co.uk and easy-pv.ie versions of Easy PV. The information provided here may not be accurate for easy-pv.com.
When you first create a project you will get the choice of the which design mode you would like to use. In Easy PV there are four options, each with particular applications.
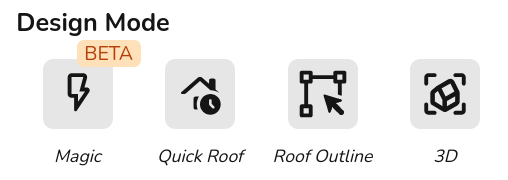
3D
- Create 3D property model by designing the roof from a satellite image (so you will need to zoom into the map or fill in the address before selecting).
- Model nearby buildings or trees that may cast shade on the roofs you're working on to get accurate shade analysis and improve the accuracy of the performance calculations.
Magic BETA
- Create an automatic 3D design, it works out the height and pitch of buildings and identifies any obstructions.
- Three free magic designs per day for standard users and unlimited for Pro.
Quick Roof
- Create 2D roof using dimensions, pitch, orientation and tile type, can also spec ground mount systems.
- Does not use satellite imagery so a good option if satellite map it out of date, you're working on a new build property or if the satellite image is too blurry.
Roof outline
- Create 2D roof model by outlining the roof from a satellite image.
- Uses satellite map imagery (so you will need to zoom into the map or fill in the address before selecting) so you can accurately model the roof based on the actual size of the property.
Quick Roof
This guide applies to the easy-pv.co.uk and easy-pv.ie versions of Easy PV. The information provided here may not be accurate for easy-pv.com.
This guide explores Easy PV’s design mode “Quick Roof”, and the various tools at your disposal to create precise and complex roof designs.
Edit via the corner points
Click anywhere on the roof to get the editing points to show. Clicking and dragging the white corner points allows you to resize your roof.
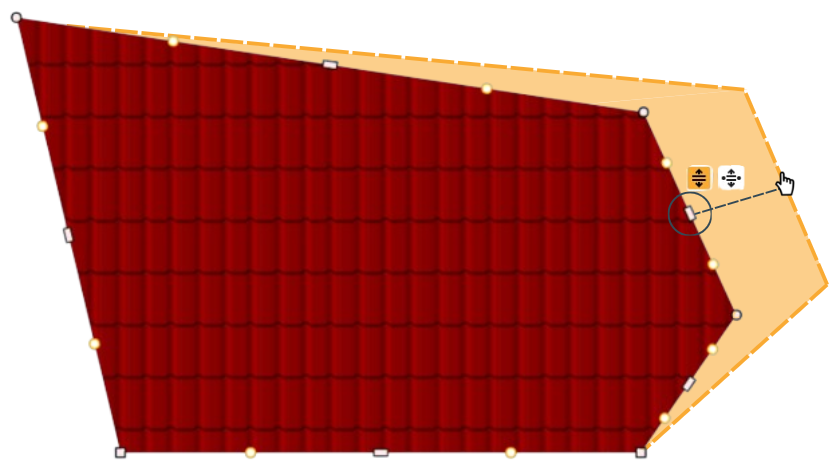
Selecting one of the corner points will bring up three options:
![]() Fixed corner angle: the angle of the corner will stay fixed when you drag it (see below, left).
Fixed corner angle: the angle of the corner will stay fixed when you drag it (see below, left).
![]() Free corner angle (default): corners move freely when dragged (see below, right).
Free corner angle (default): corners move freely when dragged (see below, right).
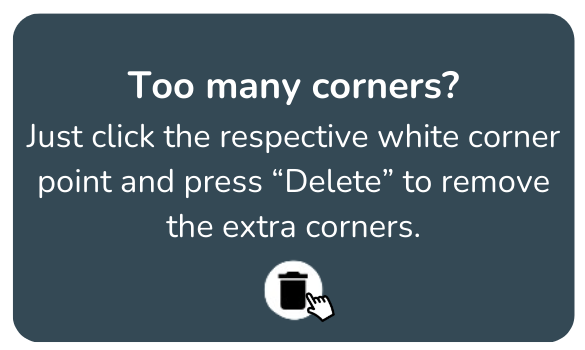
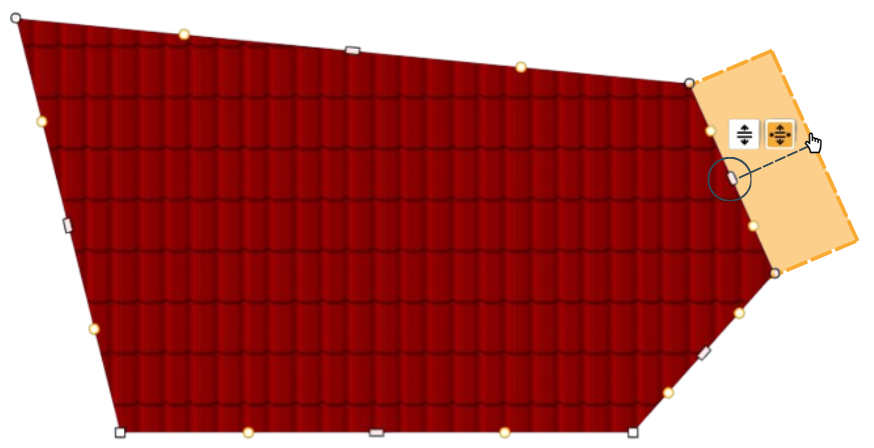
![]() Delete corner: this removes the corner, e.g. it would turn a rectangular roof into a triangle.
Delete corner: this removes the corner, e.g. it would turn a rectangular roof into a triangle.
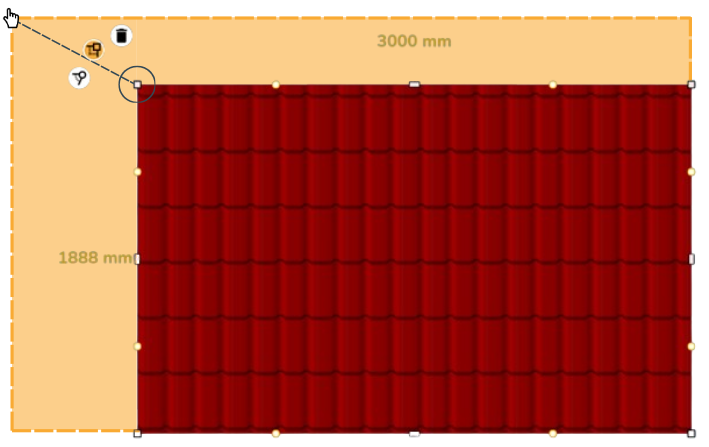
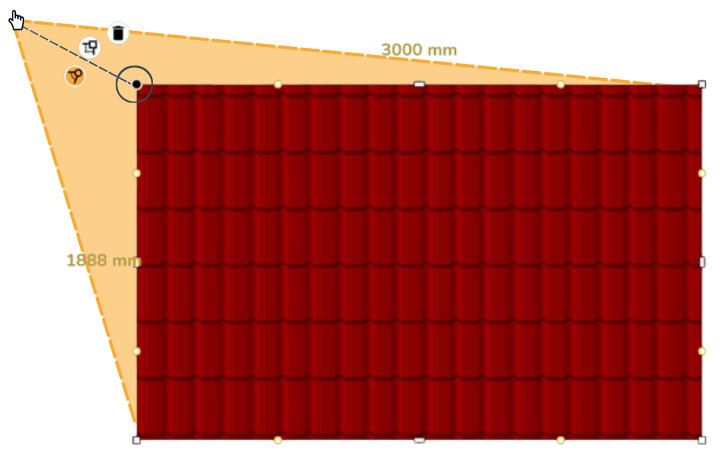
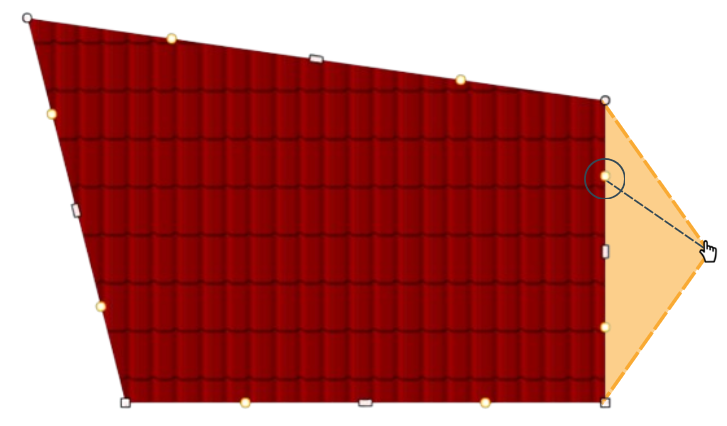
Edit roof dimensions: clicking on the white corners brings up the dimensions for the adjacent sides. If you click on this value, you will be able to input the precise dimensions for that side.

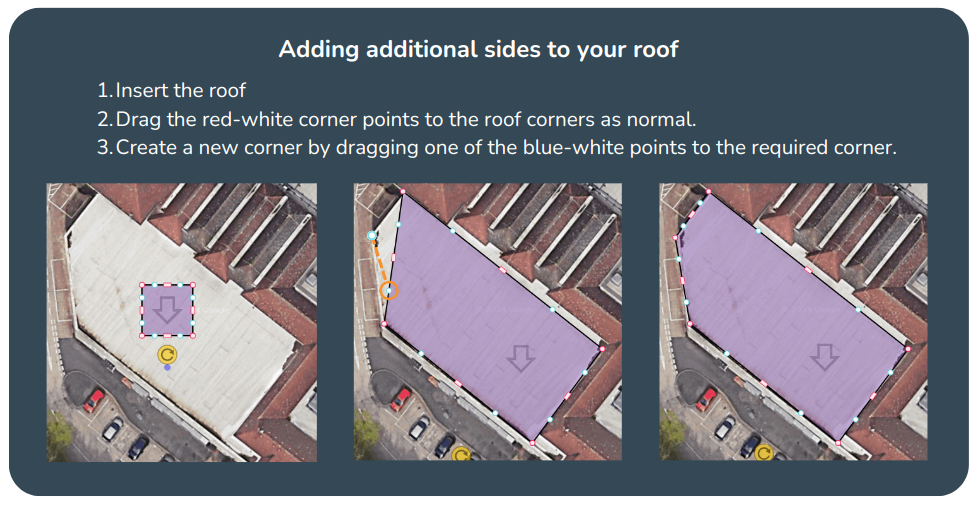
Add corners by dragging the orange points
Clicking and dragging the orange points allows you to add extra roof edges to the roof. This is great for creating unusually shaped roofs.
Edit via the white rectangles
The white rectangle icons on each side allow you to amend the width/height of the roof.
If you click on the white rectangle, it gives you two options:
 Elongates the whole roof (see below, left)
 Creates a new set of corners: drags the selected roof edge out, staying parallel to the adjacent white points (see below, right)
Some final tips for the finished roof
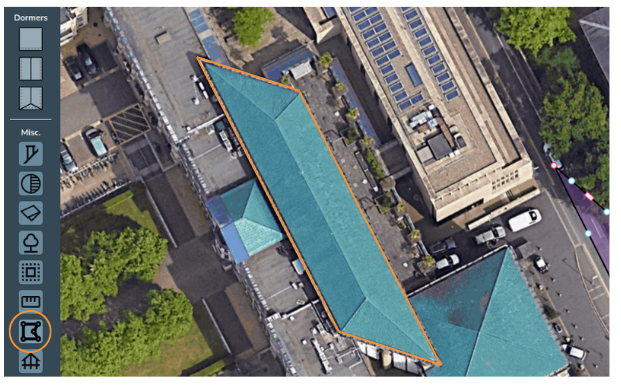
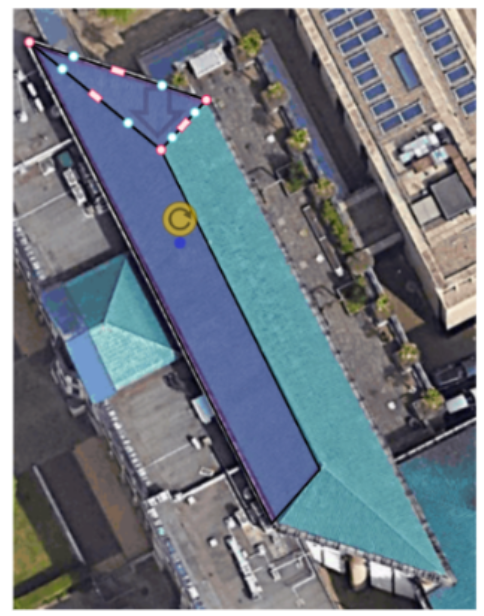
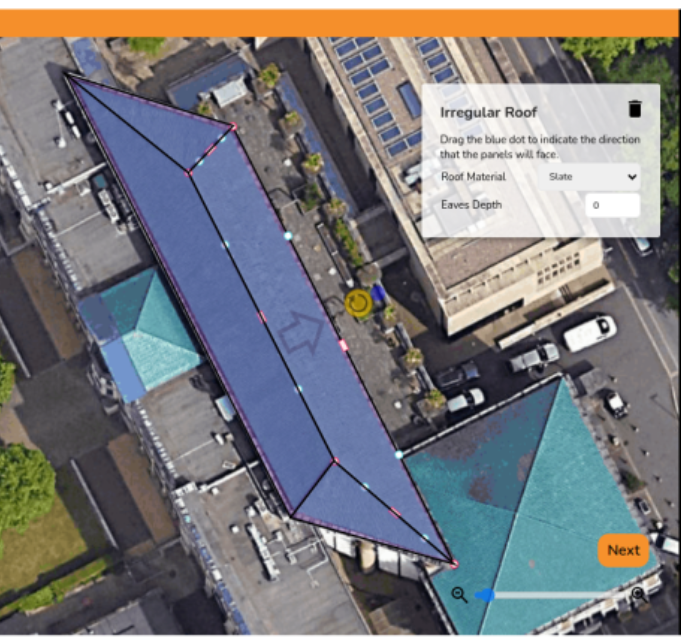
Irregular Building Tool in 3D design mode
This guide applies to the easy-pv.co.uk and easy-pv.ie versions of Easy PV. The information provided here may not be accurate for easy-pv.com.
The irregular building tool allows you to create unusual roof shapes in the 3D design mode. It’s perfect for complex buildings and large commercial projects.
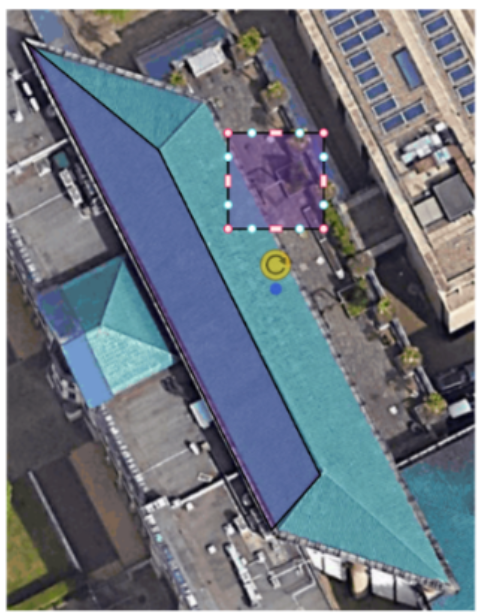
Step 1: Inserting the roof
Scroll down in the left-hand toolbar and select the irregular building tool in the miscellaneous section. In this example, we will plot the highlighted roof below. We will do so by plotting out each roof face one at a time.

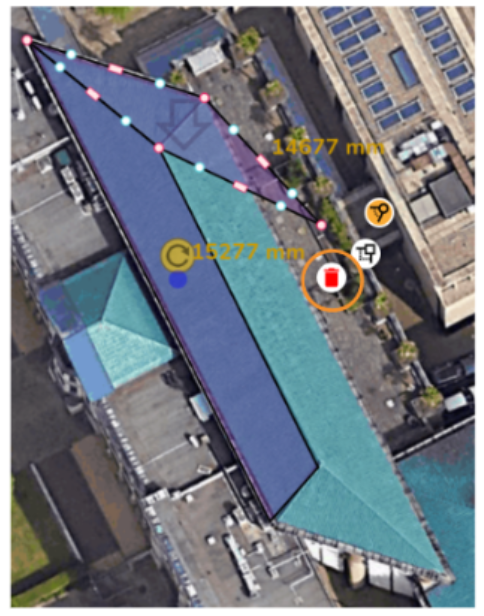
Step 2: Resizing the roof
First, we will create the west-facing roof. Start by adding a new irregular roof and then drag each of the pink corner controls to the four corners of the roof face. If you accidentally create too many corners, click on the respective pink corner control and press the bin icon to delete them.
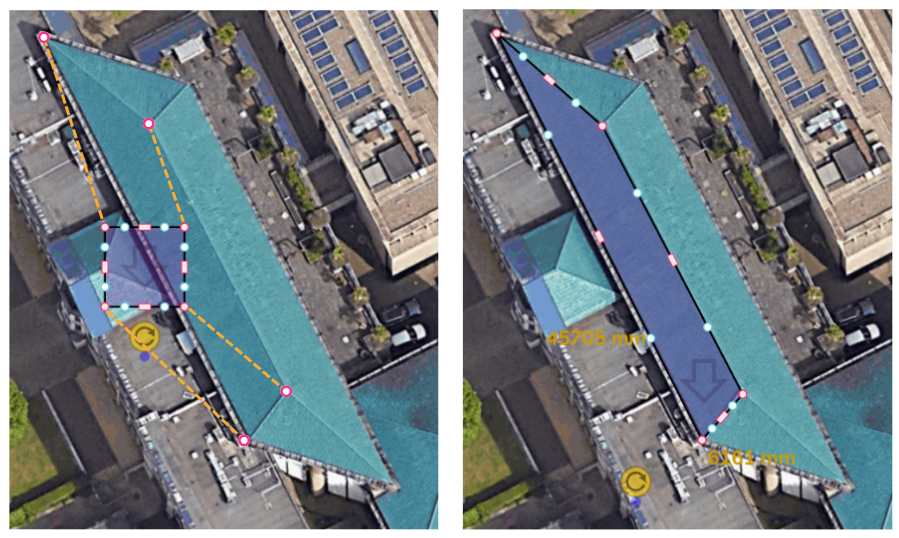
Resizing options if you click on one of the pink corner controls, it will bring up three options:
- Free corner angle (default): corners move freely when dragged, e.g. Step 2.
- Fixed corner angle: the angle of the corner will stay fixed when you drag it (see our Quick Roof guide for more info).
- Delete corner: this removes the corner, e.g. it would turn a rectangular roof into a triangle
|
Input precise roof dimensions Clicking on the white corners also brings up the dimensions for the adjacent sides. If you click on this value, you can input the precise dimensions for that side. |
Step 3: Editing the slope direction
The direction that the roof slopes is indicated by the arrow on the roof.
To edit the slope direction, drag the blue dot (it can be a little hard to spot at first!). You will see that this
moves the arrow.
It is useful to watch how the slope changes in the Elevations box. It’s likely you’ll want the gutter line to be completely horizontal. When it becomes horizontal, it will snap into place in the Elevations box.
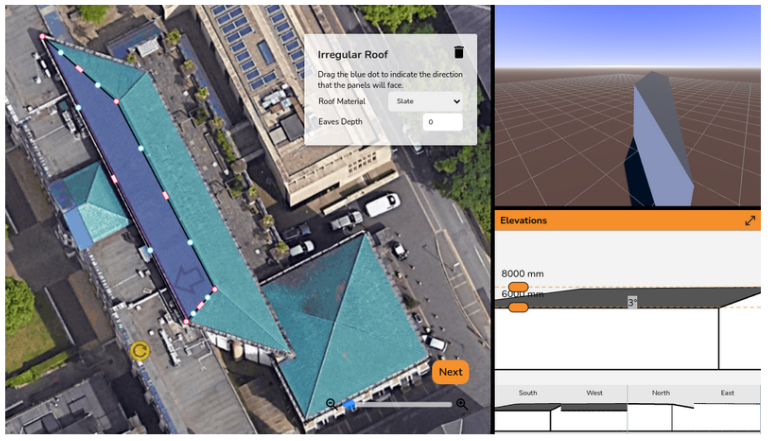
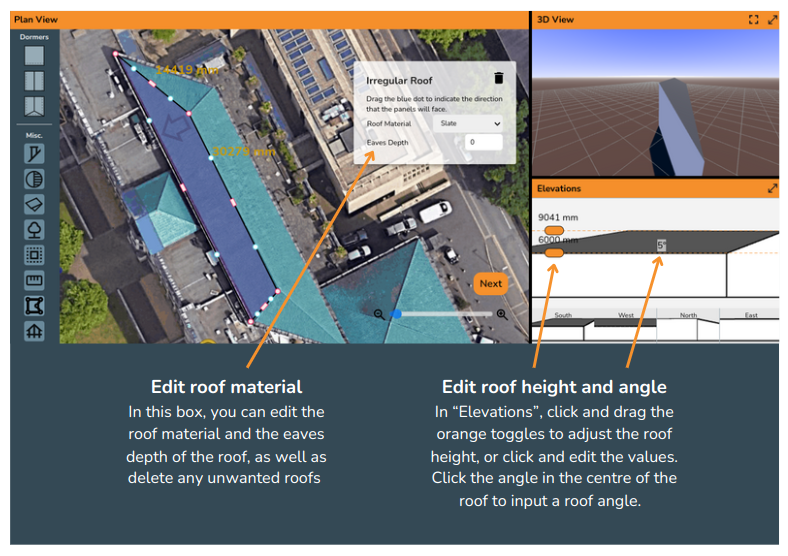
Step 4: Edit roof details
In the same way as the normal 3D design mode, edit the roof height, pitch, material, and eaves depth using the boxes shown below.
Step 5: Creating a triangular roof
You now need to create the other three roofs. To create the triangular roofs, insert a new irregular roof and drag the x3 pink-white points to their respective corners. Then simply delete the remaining corner to turn it into a triangle.
The finished result!
After inserting all four roofs and amending the various roof slopes and heights, we have designed a complete irregular building.
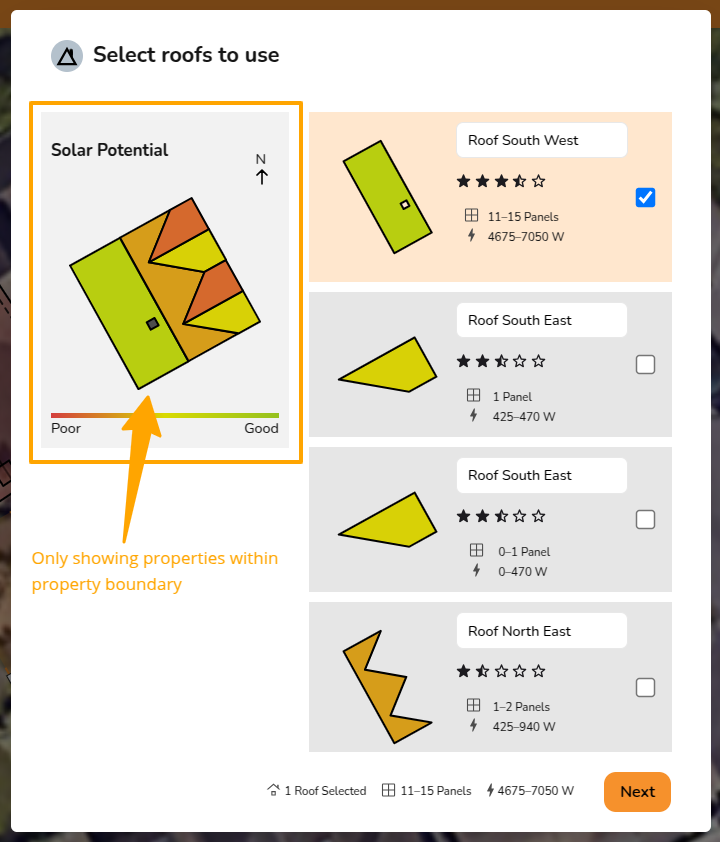
Selecting a roof in 3D design mode
This guide applies to the easy-pv.co.uk and easy-pv.ie versions of Easy PV. The information provided here may not be accurate for easy-pv.com.
When you finish designing your property in the buildings task, click next and this menu will appear.
Here you will see each roof rated on a scale of poor to good based on our how suitable Easy PV thinks the roof will be for solar. This is based on the size of the roof as well and how much shade will be on the roof based on its pitch and orientation.
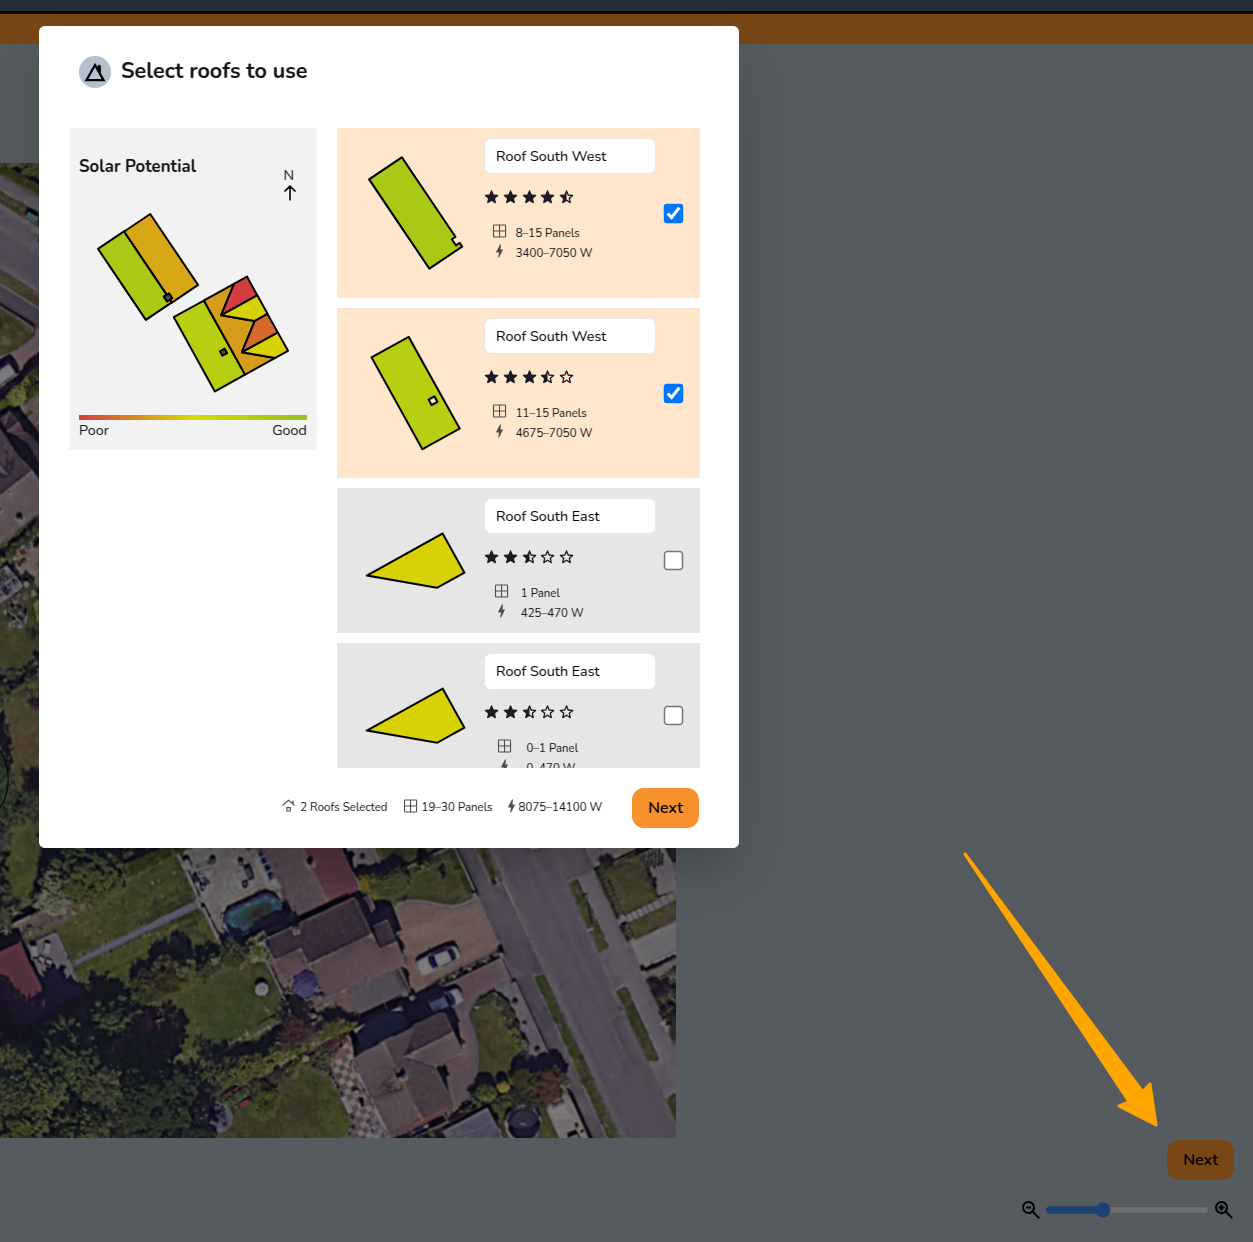
Selecting your roof
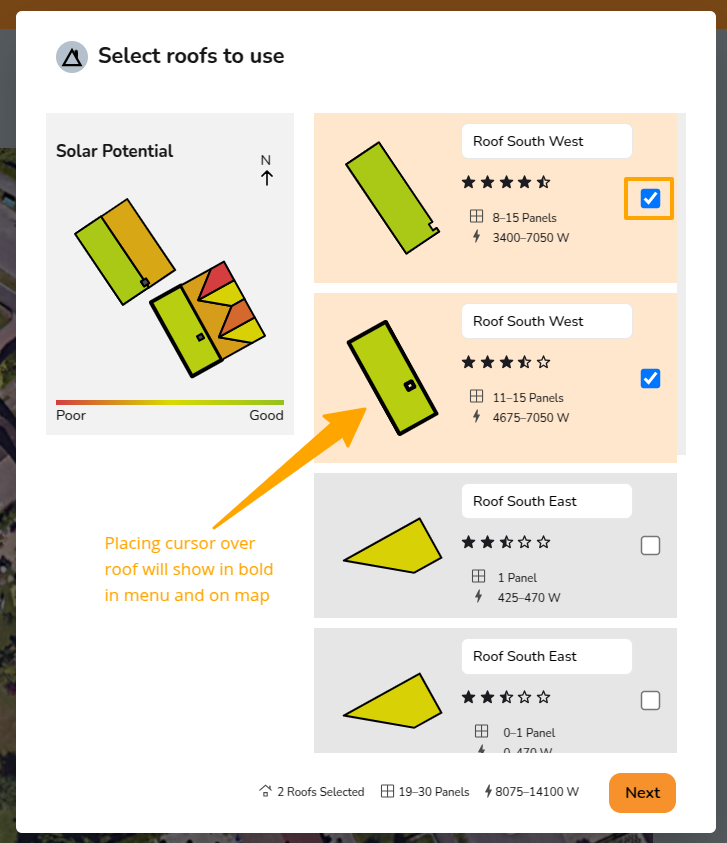
When there is a property boundary, only the roofs within that boundary will show in this menu for maximum ease of selection!
Performance and self-consumption
Performance task
This guide applies to easy-pv.ie and easy-pv.co.uk versions of Easy PV. The information provided here may not be accurate for easy-pv.com.
The performance task uses the system data, location and shading information to estimate the annual output of the system. This is then used in self-consumption calculations to estimate how much of what is generated will be used directly, used to charge a battery or exported to the grid, which is needed to estimate the financial benefits of the system.
Getting started with the Performance task
You can access the Performance task via the 'Tasks' drop-down menu or from the task list to the left on the project overview page.
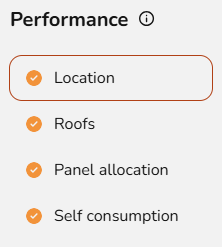
When the Performance task first opens, you'll be shown a popup that lets you configure the settings you want to use. You can use the left hand navigation to choose the settings you want to edit. More information on each of the settings is available below.
When you have finished configuring these inputs, click Done.
Navigating the performance task
The right hand sidebar contains options to switch between the Sunpaths and the Performance results:

As well as the following:
|
|
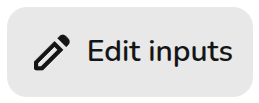
Edit inputs Click to update the location, pitch and orientation of the roofs and panel allocation |
 |
Open help page Go directly to this help page if you're ever having trouble. |
|
|
Go to user preferences Adjust which performance dataset is used, sunpath and panel allocation automation, and MCS self-consumption defaults. |
|
|
Open performance report See MCS performance table with sections A, B, C and D (if MCS self consumption completed and selected in financial task). |


View and edit Sunpaths
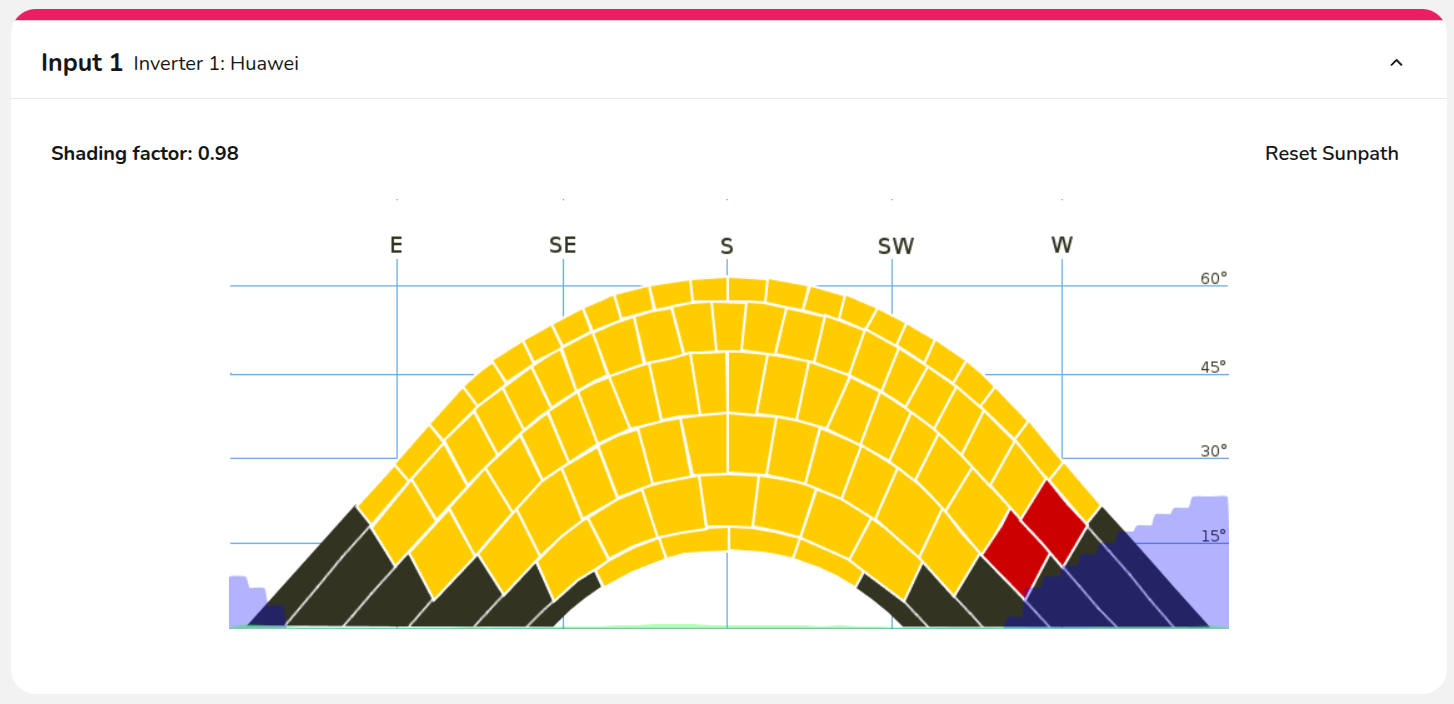
The sunpath diagrams maps the path of the sun across the sky at different hours in the day for different months of the year. For each point on the sunpath diagram, Easy PV calculates the amount of solar radiation reaching the panels from direct and diffuse radiation. For shaded regions, where direct radiation is radiation is fully blocked, the system calculates how much diffuse radiation still reaches the panels. The shading factor is the proportion of solar radiation that reaches the panels after accounting for these shading losses.
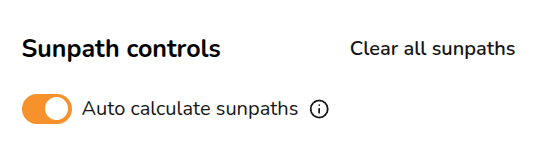
Automating with 3D
If designing in 3D or magic design mode, the shading can be calculated automatically, provided any trees or obstructions have been modelled. If you would like to manually edit the sunpaths then toggle off 'Auto calculate sunpaths'.
If designing in 2D, you will need to manually draw on the sunpath diagram what shade is on the panels at different points in the year. Click between the inputs to expand the sunpath diagrams for each inverter.
Read here about the differences between design modes.
Navigating between inverters and inputs
On the right you will see each of your inverters, when selecting between them you will see each input or shading group for that inverter on the left. Once each sunpath diagram has been calculated, a green tick will show on the inverter.
View the Performance results
These results will depend on which version of Easy PV you are using, below you can expand for information on each version:
MCS performance and self-consumption results
The performance estimate calculated here is based on the method detailed in Appendix B of MIS 3002: The Solar PV Standard (Installation). See the end of this section for more information on the methodology used for the self-consumption calculation.
The MCS performance report can be accessed from the forms (and then reports) drop down menu.
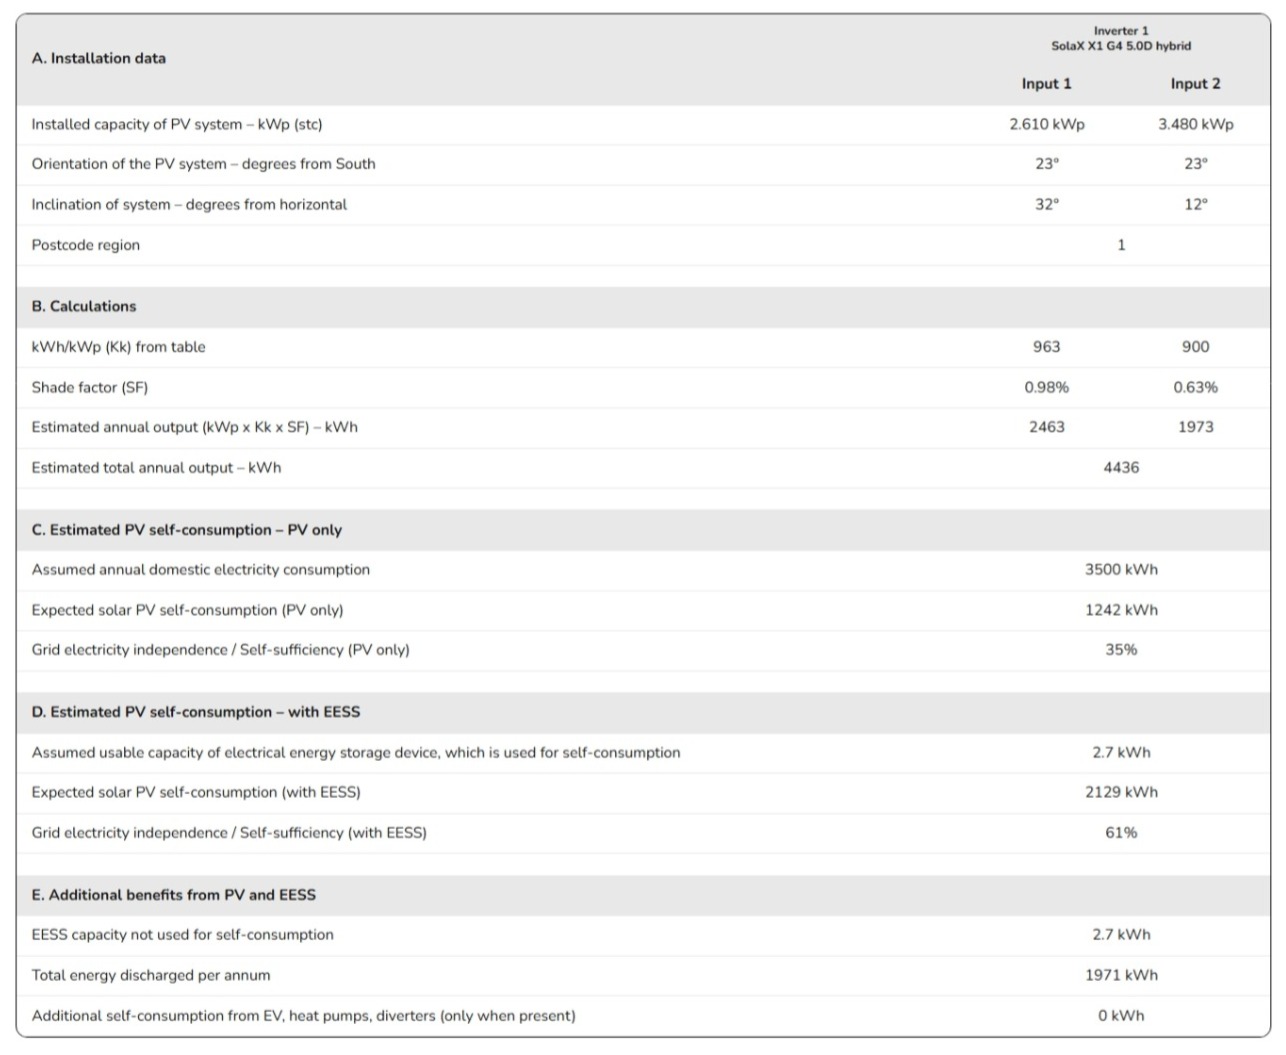
A. Installation data
This section details the installed capacity, orientation of the system, inclination of the system and the location. These inputs can be adjusted by clicking the pen icon in the top right or by adjusting the panels on the system.
B. Calculations
Using the installation data and the shading factor, an estimated annual output is calculated. To adjust the shading factor, navigate to the sunpaths diagrams tab.
C. Estimated PV self-consumption – PV only
The estimated self-consumption for the system with PV only is taken from the MCS lookup tables, depending on the values above and those input in the task. Click the pen icon to adjust these inputs.
D. Estimated PV self-consumption – with EESS
The estimated self-consumption for the system with PV and battery storage is taken from the MCS lookup tables. This section will not show if there is no battery storage, navigate to the inverter task to include battery storage.
E. Additional benefits from PV and EESS
If additional consumption is anticipated or some of the battery capacity is reserved for ancillary services, that will be detailed here. This section will not show if that is not the case, to edit those inputs click the pen icon in the top right and navigate to the self-consumption tab.
NREL performance results
Section A details the installed capacity, orientation of the system, inclination of the system and the location. These inputs can be adjusted by clicking the pen icon in the top right.
In section B, the data in section A is used to estimate the output per kWp for the unshaded array using the NREL's PVWatts calculator. The percentage of output lost from shade is then subtracted from this value. This is then multiplied by the kWp of the input to calculate the estimated generation per input. To adjust the percentage lost, navigate to the sunpaths tab.
Edit the Performance task inputs
Certain inputs are required for the performance estimate to be calculated. Designing in 3D and configuring your settings to automate panel allocation and sunpath diagram calculations will streamline much of this task.
Location
If not already input when creating the project, you will need to set the location. This is necessary for performance calculations since where in the world the system is located determines how much sunlight it will get. If there is no postcode for the location of your system, choose the most local one you can find.
This section may show as ticked and completed already if this information can be pulled from the start of the project.
Roofs
If you are creating a flat roof system or using quick roof mode, you will also need to input pitch and orientation. Both this and the location data are used to determine the output of the system.
This section may show as ticked and completed already if the pitch and orientation can be populated from earlier in the project.
Panel allocation
This section will depend on how you have configured your settings.
- If you have selected for your panels to be automatically allocated, then panel allocation will show as completed
- If you have selected suggest allocation then here you can choose to edit the allocation or select Done to accept the allocation and close the window.
- If you have manual allocation selected then you will need to allocate the panels here.
There are some cases where auto-stringing will not work and manual allocation will be required. Further information about manual panel allocation can be found here.
Self-consumption calculation
A self-consumption model is available through the Consumption Task. For UK users, this can be provided to customers in addition to the MCS calculation, which is completed here in the performance task.
MCS self-consumption calculation
This process follows MCS guidelines defined in The Battery Standard MIS 3012 ISSUE 0.1 to predict self-consumption of the generated PV electricity. UK companies installing under MCS will need to provide this calculation when it can be used.
Annual electricity consumption of the property
The lookup tables for this calculation only permit values between 1500kWh and 6000kWh. Use the consumption task for more detailed consumption calculations or for values that fall outside this range.
For the most accurate results use a value from past electricity bills. Where possible, consumption data should be taken before the installation of electric heating / hot water or electric vehicle charging.
Occupancy archetype
Properties that are occupied during the day will typically consume more PV-generated electricity directly. Properties that are empty during the day may benefit more from battery storage that can store PV-generated electricity for later use.
Proportion of battery used for ancillary services such as backup power or arbitrage
If there is a battery on the project, this question will appear. If the entire battery capacity to be used to increase self-consumption, this value will be 0%.
The lookup tables for this calculation only permit that the usable capacity is less than 15.1kWh, in this case use the consumption task for more detailed consumption calculations.
Is additional self-consumption anticipated?
The MCS calculation does not account for consumption arising from "non-typical domestic loads" such as electric space heating, swimming pools, heat pumps, electricity power diverters, electric water heating and electric vehicles.
You can enter any figure here, but the calculation assumes that a maximum of 95% of the generated electricity is available for self-consumption so the value in the results table will be capped to the remaining available generation capacity.
Manual panel allocation
Manually allocating panels is slightly different depending on whether the panels are optimised or not. All panels connected to an input must be within a certain pitch and orientation threshold and panels incompatible with the selected string will be un-selectable. In this case the panels may need to be optimised.
Without optimisers
- Select inverter input and the roof you'd like to allocate from the lists on the left.
- Click or drag over panels to allocate them to an inverter input.
- Go to the next inverter input and repeat.
- Once all inverter inputs have the correct number of panels, all inputs will be in green and a tick will show at the top. Below all your inverters and roofs, you can then click next to continue with the performance task.
With optimised systems
You can add optimisers in the inverter task by clicking Add optimsers + to the top right of the inverter string. This will automatically add optimisers to all panels on that inverter, if you would like to remove some, this will have to be done manually in the financial task.
When you come to allocating the panels the steps are largely similar to non-optimised systems:
- Select inverter input and the roof you'd like to allocate from the lists on the left.
- Use the Add group + option to sub-divide the input into shading groups and then select the roof you want to allocate panels to. You should group panels that will get similar levels of shade and Easy PV will require that you use shading groups for panels that are on different facing roofs but on the same string.
- Click or drag over panels to allocate them to an inverter input or shading group.
- Go to the next inverter input or shading group and repeat.
- Once all inverter inputs have the correct number of panels, all inputs will be in green and a tick will show at the top. Below all your inverters and roofs, you can then click next to continue with the performance task.
Adding optimisers in the inverter task will not automatically change the generation.
The generation is a product of the kWp of the inverter, the kk value (which is based on the pitch, orientation and location of the panels) and the shading factor. Putting panels in separate shading groups in Easy PV does not correspond to a physical division of the string but it allows Easy PV to factor in differences in the kk value and shading factor on the same string. Without shading groups the generation will not change because the kk value and shading factor will be the same on the whole string, as it would be without optimsers.
Other options
-
Use the
 icon to reset the allocation on the inverter or individual inverter inputs.
 - Below where it says Next, you also have the option to use auto-stringing. This will not work for systems that require shading groups.
Consumption task
This guide applies to the easy-pv.co.uk and easy-pv.ie versions of Easy PV, references to MCS only apply to the UK site. The information provided here may not be accurate for easy-pv.com.
The consumption task is alternative to the MCS self-consumption calculation completed in the performance task. Unlike with MCS, the Easy PV self consumption task can be used for projects larger than 6000 kWh and with batteries larger than 15.1 kW.
If you would like to use the Easy PV self-consumption calculations as the basis for your financial projections and in the customer proposal, make sure it is selected in the financial task.
Getting started with the Consumption task
You can access the consumption task via the 'Tasks' drop-down menu or from the task list to the left on the project overview page.
When the consumption task first opens, you'll be shown a popup that lets you configure the settings you want to use for calculating generation and consumption of the system. It will open on the 'Annual consumption' and then you can use the left hand navigation to choose the settings you want to edit. More information on each of the settings is available below.
When you have finished configuring these inputs, click Done.
Navigating the Consumption task
Once you have configured the Consumption task inputs and submitted them, you can then explore the calculated information.
The left hand side shows the full results of the consumption task calculations and detailed insights. Read the 'View and understand the calculated consumption task data section' of this guide for more information about what's included.
The right hand sidebar on the page includes options to help you navigate through the different sections of insights.
It also allows you to:
|
Edit inputs
Update the annual consumption, tariffs and export limitation used for the calculations. |
|
|
Show inverter clipping
Choose whether to show and hide the inverter and export limitation clipping on the generated graphs. |
 |

View and understand the calculated consumption task data
Once you have configured the consumption task inputs and submitted them, you can then explore the estimated PV generation, how energy will be consumed by the property, how much energy is imported and exported, the financial benefits and information about battery usage (if a battery is included). This includes annual insights and charts to show changes through the year and over the course of each day.
The left hand side of the page allows you to navigate to the different sections of the consumption data and also shows detailed insights, and the right hand side of the page shows info the calculations are based on. You can use the toggle on the right side menu to show and hide the inverter and export limitation clipping on the generated graphs.
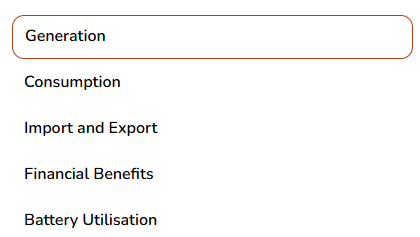
Generation
This shows the estimated annual generation of the system and whether the generated energy is used directly in the house, used to charge the battery or exported to the grid. It will also show inverter and export limitation clipping if you've turned on this toggle.
Consumption
This shows the total annual energy consumption of the property and where this energy will come from. It shows how much energy is expected to be supplied directly from the solar array, via the battery or imported from the grid.
Import and export
This shows the likely flow of energy to and from the grid over the course of a year. It's likely that there will be more energy exported during summer when the solar array is generating more energy, and more energy will be imported from the grid during winter months.
Financial benefits
This shows the money spent and earned on electricity flowing to and from the grid over the course of a year. It allows you to see the total money earned from export payments versus the money spent on imports, and how would compare to having no solar installed.
Battery utilisation
This helps you understand the modelled utilisation of the battery over the course of the year based on the amount of the the available battery capacity that is actually charged and discharged each day. Utilisation of over 100% is possible at times where a battery is charged and discharged more than once during a day. Low battery utilisation can be due to either insufficient PV generation to charge the battery (often the case in winter, or on cloudy days), or because loads are small overnight and the battery does not fully discharge. If you have low battery utilisation you may want to reduce the size of the batteries or recommend forced charging of the batteries on an overnight tariff to the property owner.
Edit the consumption task inputs
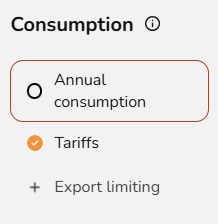
Set the annual consumption
There are a number of options for setting the annual consumption.
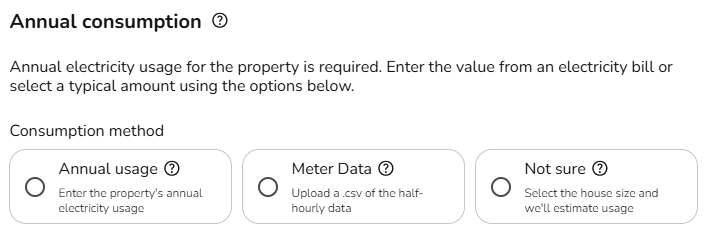
Option 1: Annual usage: If you know the annual consumption in kWh (for example from an electricity bill) you can enter it here in the annual usage field.
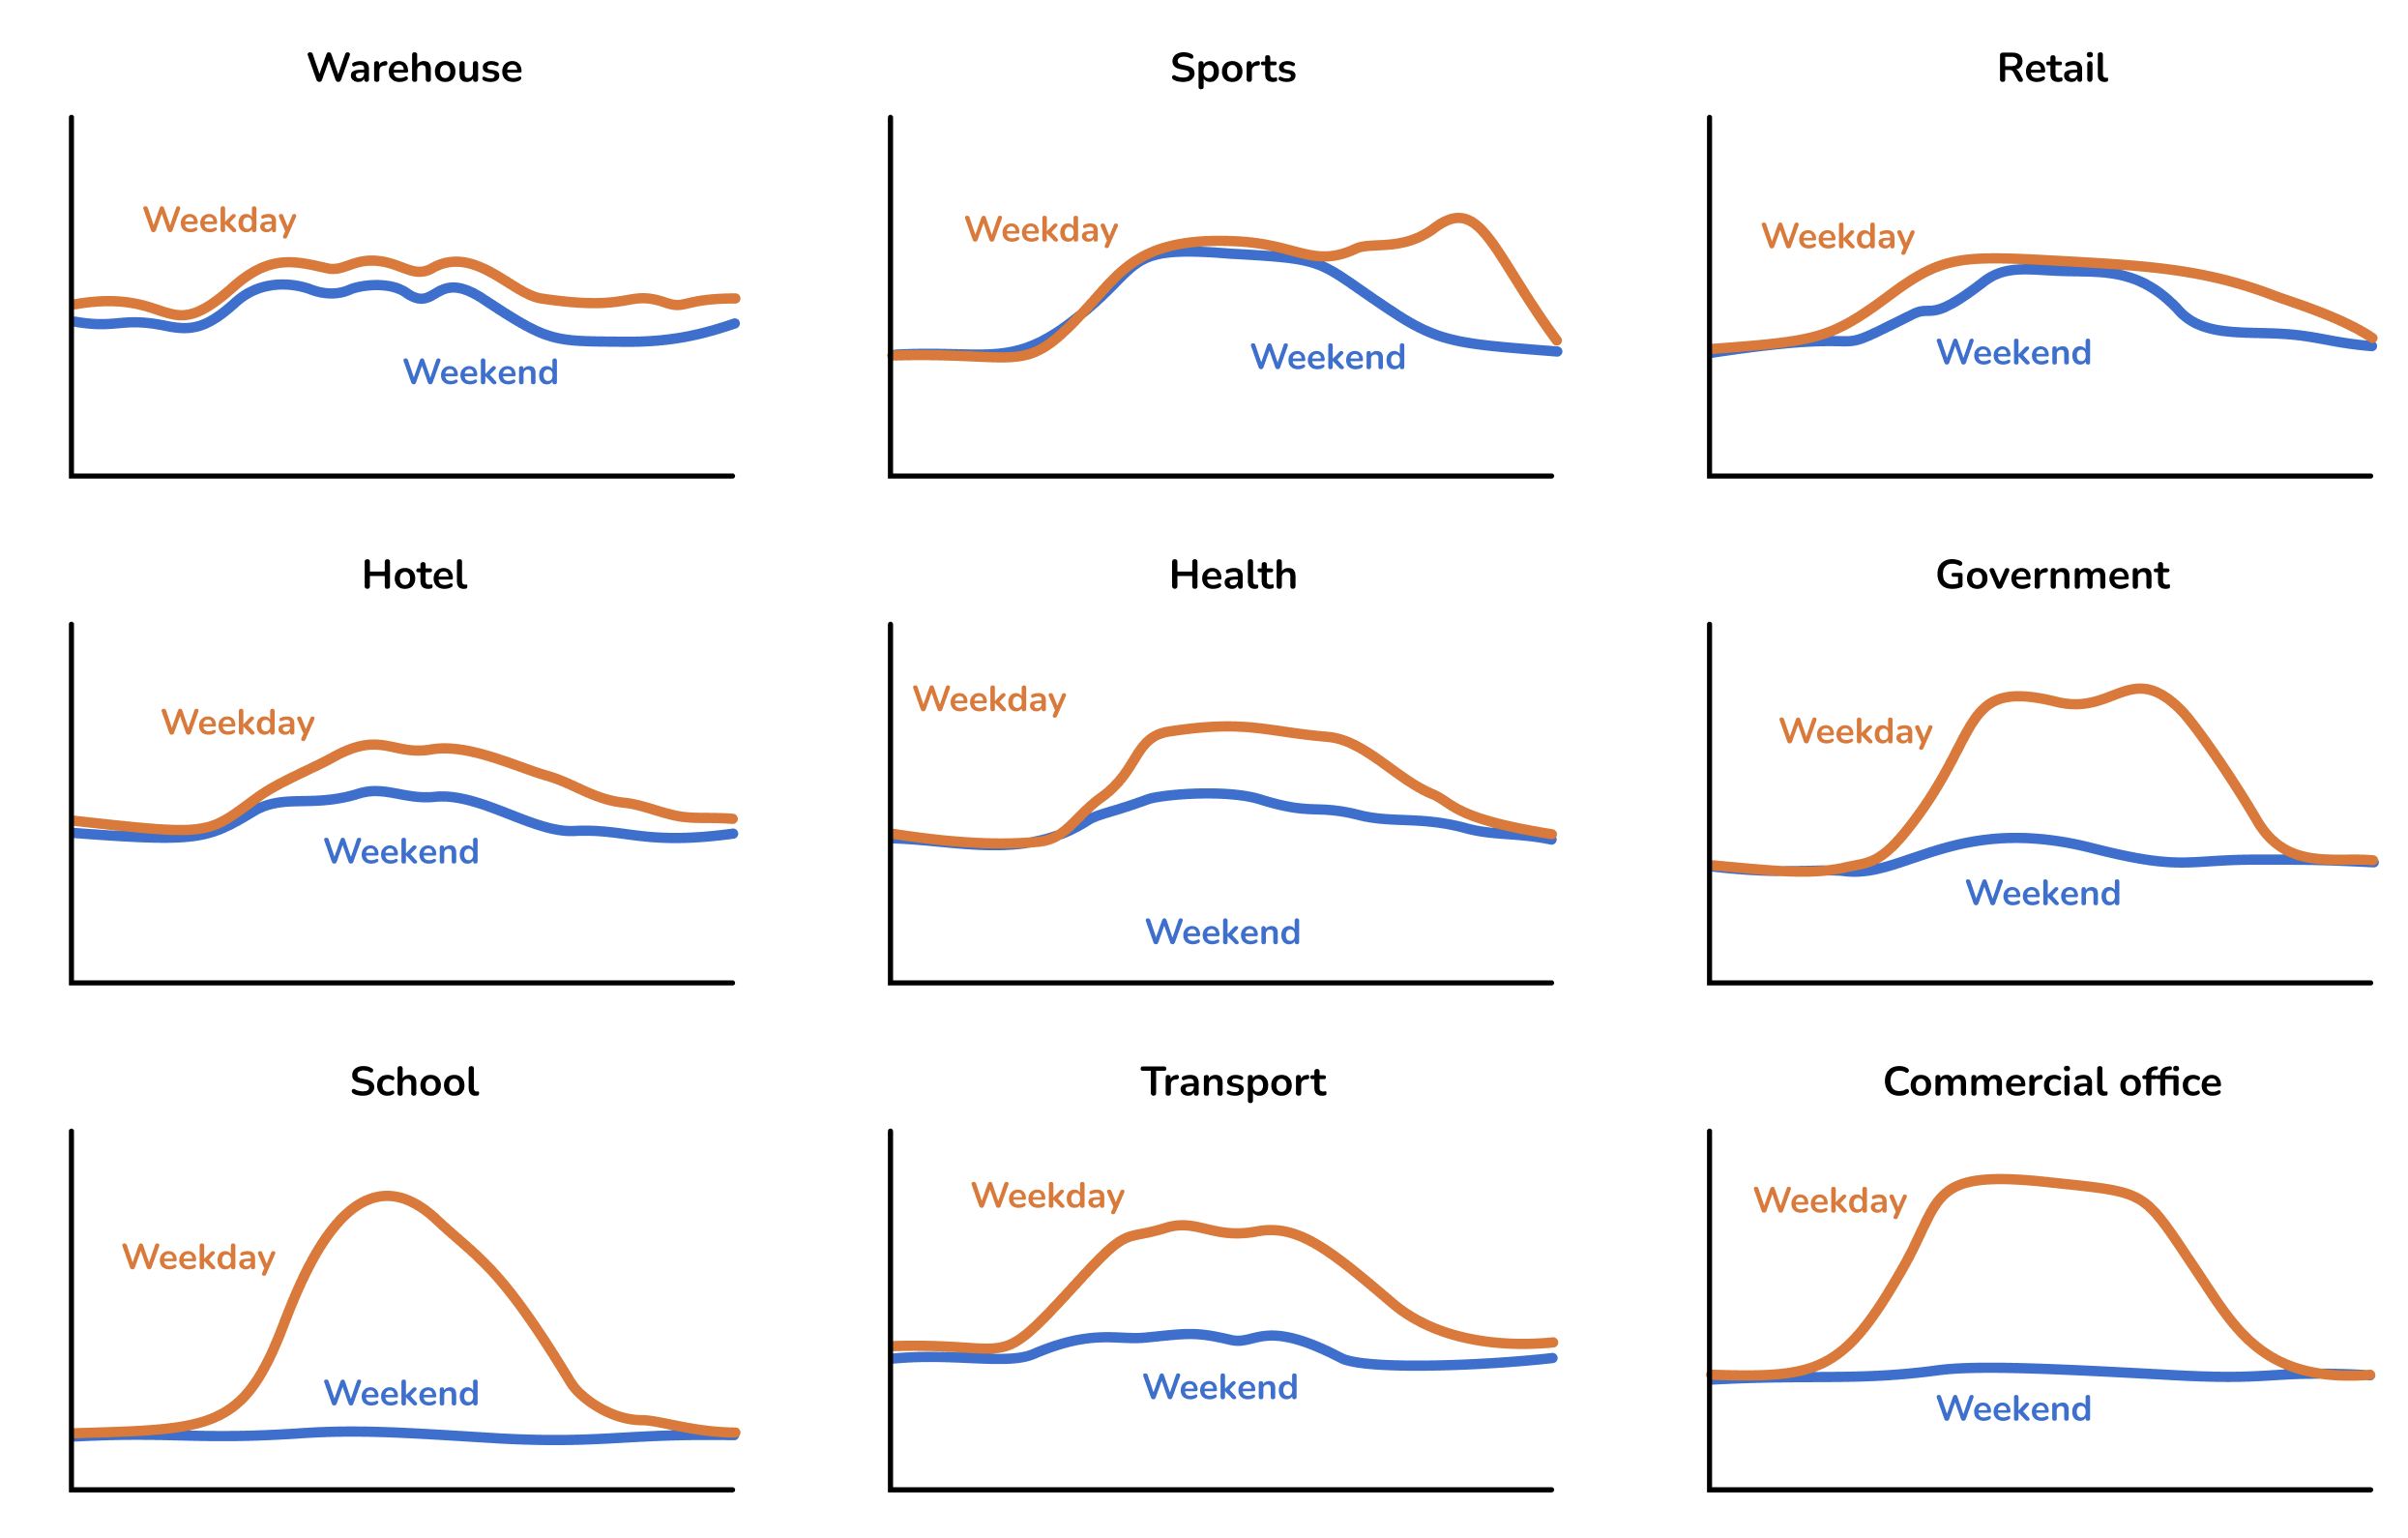
When you use this option you can now choose from a variety of domestic and commercial consumption profiles to build an accurate picture of energy usage throughout the year. A consumption profile calculates when energy is consumed—both annually and on a daily basis. For example, in a domestic home, most energy is typically used in the early morning and evenings. In contrast, an office profile reflects higher energy use during typical working hours, from around 09:00 to 17:00. The following commercial profiles are available
Option 2: Meter data: If the property has a smart meter you can upload half-hourly data to get a more accurate projections. The data should ideally span at least a year (but if it contains a minimum of 6 months our algorithm will automatically attempt to fill in gaps where they are detected). The file must have a .csv file extension. If your data is in another format you can export it as csv from Excel, Google Sheets, Libreoffice or any other spreadsheet editor.
Note that there are many different CSV formats for smart meter data, and we don't support all of them yet. If your upload doesn't work, please send us the spreadsheet at help@easy-pv.co.uk or help@easy-pv.ie and we will see if we can add the format. You can also download our sample spreadsheet here and change your data into this format.
Option 3: Not sure: If you don't know the electricity consumption in the property and it's domestic, you can use a typical values for the size of property provided here.
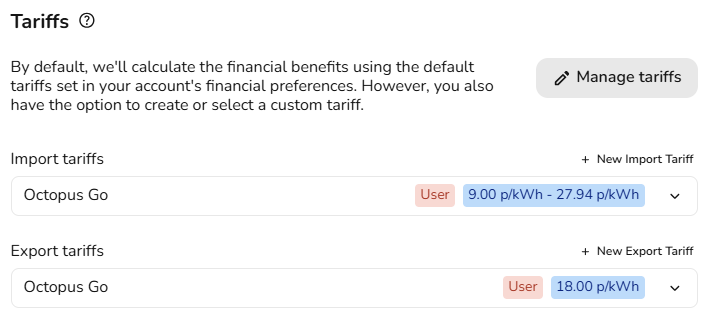
Set the import and export tariffs
Here you should select the tariffs this project will use. It is important to set suitable tariffs so the financial calculations for this project are accurate. By default, we'll calculate the financial benefits using your default flat tariffs which you can specify in your financial settings. Alternatively, you can create and select a new tariff by selecting + New import/export tariff. Click here for a full guide on creating tariffs in Easy PV.
Apply export limitation
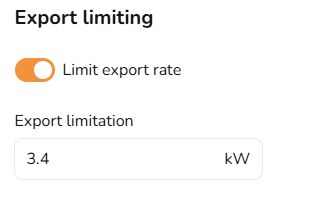
In this section you can limit the export rate if this is required by the DNO. Switch the toggle on and then input the annual export limit in kW.
Editing and creating tariffs
This guide applies to the easy-pv.co.uk and easy-pv.ie versions of Easy PV. The information provided here may not be accurate for easy-pv.com.
Setting tariffs is an essential part of ensuring the financial benefits can be calculated as accurately as possible for your customer. These can be created, viewed and edited in the consumption task or the financial task.
You can also set up user level default tariffs in your account financial settings or if you are a member of a Pro team, this will be set by a Pro team admin in Pro account financial settings.
This guide will detail how you can manage and create tariffs in Easy PV.
Creating a new tariff
Name of tariff
If this is a variable rate tariff, this name will show on the consumption section of the customer proposal. Otherwise, it is just a way for you to manage and navigate your tariffs when selecting them.
Scope of tariff
 |
Project level
|
 |
User level
|
 |
Team level
|
Once the scope of the tariff has been set, this cannot be edited.
Price bands
Flat tariff
- Input a value for the base rate and select save.
- Ensure you're putting this in in the correct units, this value should be greater than 1 (i.e. 15, not 0.15).
Variable rate tariff and tariff periods
- The first band you enter will be used as the base rate - any time period that doesn't have a price band applied will be priced at this rate.
- Add any additional rates in the price bands section.
- In the tariffs period section you will be able to select the different price bands and indicate when they apply. For some tariffs different rates might apply at the weekend, you can select the days for which the tariff period applies.
Editing existing tariffs
You can view and edit your tariffs in three different places in your account:
- Within a project:
- Consumption task
- Financial task
- (Pro) Account settings > Financial (only User or Team-level tariffs)
When you select 'View and edit tariffs' you will see the following options:

When editing tariffs you can change any of the details except the tariff scope, but note that any changes you make will affect previous projects that use these tariffs.
Using your tariffs
Once you have created your tariff either for an individual project or set a user level default, you can then select these in the consumption task and financial task.
The tariffs set in the consumption task will pull through to the Easy PV and MCS consumption methods in the financial tasks only if they are flat tariffs - if you select a varied tariff then this will only be used in the Easy PV method and your MCS default value will be selected.
Financial Task
This guide applies to the easy-pv.co.uk and easy-pv.ie versions of Easy PV. The information provided here may not be accurate for easy-pv.com.
Completing the Easy PV Financial task is an important part of designing and selling a PV system. The task has two main areas of focus:
Create an accurate quotation to give to the customer. You can fully cost the materials and services that will be included as part of the installation and set the relevant tax to be applied. It even allows you to apply relevant grants or apply discounts if you want to give the customers money off the installation. Using the Financial task and the Customer Proposal task, you can configure how you want the quote to be presented in the final customer proposal document.
Generate estimated financial projections for the installed system over time. This is important as it will help the customer understand if they are making a good investment by showing likely costs and benefits and how long it might take for the system to break even. You can also include loans, running costs and other custom savings.

Getting started with the financial task
If you haven't already done so, we recommend setting up automatic pricing rules and financial defaults via your account preferences. For Pro teams, these defaults will be configured by the team owner or admins via Pro Account Settings > Financial. This will speed up the time it takes for you to generate an accurate quotation and projections for your project.
You can access the financial task via the 'Tasks' drop-down menu or from the task list to the left on the project overview page.
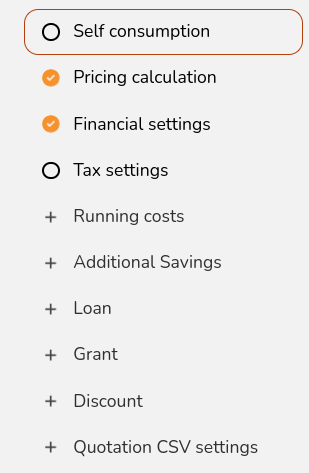
When the financial task first opens, you'll be shown a popup that lets you configure the settings you want to use for the quote and projections. It will open on 'Self-consumption' and then you can use the right hand navigation to choose the settings you want to edit:
If you have set defaults via your account preferences, these will be automatically applied here. More information on each of the settings is available below.
When you have finished updating the settings, click Save & Exit. This will close the settings popup and allow you to view and modify the quotation, or click to view the projections.
Navigating the financial task
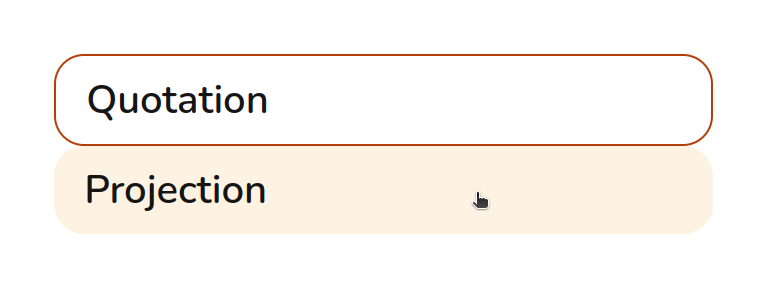
The right hand sidebar contains options to switch between the quotation and the projection view:
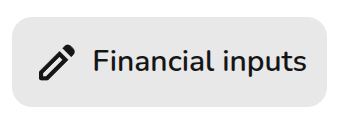
You also have the following actions:
|
|
Financial inputs Click to edit the financial settings used in the projection |
|
|
Open help page |
|
|
Refresh pricing Recalculate cost of goods, services or both reflect any changes you've made to the project via other tasks. |
|
|
Export quotation as a CSV. Customise the CSV file that will be downloaded. Line items will be based on the quotation in Financial Task. |
|
|
Auto-pricing settings Adjust settings used in automatic pricing calculator directly from the financial task. |
|
|
Go to user preferences |


Quotation view
In the quotations view, you can view and edit the quotation under the following headings:
- Goods: Here you can see the full kit list and add or delete any items. To the right is the option to display or hide the markup and edit the quote view.
- Services: If using automatic pricing, you will see your service totals and can then make any adjustment. If not using automatic pricing, you can add your services costs here.
- Total: Finally, you will be able to see the total cost of the system for the customer, including any grants or discounts applied via the financial settings you've applied to the project.
Projections view
At the top of this page you will see the annual generation, payback period, internal rate of return and net present value. A positive net present value is a good indication that the project is financially worthwhile. You will also see the following options:
- Income and savings: This graph shows the projected income from the system over the project lifetime in payments for generated and exported electricity, along with electricity savings.
- Running costs: If running cost or loan is included then this will show up in this graph.
- Bottom line: This graph will then indicate the cumulative costs and benefits of the system. When these two lines intersect is when the system benefits become equal to the cumulative costs, after this time the customer is projected to gain from their solar system.
More information about configuring the financial settings
The following sections explain all the settings you can configure. Click to expand each section and read more.
Self-consumption
The proportion of electricity generated from a solar array that is used in a property can significantly affect financial returns. Easy PV has several different methods you can use to calculate self-consumption which you can select from here:
- MCS: this can only be used with flat tariffs and properties with annual consumption between 1500 - 6000 kWh.
- Easy PV: this can be used for a project of any size and can be used with variable tariffs. Information on setting up variable tariffs can be found in our tariffs guide.
- Custom percentage: this contains significantly less information than the above methods. When using a custom percentage the 'Battery Storage' section in the Customer Proposal will not generate. If you would like this to generate, select the MCS or Easy PV self-consumption.
Pricing calculation
Here you can select which pricing calculation to use, with the option of selecting a default markup on goods or using Easy PV's pricing settings functionality which allows installation prices to be calculated according to rules that you set.
Guidance on how to set up your own automatic pricing settings can be found in the automatic pricing guide.
Financial settings
Here you can adjust the following settings:
-
Projection term: The number of years you wish to make financial projections. This should be approximately the expected lifespan of the equipment.
-
Inflation rate: this is the Inflation rate for your financial projection. (Note: the Bank of England target rate is 2%).
-
Panel degradation rate: panels gradually reduce in output as they degrade over time. Set the rate at which the output of the panels decreases each year.
-
Discount rate: a discount rate is a means of determining the current value of something (like income or savings from a PV system) that you'll receive in the future.
Tax settings
In this section, the tax rate for materials and services can be adjusted and you can select whether the customer can reclaim the tax. Business customers can usually reclaim tax paid on an installation, but domestic customers typically can't reclaim tax. Tax rates may be different for domestic and business customers.
Running costs
Add rows for costs you expect to be incurred in the future. You can choose whether costs are applied on an annual basis (for example a maintenance contract) or as one-off costs (for example an inverter replacement).
Additional savings
Add rows for additional savings, such as from immersion diversion systems or from night charging from batteries.
Loan
If your customer wishes to pay for the equipment using a loan, you can model this here.
Select the loan amount and term. Then you can choose fixed repayments, where the same amount is paid regularly, or capital plus interest, where in an addition to a fixed repayment an additional amount is added to payments to cover interest accrued. You can set an interest rate on the loan itself, which can compound either monthly or annually. This will usually be higher than inflation.
Grant
If the project is eligible for a grant that will pay for some or all of the cost of the system, you can add it here.
Discount
If you want to apply a discount to your quote to reduce the cost for your customer, you can do so here. Input a description and choose the type of discount you want to apply. This can be a fixed discount or a percentage of the total cost.
Quotation CSV settings
If you wish to export the quotation as a CSV, here you can customise what will appear including the quotation date, reference, text and the customer address.