Can't find what you're looking for? See how to add custom [inverters](https://help.easy-pv.co.uk/books/creating-components/page/custom-inverters "Custom inverters").
When you open the inverter task, a menu will pop up with the following information: - **Inverter recommendations**: Recommended based on array size, number of inputs and cost. Choose from string, hybrid, optimised inverters. - **Peak panel output and optimum inverter size**: The installed capacity of the system and optimum inverter size based on solar data for project location. - **List of inverter manufacturers**: List of all inverter manufacturers stocked by Midsummer, sorted by type. If you select a manufacturer from the list on the left, you can then: - Choose between **single phase** and **three phase** inverters for that manufacturer. - View the **output** **loss percentage** for each inverter, which you can use to choose an appropriately sized inverter. Once selected, you'll see the **specs for the inverter** and **[Midsummer](https://midsummerwholesale.co.uk/) stock and price information** on the left. Click on the Midsummer box to view the full listing with datasheets, warranty and more. Click *Go* in the bottom right once you've chosen your inverter to add it to the project.[Connect your Midsummer Wholesale account](https://help.easy-pv.co.uk/books/getting-started-f2k/page/connecting-to-midsummer "Connecting to Midsummer") for accurate pricing. Not registered? [Sign up here](https://midsummerwholesale.co.uk/register).
### Panel allocation Once you've chosen your inverter, the next step is to **select how many panels you want for each MPPT**. If the inverter was from the recommended section, this step will be completed for you. In the top right you can see **how many panels** **you need to allocate**. On each inverter you will see the **different combinations** that can be allocated to each string. Once the right number of panels have been allocated, a green tick will appear. **Multiple string arrangements** are typically possible. Below shows an example with 12 panels, selecting 1x6 (1 string of 6 panels) to each input and then 1x4 and 1x8: [](https://help.easy-pv.co.uk/uploads/images/gallery/2026-02/e2boFtBIWrKVbPll-simplescreenrecorder-2026-02-05-12-34-07-ezgif-com-video-to-gif-converter-1.gif) **Electrical compatibility information** for the selected arrangement is shown below the stringing options. This indicates which limiting factors for that input are met or exceeded. For each input, some options will show in **red**, indicating the arrangement does not pass the electrical checks, and others in **green**, indicating the arrangement does pass all the electrical checks Easy PV is doing. The number of viable inputs will vary depending on the size of the inverter and the panels chosen.| Not electrically viable [](https://help.easy-pv.co.uk/uploads/images/gallery/2026-02/XKNhdqyoGjWync2a-material-cross-black.png) | [](https://help.easy-pv.co.uk/uploads/images/gallery/2026-02/cc22CUkQMUHigiQu-image.png) |
| Electrically viable [](https://help.easy-pv.co.uk/uploads/images/gallery/2026-02/w6diK1y1NNa1Gyqm-material-tick-black.png) | [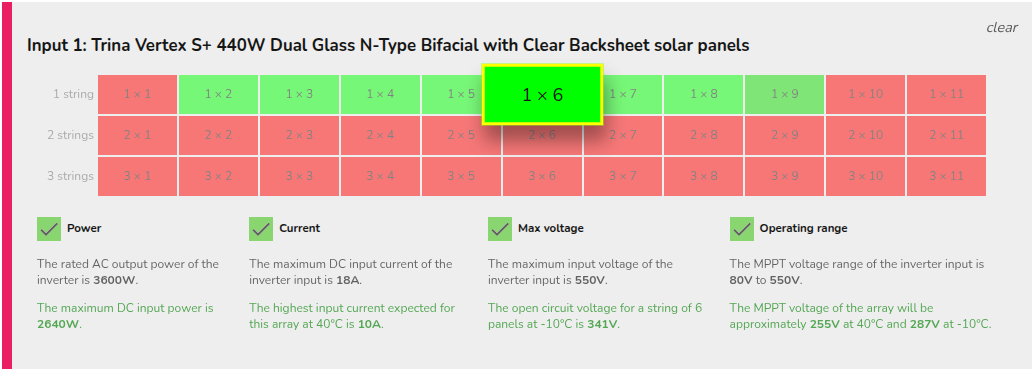](https://help.easy-pv.co.uk/uploads/images/gallery/2026-02/VrVFtC787zQXqLsB-screenshot-20260203-122129.png) |
On every project, you will need either a string or hybrid inverter (battery only projects are not yet supported). If you have an AC inverter, you will also need a string inverter.
You can skip adding a battery to a hybrid inverter if the plan is to install one at a later date. Simply add the inverter and don't select a battery. A warning will appear when going to the [Electrical task](https://help.easy-pv.co.uk/books/panels-inverter-and-electrical/page/electrical-task "Electrical task"), just click *OK* to continue.
### Additional options| [](https://help.easy-pv.co.uk/uploads/images/gallery/2025-11/g39VBFYQw8ePz0vy-3.png) | **Delete inverter** This is in the top right of each inverter. |
| [](https://help.easy-pv.co.uk/uploads/images/gallery/2025-09/jMO6FxliPQuscMfZ-image.png) | **Clone inverter** This is in the top right of each inverter. Cloning will also copy stringing arrangements. |
| [](https://help.easy-pv.co.uk/uploads/images/gallery/2026-02/DAGeqbKI7YMwNpFz-image.png) | **Add optimisers** This is to the top right of the first input on compatible inverters. After adding, select from the drop-down which optimiser you want to use. This will add **one optimiser per panel**. |
| [](https://help.easy-pv.co.uk/uploads/images/gallery/2026-02/cH4xADbPQfLy9Pys-image.png) | **Add a different inverter** This is to the bottom right of the last inverter. This will re-open the inverter selection menu. |
Using optimisers or microinverters will also mean you need to [manually allocate panels](https://help.easy-pv.co.uk/books/performance-and-consumption/page/manual-panel-allocation "Manual panel allocation") in the [Performance task](https://help.easy-pv.co.uk/books/performance-and-consumption/page/performance-task "Performance task").