# Getting started

# Embedding Speedy PV into your Website

Speedy PV is a lead-generation tool that can be embedded into your website. It allows your customers to get a speedy estimate of how suitable their property is for solar installation, and an indicative price. These leads are linked directly to your Easy PV Pro account so that they can be turned into projects.

In order to embed Speedy PV into your website, sign in to your account on Easy PV, and make sure you have the Speedy PV configuration dashboard enabled in your Pro Account Settings. For detailed instruction on how to do this, please see [Setting Up Speedy PV](https://help.easy-pv.co.uk/books/getting-started/page/setting-up-speedy-pv "Setting Up Speedy PV").   
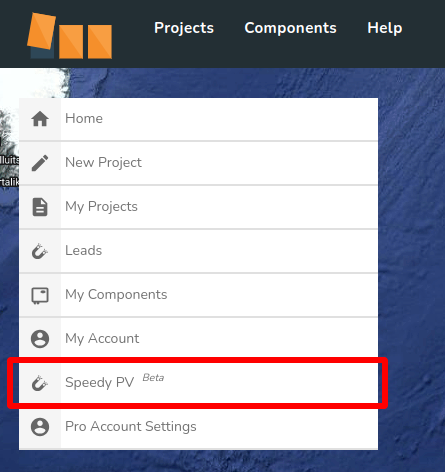
Click the **Speedy PV <sup>Beta</sup>** button in the left-hand menu, and then click the **Go Live** tab.

[![speedypv1.png](https://help.easy-pv.co.uk/uploads/images/gallery/2024-09/scaled-1680-/JddTLNb7oSgFdhaM-speedypv1.png)](https://help.easy-pv.co.uk/uploads/images/gallery/2024-09/JddTLNb7oSgFdhaM-speedypv1.png)
[![speedypv2.png](https://help.easy-pv.co.uk/uploads/images/gallery/2024-09/scaled-1680-/qXRJWwKyxZtz6yv9-speedypv2.png)](https://help.easy-pv.co.uk/uploads/images/gallery/2024-09/qXRJWwKyxZtz6yv9-speedypv2.png)
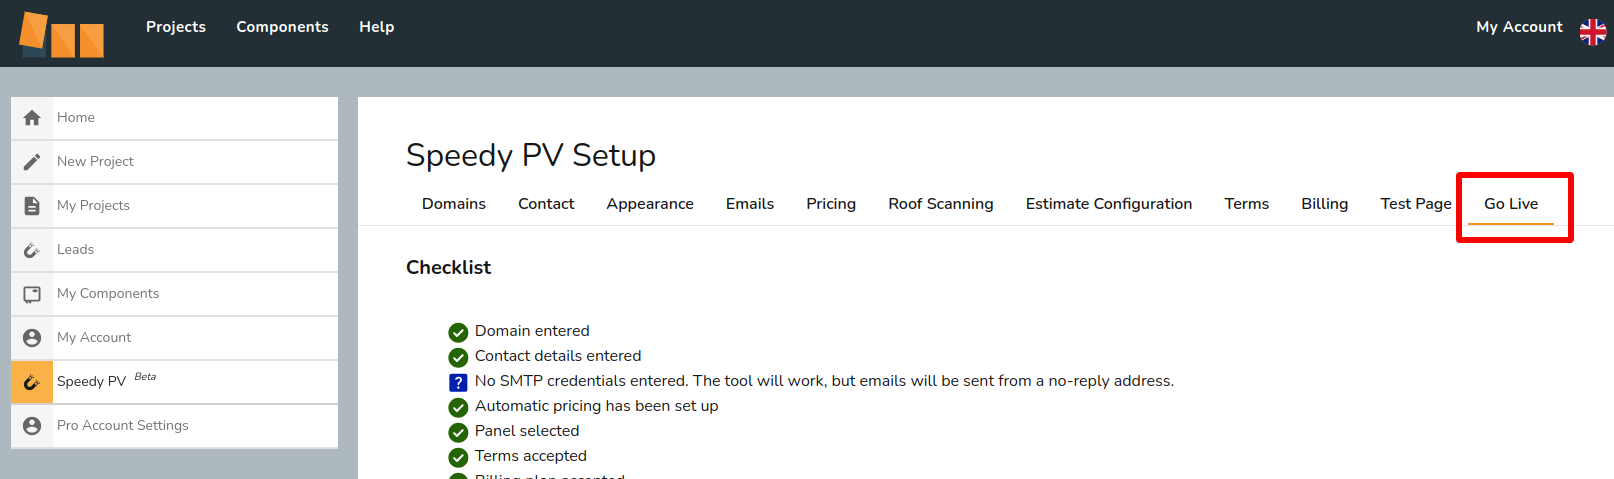
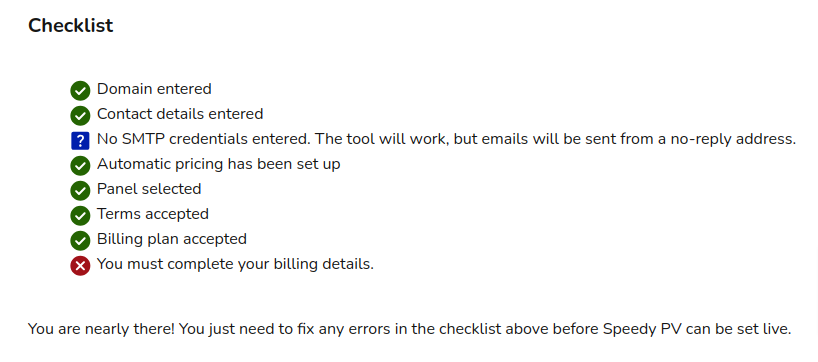
Next, check that the Checklist at the top of the tab is showing all green ticks, and no red crosses. If you see any red crosses in the list, make sure you check the corresponding sections in the other menu tabs and fill out any necessary fields - see our [Setting Up Speedy PV](https://help.easy-pv.co.uk/books/getting-started/page/setting-up-speedy-pv "Setting Up Speedy PV") guide for more information.

[![speedypv3.png](https://help.easy-pv.co.uk/uploads/images/gallery/2024-09/scaled-1680-/Qf0pcu0wqL5rxDpa-speedypv3.png)](https://help.easy-pv.co.uk/uploads/images/gallery/2024-09/Qf0pcu0wqL5rxDpa-speedypv3.png)
---

If the SMTP credentials has a (?) question mark symbol next to it, then you can still proceed with embedding Speedy PV into your website. Just bear in mind that the emails generated by the tool will be sent from a no-reply email address, instead of one of your company’s addresses.

We recommend setting up the SMTP credentials to make it easier for the potential customers to contact you about leads generated by the tool.

---

Then, you’ll need to make sure you have **Speedy PV** enabled, by toggling the **Enable Speedy PV** in your **Go Live** tab, just below the checklist.

[![speedypv4.png](https://help.easy-pv.co.uk/uploads/images/gallery/2024-09/scaled-1680-/i2qKO6nrRaXAMRuD-speedypv4.png)](https://help.easy-pv.co.uk/uploads/images/gallery/2024-09/i2qKO6nrRaXAMRuD-speedypv4.png)

Next, you’ll need to edit the HTML code in your website to include the HTML tags that are generated in the **Go Live** tab. If you use a website building software such as Wix or Squarespace for your website, then you’ll need to follow instructions specific to that site in order to embed the HTML. Please see the sections further down for more help with this.

You’ll find the tags that you need at the bottom of the **Go Live** tab, and they should look as follows:

[![5.png](https://help.easy-pv.co.uk/uploads/images/gallery/2024-09/scaled-1680-/qjwl4m23y91hwNbw-5.png)](https://help.easy-pv.co.uk/uploads/images/gallery/2024-09/qjwl4m23y91hwNbw-5.png)
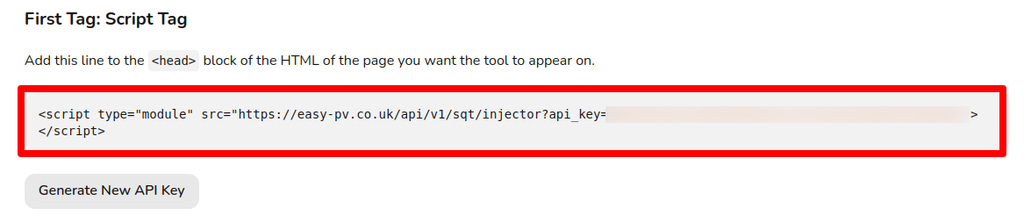
Your `<script>` tag should contain an API key written in orange text - it’s blurred out here but it looks like a random string of numbers and letters. If not, you can click **generate new API key** to generate a new one. **Note:** if you generate a new API key, any existing embeds will no longer work and will need updating to the new key.

[![6.png](https://help.easy-pv.co.uk/uploads/images/gallery/2024-09/scaled-1680-/o0zXlOlVCg0MShVd-6.png)](https://help.easy-pv.co.uk/uploads/images/gallery/2024-09/o0zXlOlVCg0MShVd-6.png)

You’ll need to insert the `<script>` tag into the header, i.e. between the `<head>` and `</head>` tags in the HTML of the page you’d like it to appear on. The `<div>` tag will determine where in the page Speedy PV will appear, so will need to be placed between the `<body>` and `</body>` tags. So for example, your HTML might look something like this once you’ve inserted both tags:

```

<html lang="en">
<head>
    <meta charset="UTF-8">
    <meta name="viewport" content="width=device-width, initial-scale=1.0">
    <title>SunMax</title>

    <script type="module" src="https://easy-pv.co.uk/api/v1/sqt/injector?api_key=yourAPIkeyHere"></script>

</head>
<body>
    <h1>Welcome to SunMax</h1>
    <p>At SunMax, we specialize in providing top-quality solar panel installation services to help you harness the power of the sun. Contact us today to learn more about how solar energy can benefit your home or business!</p>
    <h2>Get an instant estimate with this easy-to-use tool!</h2>

    <div id="sqt-container"></div>

    # no doubt you will have much more page content than this!
</body>
</html>

```

That’s all you need to do! Speedy PV will now be visible on your webpage and ready to generate leads for your company.

<p class="callout warning">Speedy PV already has a very high z-index so be wary of putting it inside a container with a lower one. The other elements on your site might start overlapping Speedy PV for mobile users.</p>

### Embedding with Wix

Wix allows you to embed code snippets into your website directly through the advanced settings.

Firstly, you’ll need to navigate to your website’s dashboard, then scroll down in the left-hand menu to **Settings**. Scroll to the bottom of the **Settings** page to the **Advanced** section where you should see **Custom code**.

Click on **Custom code** and then you’re greeted with three sections titled **Head**, **Body - Start**, and **Body - End**. You’ll need to click **Add code** under the **Head** section and insert the `<script>` tag from Easy PV in there. Delete the `type="module"` part of the code snippet highlighted below.[![Screenshot from 2024-10-24 11-39-54.png](https://help.easy-pv.co.uk/uploads/images/gallery/2024-10/scaled-1680-/aJULj3tYtS0Hb5XB-screenshot-from-2024-10-24-11-39-54.png)](https://help.easy-pv.co.uk/uploads/images/gallery/2024-10/aJULj3tYtS0Hb5XB-screenshot-from-2024-10-24-11-39-54.png)You’ll be prompted to choose whether you want it to appear on all pages, or specific pages: choose **Choose specific pages** and then select the page(s) you want the tool to appear on from the dropdown options.[![Screenshot from 2024-10-24 11-41-33.png](https://help.easy-pv.co.uk/uploads/images/gallery/2024-10/scaled-1680-/qcQlJPPcYIWNhrnC-screenshot-from-2024-10-24-11-41-33.png)](https://help.easy-pv.co.uk/uploads/images/gallery/2024-10/qcQlJPPcYIWNhrnC-screenshot-from-2024-10-24-11-41-33.png)Then click **Apply**. For more help, you can visit the [Wix Help Center page about adding custom code](https://support.wix.com/en/article/embedding-custom-code-on-your-site).

Then, you’ll need to go back into your editor, and find the page you’d like the tool to appear on. Then, click **Add Elements**, click **Embed Code**, click **Popular Embeds**, and click **Custom Element** (note: you may need to have a premium Wix membership to use Custom Elements). On this element, click **Choose source**, select **Velo file** (you may need to enable **Dev mode** at the top of the Wix window to do this), select **Create new** and then in the bottom panel where the code appears, delete all the contents of the Velo file for that element (the file might be called **wix-default-custom-element.js**).[![Screenshot from 2024-10-25 11-01-38.png](https://help.easy-pv.co.uk/uploads/images/gallery/2024-10/scaled-1680-/BififtSOn43ykXpp-screenshot-from-2024-10-25-11-01-38.png)](https://help.easy-pv.co.uk/uploads/images/gallery/2024-10/BififtSOn43ykXpp-screenshot-from-2024-10-25-11-01-38.png)Back on the custom element, click **Set attributes**, and add an attributes with the name **"id"** and value **"sqt-container"**.[![Screenshot from 2024-10-22 11-52-08.png](https://help.easy-pv.co.uk/uploads/images/gallery/2024-10/scaled-1680-/Q7KRkR0ztZbAxws1-screenshot-from-2024-10-22-11-52-08.png)](https://help.easy-pv.co.uk/uploads/images/gallery/2024-10/Q7KRkR0ztZbAxws1-screenshot-from-2024-10-22-11-52-08.png)On the custom element, under **Stretch** (arrow icon pointing left and right), turn on the **Stretch to full width** option on, so the tool uses all the available space. Then, save your changes and publish your site. For more detailed instructions, you can visit the [Wix Help Center page about custom elements](https://support.wix.com/en/article/wix-editor-adding-a-custom-element-to-your-site).

That should be it! You should now be able to see the Speedy PV in your webpage!

### Embedding with Squarespace

Squarespace also allows you to embed custom code snippets into your website directly through their editor.

Firstly you’ll need to hover over the page you want Speedy PV to appear on in the **Pages** panel. Then click the cog icon to enter the settings. Click **Advanced**, there should be an option called **Page Header Code Injection** where you’ll need to add the `<script>` tag from Easy PV so that it gets inserted into the header section. Once you’ve added it, make sure you click **Save**.

---

Note: Squarespace’s help page advises that “the code won’t appear if you turn off your site header’s transparency” in version 7.1. Please see their [help page](https://support.squarespace.com/hc/en-us/articles/205815908-Using-code-injection#toc-per-page-code-injection) for more detailed information.

---

Then, you’ll need to go to the **Pages** panel again, and select the page you want Speedy PV to appear on. Click **Edit** in the top-left corner, and then hover over the section where you want the tool to be and click **Add Block** in the top-left corner. In the menu, click **Code** from the types of blocks, and the block will appear on your page with a placeholder inside. Click the pencil icon to edit the block contents, and replace the placeholder with the `<div>` tag from Easy PV. Make sure you select **HTML** in the Type menu so that it displays correctly on your page! If you need more detailed information, please see the [Squarespace Help Center page](https://support.squarespace.com/hc/en-us/articles/206543167-Code-blocks#toc-add-a-code-block).

That’s all! You should now be able to see the Speedy PV in your webpage!

### Embedding with WordPress

WordPress allows embedding of custom code content through the use of a free plugin called [Insert Headers and Footers](https://wordpress.com/plugins/insert-headers-and-footers) by WPCode. We can’t directly provide support for the installation and activation of the plugin, but here are the steps you’ll need to take after doing so.

In the WordPress admin menu bar, you should navigate to **Code Snippets** and then click **Header and Footer**. Paste the `<script>` tag from Easy PV into the **Header** text box, and then click the **Save Changes** button.

Next, you’ll need to return to the **Code Snippets** section, and click **Add New**. Then, click **Add your custom code (new snippet)** and choose **HTML** from the **Code Type** dropdown menu. Name the code snippet something appropriate like Speedy PV, and then paste the `<div>` tag into the **Code preview** area. Click **Save snippet** when you’re done, and scroll down to the **Insertion** section below. Then, you can choose to use **Auto Insert** or **Shortcode**. If you choose **Auto Insert**, you’ll be asked to choose whether it runs on every page, or only on specific page(s). **Shortcode** will generate a shortcode for it which you’re then able to manually paste into any page(s) you want. When you’ve decided on a method, make sure you activate the snippet by clicking the **Active/Inactive** toggle in the top right corner. If you need further information, please consult the [WPCode help pages](https://wpcode.com/insert-scripts-in-wordpress/).

You should now be able to see the Speedy PV in your webpage!

### Embedding with GoDaddy

On GoDaddy's website builder, you can add custom HTML code by adding an **HTML Section**.

You can follow GoDaddy's own instructions for creating one of these sections on their help page here:  
[https://www.godaddy.com/en-uk/help/add-html-or-custom-code-to-my-site-27252](https://www.godaddy.com/en-uk/help/add-html-or-custom-code-to-my-site-27252)

The code you'll need to add in the **Custom Code** field of that **HTML Section** can be copied from the "Go Live" tab of the Speedy PV Setup pages on Easy PV. You will need to copy both the code snippets from that page into the **Custom Code** field.  
It will look like this, but with your API key in the `script` tag:

```html
<div id="sqt-container"></div>
<script type="module" src="https://easy-pv.co.uk/api/v1/sqt/injector?api_key=YOUR_API_KEY"></script>
```

Once you save and Publish your site, Speedy PV should be visible!

---

If you use a different website creation service that we haven’t covered here and need some guidance, or you have any further questions, feel free to get in touch at <help@easy-pv.co.uk>.

</body></html>

# Setting Up Speedy PV

Speedy PV is an instant estimate and lead generation tool. It can be embedded in your website and allows your customers to get an immediate indication of the suitability of their property for solar, and an indicative price. Leads generated by the tool are imported into Easy PV so that you can turn them into projects.

Below you'll find a helpful video walking you through the setup process. Further down, you'll find written instructions too, so you can easily refer back to this page whenever you need.

<iframe allow="clipboard-write; encrypted-media; picture-in-picture" allowfullscreen="allowfullscreen" frameborder="0" height="315" src="https://www.youtube.com/embed/BIQ3n14fJrc?si=fvnGAYXHO1DAvM2L" title="SpeedyPV Setup" width="560"></iframe>

#### Enabling the tool in Pro Account Settings

To configure Speedy PV, navigate to **Pro Account Settings** and go to the **Speedy PV <sup>Beta</sup>** tab. Then enable the Speedy PV configuration dashboard. If you would like to try out the new version please check the guides here.

[![setup1.png](https://help.easy-pv.co.uk/uploads/images/gallery/2024-09/scaled-1680-/QCTrlTwYUlkoSdCr-setup1.png)](https://help.easy-pv.co.uk/uploads/images/gallery/2024-09/QCTrlTwYUlkoSdCr-setup1.png)

Then a new option will appear on the left-hand side. Click this and you will be able to work through all the tabs to set up your Speedy PV.

[![setup2.png](https://help.easy-pv.co.uk/uploads/images/gallery/2024-09/scaled-1680-/nnxbegNmcw2nuODu-setup2.png)](https://help.easy-pv.co.uk/uploads/images/gallery/2024-09/nnxbegNmcw2nuODu-setup2.png)

#### Setting up website domain

Start by putting in the website domain for the websites you want to host the tool on. If you would like to embed it in more than one website, then add an additional row to your list of URLs. If you would like to remove a domain, click the option highlighted below.

Please note you only need to include the *domain* of the website, not the full address. For example, if the tool will appear at "www.mywebsite.com/my-speedy-pv" then you only need to input "www.mywebsite.com" into the URLs section.

#### Contact details

On the contacts tab, put in the details for people to use when they need to contact you for more information. These will usually be your main office or sales phone number and email address.

#### Appearance

On the appearance tab, you can set the primary colour to use for the iconography colour scheme and any buttons in the tool.

To do this simply add in the Hex code for the colour you would like to use in the box outlined below and make sure it looks correct in the preview.

If you haven't used hex codes for colours before, don't panic! You can find a [ colour picker here ](https://htmlcolorcodes.com/color-picker/) where you can find the colour you want for your tool, and turn it into a hex code.

[![3.png](https://help.easy-pv.co.uk/uploads/images/gallery/2024-09/scaled-1680-/pM0bO0vIKHwzJluK-3.png)](https://help.easy-pv.co.uk/uploads/images/gallery/2024-09/pM0bO0vIKHwzJluK-3.png)

#### Emails

On the emails tab you can add an email signature that will appear at the bottom of the emails that are sent by the system.

You can optionally configure SMTP email credentials for one of your email addresses so emails will be sent from that address instead of a no reply at EasyPV email address.

You can also add in other email addresses to copy in on the emails that are sent so that could be an email for your sales team or another generic mailbox.

#### Pricing settings

To use Speedy PV, you must set up automatic pricing rules, so the correct estimates can appear for your project. If automatic pricing is already set up then nothing needs to be changed here.

If automatic pricing is not already set up then you can follow these steps on our [guide](https://help.easy-pv.co.uk/books/getting-started-f2k/page/setting-up-your-automatic-pricing-calculator "Setting up your Automatic Pricing Calculator").

#### Estimate configuration

In this section, you set defaults for which panels and inverters will be used in the estimates Speedy PV generates.

Select from the drop down menu which panel you want the quotes to be based on. If left blank, the tool will default to using "Jinko Tiger Neo 440W N-Type All Black Mono" in estimates.

In the inverter selection, you can choose up to three inverter groups you would like the tool to pick from in estimates. The tool will use inverters from your chosen groups in order of preference, whenever suitable for the generated PV system. If not filled in, the tool will default to using the groups "GivEnergy (Hybrid)", "Huawei (Hybrid)", "Growatt".

#### Terms

On the terms tab, read through the specific terms for Speedy PV and once you're happy, click I accept the terms of use.

#### Billing

On the billing tab you will need to accept the billing conditions.

#### Test page

Once the previous sections have been completed, you can play around with a test page. This has the option of testing with the desktop or mobile version.

#### Go Live

On the ‘Go Live’ tab, you will be able to see the following checklist:

[![4.png](https://help.easy-pv.co.uk/uploads/images/gallery/2024-09/scaled-1680-/OEYKWaJE9p7h36c4-4.png)](https://help.easy-pv.co.uk/uploads/images/gallery/2024-09/OEYKWaJE9p7h36c4-4.png)

If any required sections are not completed, go back and fix any errors. Once all required fields are checked and you are happy with everything, you can then embed the tool into your website by following the instructions in this article: [Embedding Speedy PV into your Website](https://help.easy-pv.co.uk/books/speedy-pv/page/embedding-speedy-pv-into-your-website).

Once that's all done, you can then start using the tool in your website! If you have any questions, please contact our support team at <help@easy-pv.co.uk>.

# Speedy PV V.2

If you would like to try out our new, more advanced version of Speedy PV. Follow the steps in this guide.

# Speedy PV V2.

The new Speedy PV gives you your own estimate page on speedy-pv.co.uk and a widget for your website. It quotes from your own kit combinations, can place panels on the homeowner's roof as they draw it, and sends every lead to your Easy PV Leads. This guide takes you from switching it on to your first lead.

<p class="callout info">**Already using Speedy PV?** Your settings come with you, and your website keeps showing the previous Speedy PV until you switch the new one on in step 12. The previous Speedy PV is retired on 31 March 2027.</p>

#### 1. Switch on the new Speedy PV

Open **Pro Account Settings** from the menu on the left and choose the **Speedy PV** tab. Switch on **Enable the Speedy PV configuration dashboard**, then **New Speedy PV using kit combinations**. A **Speedy PV** item appears in the menu on the left: it opens **Speedy PV Setup**, where you do the rest of the steps below.

[![The Speedy PV tab in Pro Account Settings with both switches on](https://help.easy-pv.co.uk/uploads/images/gallery/2026-10/IgHgeTRPHJM1Bg29-speedy-pv-switch-on.jpg)](https://help.easy-pv.co.uk/uploads/images/gallery/2026-10/IgHgeTRPHJM1Bg29-speedy-pv-switch-on.jpg)

Until 31 March 2027 you can switch **New Speedy PV using kit combinations** off again to go back to the previous Speedy PV, exactly as it was. After that date, if you have no kit combinations or tariffs of your own, Speedy PV quotes with our default ones.

#### 2. Choose a plan

On the **Billing** tab, pick a plan. Every plan has its own page on speedy-pv.co.uk and a widget for your website, and you can change plan at any time.

<table id="bkmrk-plan-cost-what-your-" style="width: 100%;"><thead><tr><th style="width: 11.323%;">Plan</th><th style="width: 12.3933%;">Cost</th><th style="width: 76.2837%;">What your customers get</th></tr></thead><tbody><tr><td style="width: 11.323%;">**Free**</td><td style="width: 12.3933%;">No charge</td><td style="width: 76.2837%;">A short enquiry form: they find their address, confirm the outline of their property, and tell you whether they want a battery and how much electricity they use. No estimates are shown.</td></tr><tr><td style="width: 11.323%;">**Basic**</td><td style="width: 12.3933%;">£5 per lead</td><td style="width: 76.2837%;">Instant, priced estimates from two of your kit combinations: the first one with a battery and the first one without, in the order your Kit Combinations page lists them.</td></tr><tr><td style="width: 11.323%;">**Premium**</td><td style="width: 12.3933%;">£100 a month plus £5 per lead</td><td style="width: 76.2837%;">Everything in Basic, plus: a system for every kit combination you tag, with filters to compare them; your own web address; a choice of when prices show; a 3D view of the home; enquiries from outside your area stay yours; your own Google Tag Manager; and your choice of card layout and kit names.</td></tr></tbody></table>

Then switch on **I accept the Speedy PV billing conditions for the plan I have chosen** and check your **Billing details** underneath.

- The Premium fee is charged for each day your Speedy PV is live on Premium, as a share of the month.
- If you're new to Speedy PV, your first two months are free, counted from your first lead.
- Nothing sent from a preview reaches you or is charged, and neither is a lead sent with your team owner's email address as the customer's email, so you can test on your own website.

[![The Plan section of the Billing tab with Free, Basic and Premium](https://help.easy-pv.co.uk/uploads/images/gallery/2026-10/lA45S2BopVkjXKIZ-speedy-pv-billing-plans.jpg)](https://help.easy-pv.co.uk/uploads/images/gallery/2026-10/lA45S2BopVkjXKIZ-speedy-pv-billing-plans.jpg)

#### 3. Domains and your Speedy PV address

**Website domains:** under **URLs**, enter the domain of each website where you will put the widget. Only pages on these domains can load it.

- Enter the shortest form: `yourcompany.co.uk` also covers `www.yourcompany.co.uk`, but not the other way round.
- Leave out `https://` and page paths, and don't use wildcards such as `*.yourcompany.co.uk`.
- Use **Add Row** for each extra website, up to five.

[![Website domains on the Domains tab](https://help.easy-pv.co.uk/uploads/images/gallery/2026-10/h2GQeUHby7vA50b7-speedy-pv-domains.jpg)](https://help.easy-pv.co.uk/uploads/images/gallery/2026-10/h2GQeUHby7vA50b7-speedy-pv-domains.jpg)

**Your Speedy PV address:** your page lives at `speedy-pv.co.uk/your-name`. Type the name you want in **Name**: lowercase letters, numbers and hyphens, up to 48 characters. If you leave it empty, your company name is used, so we recommend typing it yourself: then your address doesn't change if you rename your company.

**Your own domain (Premium):** your page can run on a web address of your own instead, such as `quote.yourcompany.co.uk`. We connect each domain for you:

1. Enter the address under **Domain you would like instead** and press **Send us a request**. We reply once it's ready.
2. At your domain provider, add the **CNAME** record shown under **DNS record**. It can take up to an hour to work.
3. Press **Check connection** until it says **Connected**.

[![Your Speedy PV address and Your own domain on the Domains tab](https://help.easy-pv.co.uk/uploads/images/gallery/2026-10/uV9iIAv6gp9gDzz8-speedy-pv-address-and-domain.jpg)](https://help.easy-pv.co.uk/uploads/images/gallery/2026-10/uV9iIAv6gp9gDzz8-speedy-pv-address-and-domain.jpg)

**Google Tag Manager (Premium):** once your own domain is connected, add your container ID to track your page in Google Analytics and Google Ads. It only loads on your own domain. The widget on your website uses your website's own Tag Manager.

[![The DNS record, Check connection and Google Tag Manager sections](https://help.easy-pv.co.uk/uploads/images/gallery/2026-10/lwZFC63F003XOiK0-speedy-pv-dns-and-tag-manager.jpg)](https://help.easy-pv.co.uk/uploads/images/gallery/2026-10/lwZFC63F003XOiK0-speedy-pv-dns-and-tag-manager.jpg)

#### 4. Contact details

On the **Contact** tab, enter the email address and phone number customers should use to contact you or ask for help, usually your main office or sales team. They appear in the emails your customers receive.

#### 5. Branding

- **Theme colour:** your brand colour for buttons and highlights. Avoid very dark colours, because black text sits on it.
- **Logo** (needed to go live): shown at the top of your page and widget, and in the emails. A PNG or SVG with a transparent background looks best, at least 400 pixels wide. Until you upload one, we use your logo from the Midsummer marketplace if you have one there.
- **Logo for dark backgrounds** (optional): a light or white version for your page's dark header and footer, and for the widget's dark look.
- **Favicon** (optional): the small icon in browser tabs. Without one, we use your logo.

Upload a PNG, JPEG, WebP or SVG file of up to 5 MB, or drop it on the preview.

[![Theme colour and Logo on the Branding tab](https://help.easy-pv.co.uk/uploads/images/gallery/2026-10/I8Q9lWVF1IqqkbY2-speedy-pv-branding.jpg)](https://help.easy-pv.co.uk/uploads/images/gallery/2026-10/I8Q9lWVF1IqqkbY2-speedy-pv-branding.jpg)

#### 6. Emails

On the **Emails** tab, under **Email Setup**:

- **Email Signature:** one line added to every email, usually your company name.
- **Email Credentials:** connect your mailbox so emails to your customers come from your own address. Choose **OAuth 2.0** to connect Microsoft 365 or Gmail, or **Basic SMTP** with your provider's details (you may need an app password). If you leave it empty, emails come from a no-reply address. Press **Send test email** to check it works.
- **Email CC's:** the addresses that should be copied into the emails, including the notice of each new lead.

If you later turn on two-factor sign-in for this mailbox, or change its password, connect it again here, or emails to your customers stop sending. The **Email Templates** tab holds the follow-up emails you can send from your Leads.

[![Email Credentials on the Emails tab](https://help.easy-pv.co.uk/uploads/images/gallery/2026-10/amLQOuMwfiInQOYa-speedy-pv-emails.jpg)](https://help.easy-pv.co.uk/uploads/images/gallery/2026-10/amLQOuMwfiInQOYa-speedy-pv-emails.jpg)

#### 7. Installation Area

Enter the postcode areas you cover, separated by commas (for example `CB, PE, SG8`), or press **I cover the whole country**.

By default, a homeowner whose address is outside your area is told you don't cover it yet:

- On Free and Basic, they are offered installers who cover them on our Solar Marketplace, or to have their details passed to us at Easy PV so we can find them an installer. Those requests don't come to you, and you are not charged for them.
- On Premium, they can't carry on.

Switch on **Let homeowners outside my installation area carry on** to let them get estimates and send you a request anyway. You then decide whether to take it on.

[![The Installation Area tab](https://help.easy-pv.co.uk/uploads/images/gallery/2026-10/QzefoDjS9SPTebdS-speedy-pv-installation-area.jpg)](https://help.easy-pv.co.uk/uploads/images/gallery/2026-10/QzefoDjS9SPTebdS-speedy-pv-installation-area.jpg)

#### 8. Pricing and roof scanning

**Pricing (Basic and Premium):** Speedy PV prices each system with your automatic pricing rules, so they must be switched on in the Financial tab of Pro Account Settings (or press **Change pricing settings**). If they aren't set up yet, follow our [automatic pricing guide](https://help.easy-pv.co.uk/books/getting-started-f2k/page/setting-up-your-automatic-pricing-calculator). If you price from lookup tables, also switch on **Use markup pricing where no lookup table applies**. The Free plan shows no prices, so it doesn't need pricing.

**Roof Scanning:** switch on **Enable automatic roof scanning**. Speedy PV then finds the roofs of the house for your customer, who confirms them or adjusts them.

#### 9. Lead Capture: when customers see prices (Premium)

Choose when prices show. Whenever prices are not on screen, nothing else about money is either: no payback, savings or bill figures.

- **With the estimates** (default): prices, payback and savings show with each system, and the customer gives their details when they ask for a quote.
- **Once they give their contact details:** prices are hidden until the customer gives their name and email. We then save a lead for the system they were looking at and send you a short notice. If they go on to ask for a quote, that same lead is updated with the system they chose.
- **Only in the emailed estimate:** no prices on screen. The customer sees the price of the system they choose in the estimate we email them.
- **Never:** no prices on screen or in the emails, to the customer or to you. You go through the price with them yourself.

On Free and Basic, prices always show with the estimates.

[![When customers see prices on the Lead Capture tab](https://help.easy-pv.co.uk/uploads/images/gallery/2026-10/ROawnXJ11ANJHGWq-speedy-pv-lead-capture.jpg)](https://help.easy-pv.co.uk/uploads/images/gallery/2026-10/ROawnXJ11ANJHGWq-speedy-pv-lead-capture.jpg)

#### 10. Kit combinations (Basic and Premium)

Speedy PV quotes only the kit combinations you tag for it. Each one brings its own panel, inverter, mounting systems and, if it has one, battery. To tag one:

1. In **Pro Account Settings**, open the **Design** tab and scroll to **Kit combinations**.
2. Press the pencil on a kit, and on its **Basics** tab switch on **Speedy PV** under **Where this combination is used**.
3. Press **Save changes**, and make sure the kit's own switch in the list is on too.

[![The Speedy PV switch under Where this combination is used](https://help.easy-pv.co.uk/uploads/images/gallery/2026-10/gdYPuaErDo1y4Ofs-speedy-pv-kit-tag.jpg)](https://help.easy-pv.co.uk/uploads/images/gallery/2026-10/gdYPuaErDo1y4Ofs-speedy-pv-kit-tag.jpg)

Basic quotes the first tagged kit with a battery and the first without, in the order of your list, so put your favourites first. Premium quotes every tagged kit. We recommend having a few kits with and without batteries.

Back in Speedy PV Setup, the **Estimate Configuration** tab lists the kits Speedy PV quotes. On Premium you can also switch on **Show kit combination names to homeowners**, so each system is headed by its kit's name rather than its size: check the names read well to a customer first.

[![Kit combinations and Kit combination names on the Estimate Configuration tab](https://help.easy-pv.co.uk/uploads/images/gallery/2026-10/br27WaEmkAqftP1U-speedy-pv-estimate-configuration.jpg)](https://help.easy-pv.co.uk/uploads/images/gallery/2026-10/br27WaEmkAqftP1U-speedy-pv-estimate-configuration.jpg)

**Instant panel layout:** when it's on, panels appear on the roof as soon as your customer has drawn it, and their estimates use exactly the panels they kept. It's available when every kit you quote uses the same panel and the same mounting system for each roof type. The box underneath says whether yours do.

[![Instant panel layout switched on, with the box saying it is available](https://help.easy-pv.co.uk/uploads/images/gallery/2026-10/WKWMMzzzRaCBwnwg-speedy-pv-instant-panel-layout.jpg)](https://help.easy-pv.co.uk/uploads/images/gallery/2026-10/WKWMMzzzRaCBwnwg-speedy-pv-instant-panel-layout.jpg)

#### 11. Terms

Read the terms on the **Terms** tab and switch on **I accept the terms of use**. Before you go live, update your website's terms and privacy policy to say that you use Speedy PV and that Midsummer Energy Ltd processes your customers' information on your behalf. Section 3.d of the terms has sample wording.

#### 12. Preview, then go live

The **Preview** tab (under **More**) shows your Speedy PV exactly as your customers will see it. Try a few addresses you know and check the systems and prices; if something looks wrong, adjust your kits or pricing rules. Nothing you send from a preview reaches you. You can also see the widget on each plan, set its colours, choose the estimate card layout (Premium) and switch between desktop and mobile. On Premium, the **Your site** tab shows your Speedy PV page.

[![The Preview tab with the plan to preview and the live widget](https://help.easy-pv.co.uk/uploads/images/gallery/2026-10/Mrk2foYx4hWL5t3U-speedy-pv-preview.jpg)](https://help.easy-pv.co.uk/uploads/images/gallery/2026-10/Mrk2foYx4hWL5t3U-speedy-pv-preview.jpg)

On the **Go Live** tab, the checklist shows what's left. When everything is ticked, switch on **Enable Speedy PV**: your page and widget stop being previews and start taking leads. If your website still has the previous Speedy PV, it switches to the new widget at this moment. If the switch stays greyed out after you've fixed everything, press **Refresh**.

[![The Go Live checklist and the Enable Speedy PV switch](https://help.easy-pv.co.uk/uploads/images/gallery/2026-10/BRjoLamfTWswTwBT-speedy-pv-go-live.jpg)](https://help.easy-pv.co.uk/uploads/images/gallery/2026-10/BRjoLamfTWswTwBT-speedy-pv-go-live.jpg)

<p class="callout info">Changes you save reach your Speedy PV within the hour. Press **Resync**, at the top of every Speedy PV Setup tab, to send them straight away.</p>

#### 13. Add it to your website

- **Already using Speedy PV?** The code already on your website loads the new widget in the same place once you go live, so there's nothing to change. Keep its API key as it is: generating a new one would stop that code working.
- **New to Speedy PV:** copy the two tags from the Preview tab, one for the page's head and one for where the widget should appear. No API key is needed. For a single address box that sends visitors on to your Speedy PV page, use the **Address finder** tags instead.
- **WordPress:** use **Get the WordPress plugin** on the Preview tab. The plugin adds Speedy PV as a block, a shortcode, and an Elementor or WPBakery element, and keeps itself up to date.
- **Anywhere else:** your Speedy PV page works on its own, so you can link to it from emails, social posts and adverts.

[![The widget and address finder tags on the Preview tab](https://help.easy-pv.co.uk/uploads/images/gallery/2026-10/9gYMJfPRg7pwr20U-speedy-pv-embed-code.jpg)](https://help.easy-pv.co.uk/uploads/images/gallery/2026-10/9gYMJfPRg7pwr20U-speedy-pv-embed-code.jpg)

If your website sends a Content-Security-Policy, the Preview tab lists what it has to allow. Most websites don't, and then there's nothing to do.

#### Your leads

Every quote request lands in the **Leads** tab of Easy PV, as before. Everyone under Email CC's gets an email about it, your customer gets their estimate by email from your mailbox, and you can convert the lead into a full Easy PV project with the roof already drawn.

If you have any questions, please contact our support team at <help@easy-pv.co.uk>.