**Note**: [Some banks do not support instant payments](https://help.easy-pv.co.uk/books/faqs/page/my-bank-is-not-showing-up-when-trying-to-upgrade-to-pro-what-should-i-do "My bank is not showing up when trying to upgrade to Pro, what should I do?") so if you're having trouble setting up the payment, please [get in touch](mailto:easy-pv.co.uk) so we can do this manually.
**Note**: when you upgrade, you keep your existing account and projects, but just with access to Pro features.
--- ## Configure team settings Correctly setting up your team preferences can help you make the most of Easy PV Pro. Navigate to **Pro account settings** and click through each tab to set this up. Find further information in each section below. [](https://help.easy-pv.co.uk/uploads/images/gallery/2026-02/L1onYiJxt7l3JIq9-image.png) ### 1. General If you have multiple users in your team, you can edit team members and what role they have here. [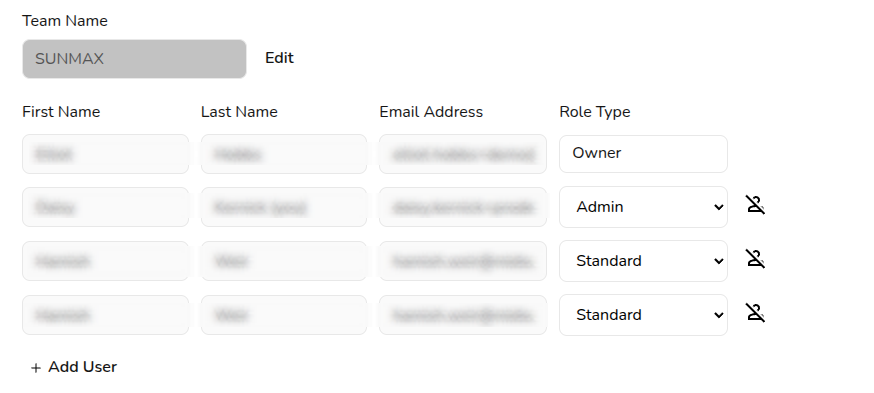](https://help.easy-pv.co.uk/uploads/images/gallery/2026-02/uDjFCEzWDvaLZHts-image.png) **Learn more**: [Pro team management and user roles](https://help.easy-pv.co.uk/books/getting-started-with-pro/page/pro-team-management "Pro: Team Management"). The details you set under **Company Details** will be used throughout Easy PV tasks, forms, and reports. [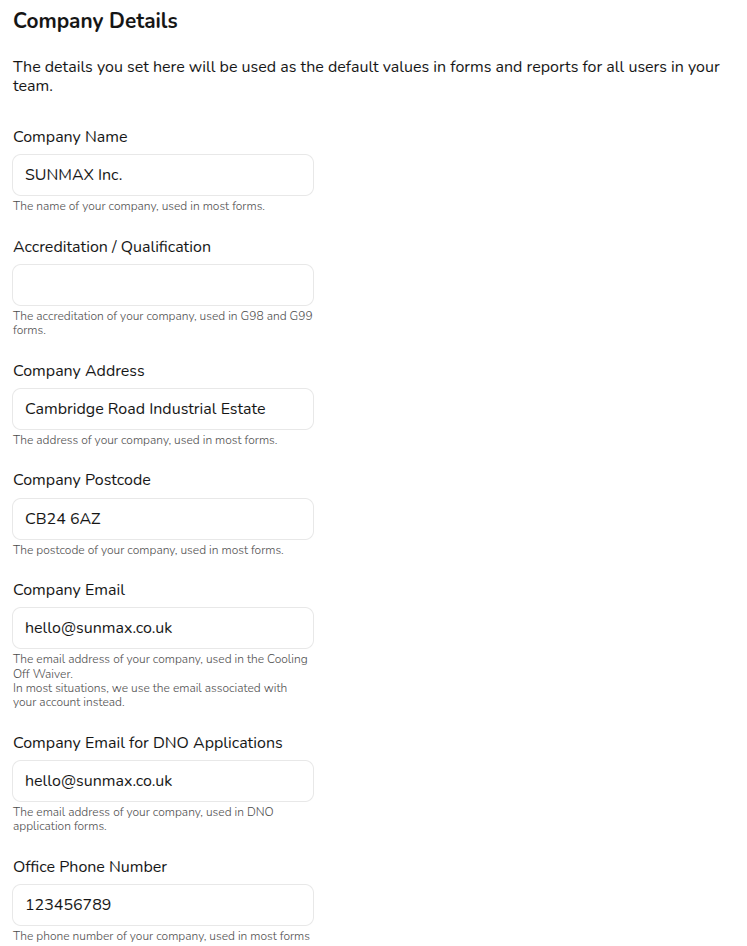](https://help.easy-pv.co.uk/uploads/images/gallery/2026-02/FQdzrGxi5GVolasj-image.png) At the bottom of this section you can view and change your **subscription status**. ### 2. Configuring financial settings In the **Financial** tab you can configure **financial defaults for your team**. Many of these settings are the same as those available in user settings. Team financial settings override user financial settings and apply consistently across your team's projects. **Learn more**: [Setting financial defaults](https://help.easy-pv.co.uk/books/getting-started-f2k/page/setting-financial-defaults "Setting financial defaults"). ### 3. Upload team documents Any files uploaded to the documents tab will be accessible to any user in the team when sending emails through Easy PV. Upload your terms and conditions, MCS certificate or anything else you would like available for all projects. [](https://help.easy-pv.co.uk/uploads/images/gallery/2026-02/qnm0dmFpZifh90W7-teamuploads.gif) ### 4. Set up customised proposal With Easy PV Pro you have the option to customise the customer proposal to align more with your branding. **Learn more**: [Setting Up Your Customised Proposal](https://help.easy-pv.co.uk/books/getting-started-with-pro/page/pro-customer-proposal-customisation "Pro: Customer Proposal Customisation"). ### 5. Configure email credentials With Easy PV Pro you can send emails to your customer within projects. By setting up your email credentials, it means these emails will send from your domain, rather than from no-reply@easy-pv.co.uk. **Learn more**: [How to Set Up Email Credentials](https://help.easy-pv.co.uk/books/getting-started-with-pro/page/pro-email-credentials "Pro: Email Credentials"). ### 6. Design Adjust the default roof margin for new projects. ### 7. Performance Adjust the defaults used in the performance task. **Learn more**: [Performance Task Preferences](https://help.easy-pv.co.uk/books/getting-started-f2k/page/performance-task-preferences "Performance task preferences"). ### 8. CRM connections In this tab you can access your API key to connect with CRMs and job management platforms. **Learn more**: - [Existing Integrations](https://help.easy-pv.co.uk/books/faqs/page/does-easy-pv-have-integrations-with-crm-systems "Does Easy PV have integrations with CRM systems?") - [Developer guidelines](https://help.easy-pv.co.uk/books/developer-guidelines "Developer guidelines") for setting up your own integration ### 9. Speedy PV If you're interested in setting up Speedy PV, enable the Speedy PV configuration dashboard. **Learn more**: [Setting up Speedy PV](https://help.easy-pv.co.uk/books/getting-started/page/setting-up-speedy-pv "Setting Up Speedy PV"). ## Getting start with Pro features in a project Once you've configured your Pro account settings, you can get started using Pro features within a project. ### Project statuses From the project overview, you'll now be able to set the status on your project. Use filters on the right-hand side to view jobs in each stage. [](https://help.easy-pv.co.uk/uploads/images/gallery/2026-02/STCfYp9HYv4GgEqI-projectstatuses.gif) ### Project and component sharing If you'd like new projects or components shared by default, navigate to **My account** > **Preferences** > **General** and then **Default sharing**. Select the permissions you'd like to be given by default on new projects. These settings are account (not team) specific so will only apply to the account you are logged into. [](https://help.easy-pv.co.uk/uploads/images/gallery/2026-07/ngJh4VsovICRPUbH-defaultpermissons.gif) Old projects and components will not be shared with your team by default. Any old projects you'd like shared with your Pro team, you can share manually. **Learn more**: [Project and Component Sharing](https://help.easy-pv.co.uk/books/getting-started-with-pro/page/pro-share-projects-and-components "Pro: Share projects and components"). ### Using project features **Learn more** about the Pro features you can now use in projects: - [E-signing](https://help.easy-pv.co.uk/books/reports-documents-and-emails/page/pro-e-signing "Pro: E-signing") - [Document storage ](https://help.easy-pv.co.uk/books/reports-documents-and-emails/page/pro-document-management "Pro: Document Management") - [Sending emails ](https://help.easy-pv.co.uk/books/reports-documents-and-emails/page/pro-sending-emails-from-easy-pv "Pro: Sending emails from Easy PV") - [Survey and install records](https://help.easy-pv.co.uk/books/reports-documents-and-emails/page/pro-survey-and-installation-record-tasks "Pro: Survey and installation record tasks") - [DNO applications via Connect Direct](https://help.easy-pv.co.uk/books/reports-documents-and-emails/page/pro-dno-application-via-connect-direct "Pro: DNO Application via Connect Direct") --- ## Interested to know more? - **Live Training**: [Book onto a live demo session](https://cal.com/easy-pv/pro-training) which covers all the features that you get with Pro. - **FAQs**: Take a look at our [pro FAQs](https://help.easy-pv.co.uk/books/faqs/chapter/pro "Pro") for common questions. **Contact Support:** If you've got unanswered questions, feel free to get in touch with our support team at **help@easy-pv.co.uk** (UK) or **help@easy-pv.ie** (IE). # Pro: Share projects and components With Easy PV Pro you're able to collaborate with your team by sharing projects and components. See below how you can configure your sharing settings. --- ## Understanding sharing options You will have the following options when sharing projects and components in Easy PV: - **View**: Users will be able to view projects or use the component, but not edit it. - **Edit**: Users will be able to view and make changes to the project or component. - **Manage**: Users will be able view, edit and permanently delete the project or component, transfer ownership of the project and change or remove other users or team's access to the project or component**Note**: the **Owner** of a project will get email notifications when a document from that project is [e-signed](https://help.easy-pv.co.uk/books/reports-documents-and-emails/page/pro-e-signing "Pro: E-signing"). The owner will also have Manage permission by default.
--- ## Default sharing Each user in a Pro team can configure default sharing settings for the projects and components they create. Navigate to **My account** > **Preferences** > **General** and then **Default sharing.** In this section, simply select which sharing permissions you would like to be granted automatically when creating a project or component. [](https://help.easy-pv.co.uk/uploads/images/gallery/2026-07/ngJh4VsovICRPUbH-defaultpermissons.gif)**Note**: This will only apply to *new* projects and components. If you would like to share old projects or components, see below for instructions on manual sharing.
--- ## Manual sharing If you would not like projects or components to share by default, you also have the option to share individual projects or components manually. You will also have the option to transfer ownership to another user when sharing manually.**Note**: You can only configure sharing permissions on projects and components you own or have manage access to.
### Sharing a project You can share a project via your list of projects on the My Projects page, or via the project overview page on a specific project. - From your project list on the **My Projects** page - click the [](https://help.easy-pv.co.uk/uploads/images/gallery/2026-07/kCNEDaghAK36f0pA-image.png) share icon on the project you want to share[](https://help.easy-pv.co.uk/uploads/images/gallery/2025-06/IJgoXa77ZaJaJXqQ-image.png) - From the **project overview** page of a specific project - click the [](https://help.easy-pv.co.uk/uploads/images/gallery/2026-07/kCNEDaghAK36f0pA-image.png) share icon in the top left of the project. [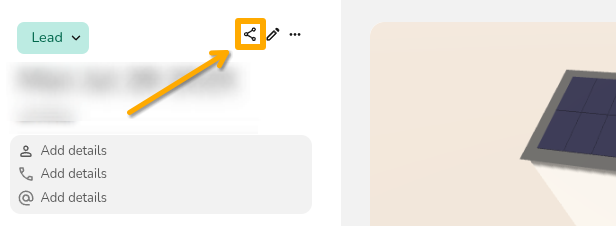](https://help.easy-pv.co.uk/uploads/images/gallery/2025-08/O0eHzokvCqcUN2jQ-image.png) Once you have chosen the project you want to share, you can **view who has access to a project** and **edit their permissions**. - **Select permissions**: Select from the drop downs which permissions you'd like given on the project - **Change owner**: If you are the owner of a project or have manage permissions, you will see the option to `Transfer ownership`. Click this to view the list of users you can transfer to and select the new owner. - **Share link**: Click the copy icon to give someone a direct link to view the project. They will need to also have the right sharing access - **Save**: Click `Save` to confirm any changes [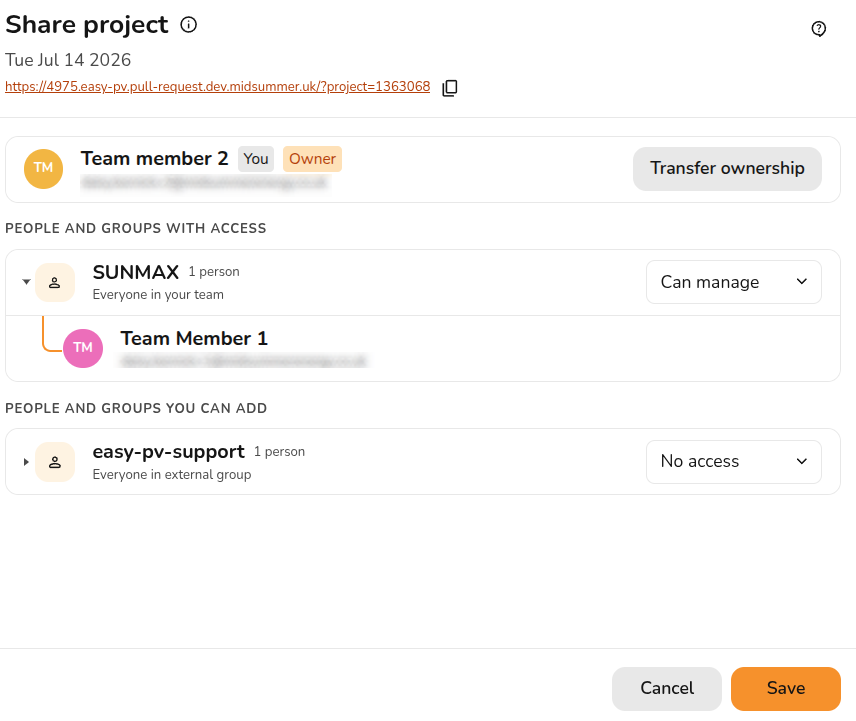](https://help.easy-pv.co.uk/uploads/images/gallery/2026-07/KTPYSZfAp2fqOpa9-image.png) If you are **not the owner** of a project or **do not have manage permissions**, you will not be able to configure the sharing on a project: [](https://help.easy-pv.co.uk/uploads/images/gallery/2026-07/Ui48tGK5AjheTUIV-image.png) If a user with manage permissions has shared on a project, you will see them in the list of 'People and groups with access': [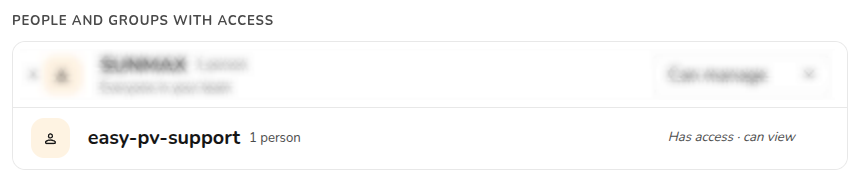](https://help.easy-pv.co.uk/uploads/images/gallery/2026-07/i571WAbhMFdgjSvG-image.png) ### Sharing a component If you are using [custom components](https://help.easy-pv.co.uk/books/creating-components/chapter/create-and-manage-your-own-components "Create and manage your own components") in Easy PV, you'll be able to share any components where you have Manage permissions. Hover over the Components option in the main site navigation and then select the component type to find the component you want to share. Click the [](https://help.easy-pv.co.uk/uploads/images/gallery/2026-07/kCNEDaghAK36f0pA-image.png) share icon to configure sharing for the component. As with projects, you can then view who has access to the component and choose which permissions to give.**Warning**: For custom inverters and solar panels, you need to share both the manufacturer group and the individual component.
[](https://help.easy-pv.co.uk/uploads/images/gallery/2025-06/ioqurE3PRYiW1OWh-image.png) --- ## **Viewing projects shared with you** To view projects shared with you, make sure this option is selected in the project list page: [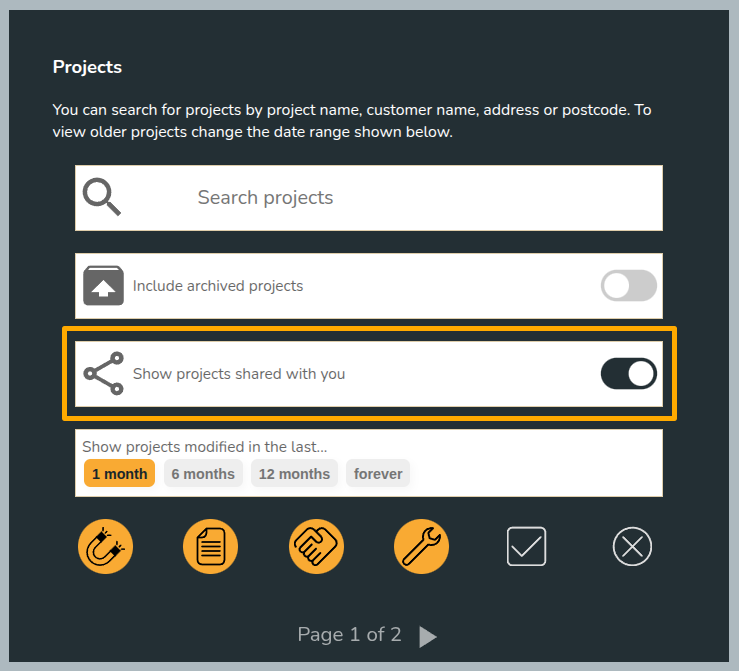](https://help.easy-pv.co.uk/uploads/images/gallery/2025-06/xFAoPMx43lEPd6Oe-image.png) Projects owned by others will say *Owned by \[name\]* in the top right corner of the project: [](https://help.easy-pv.co.uk/uploads/images/gallery/2025-06/smZNA6uZMX35pFeM-image.png) --- ## Still Need Help? - **Related FAQs:** Check out our [Pro FAQs](https://help.easy-pv.co.uk/books/faqs/chapter/pro "Pro") for answers to common questions - **Related guides**: Take a look at [Setting Up Your Pro Account](https://help.easy-pv.co.uk/books/getting-started-with-pro/page/setting-up-your-easy-pv-pro-account) or [Pro Team Management](https://help.easy-pv.co.uk/books/getting-started-with-pro/page/pro-team-management) for more information on setting up your Pro team - **More Examples:** [Book onto a Pro demo session](https://cal.com/easy-pv/pro-training) to see this feature in action **Contact Support:** If you require additional assistance, feel free to get in touch with our support team at **help@easy-pv.co.uk** (UK) or **help@easy-pv.ie** (IE). *If you are experiencing a bug, to help us look into your issue faster, please include the email address of your account, the name of the project and screenshots of any unexpected behaviour.* # Pro: Team Management Team management allows you to have control over who is on your Easy PV Pro Team and the permissions they have. --- ## **Managing your team** You can manage your team settings in **Pro Account Settings** > **General**. The team owner and any users with the admin role type can add and remove users, as well as change their role type. [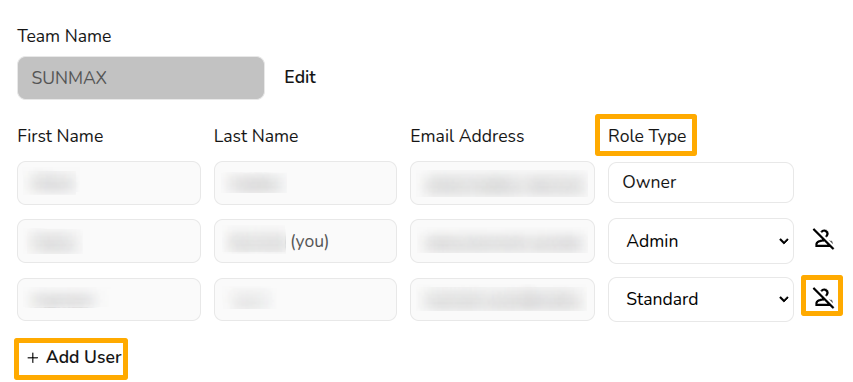](https://help.easy-pv.co.uk/uploads/images/gallery/2025-06/BdFWQbtSKIRukoSE-image.png) ### Role types With Easy PV pro, different members of the team can have different levels of access. The roles available are: - **Admin**: role includes the ability to view and manage Pro team settings - **Owner**: this is the user who set up the pro team and this role cannot be selected or changed. They have same permissions as admin but cannot be removed from the team, so make sure this is under an email address you can access even if the owner was to leave the company - **Standard**: can access all pro features within projects, but cannot view or edit the pro account settings ### Adding or removing users To **add users**, click `+ Add user` to the bottom left of the existing team members. Then input the individual’s name and email address (they do not need an existing Easy PV account), choose the user’s role (this role can be changed at anytime) and click `Save`. A pop-up will then appear with details about the payment for the additional user. The fee for the additional members will be pro rata until the next billing date. [](https://help.easy-pv.co.uk/uploads/images/gallery/2025-06/7zEOhz2bvy1LQhKP-image.png) To **remove a user**, click the [](https://help.easy-pv.co.uk/uploads/images/gallery/2026-07/uLo7QNW94kloelqt-image.png) icon beside their details. This will disable their account and remove them from the subscription. The owner account cannot be removed so ensure it is under a company email address. ### Editing users User names or email addresses cannot be edited here. This can only be done while logged into the relevant account. If you've made a typo when adding a new user to your team and cannot access the account, get in touch with the [support team](mailto:help@easy-pv.co.uk). --- ## Still Need Help? - **Related FAQs:** Check out our [Pro FAQs](https://help.easy-pv.co.uk/books/faqs/chapter/pro "Pro") - **Related guides**: Take a look at [Setting Up Your Pro Account](https://help.easy-pv.co.uk/books/getting-started-with-pro/page/setting-up-your-easy-pv-pro-account) or [Sharing Projects and Components](https://help.easy-pv.co.uk/books/getting-started-with-pro/page/pro-share-projects-and-components) - **Demo session:** [Book onto a demo session](https://cal.com/easy-pv/pro-training) to see this feature in action **Contact Support:** If this guide didn't resolve your issue, get in touch with our support team at **help@easy-pv.co.uk** (UK) or **help@easy-pv.ie** (IE). # Pro: Company details and subscription settings You can manage your company details and subscription settings in **Pro Account Settings** > **General**. ## Company details You can set default information that will be used across all your team’s user accounts. This includes company name, number, accreditation, logo, address, and postcode. The details you set here will be used where relevant throughout Easy PV tasks, forms, and reports. ## Billing information Here you enter the details we should use for billing your subscription. If you have a separate accounts department, you may wish to use their email address here. We send out invoices by email every month after your subscription payment has been taken. ## Subscription status At the bottom of this section you will see your subscription status with your next billing date listed. #### Updating payment details easy-pv.co.ukIf you've recently had a failed payment or are coming to the end of a free trial, you'll be able to set up a new direct debit here. easy-pv.ieTo update your direct debit details, log into your Stripe account. #### Cancelling your subscription In the bottom right, you'll see the option to **Cancel Subscription**. This will cancel your subscription and your team’s accounts will switch back to standard on the date your subscription would have renewed. You will still have access to your old projects, but you will not have access to Pro features anymore. --- ## Still Need Help? - **Related FAQs:** Check out our [Pro FAQs](https://help.easy-pv.co.uk/books/faqs/chapter/pro "Pro") for answers to common questions - **Related guides**: Take a look at [Setting Up Your Pro Account](https://help.easy-pv.co.uk/books/getting-started-with-pro/page/setting-up-your-easy-pv-pro-account) - **Live Training**: [Book onto a live demo session](https://cal.com/easy-pv/pro-training) which covers all the features that you get with Pro **Contact Support:** If you've got further questions, get in touch with our support team at **help@easy-pv.co.uk** (UK) or **help@easy-pv.ie** (IE). # Pro: Email Credentials With Easy PV pro you can send emails to your customer within projects. By setting up your email credentials it means these emails will **send from your domain**, rather than from no-reply@easy-pv.co.uk. --- To view or edit your email settings navigate to **Pro account settings** > **Email**. [](https://help.easy-pv.co.uk/uploads/images/gallery/2025-04/QOJ9OIYQ5robENIe-screenshot-from-2025-04-28-12-04-25.png) Here you can enter email credentials to allow emails to be sent from your own email address, how this is set up will depend on what email provider you are using. ## Email configuration ### OAuth 2.0 (Gmail or Microsoft 365) If Gmail or Microsoft 365 is your email provider, then simply select **OAuth 2.0**, select the relevant option and click `Connect`, this will direct you to your email where you can approve the connection. ### SMTP If you have a different email provider then you will need to set up using the **SMTP** option. What is then required for each field depends on the provider and you will likely be able to find instructions online by searching for **your provider** and **SMTP credentials**. Below is some general guidance for each field: - **SMTP Username**: These credentials are provided by your email service provider and are used to authenticate your email client. In most cases this is your full email address (e.g. user@provider.com) - **SMTP From Address (optional)**: This is the email address that recipients see as the sender of the email. In most cases this will be the same as the SMTP username - **SMTP Name (optional)**: This will appear next to the 'from address' - **SMTP Host**: This will vary depending on provider. The format will be something like [smtp.provider.com](http://smtp.provider.com) - **SMTP Password**: This will usually be an App Password that you need to set up but in some cases it will be your email password - **SMTP Port (optional)**: By default this will be 587, but in some cases this will need to be changed Once all required fields are filled in, click **`Save credentials`**. ## Sending test email To make sure your settings are working as intended, click `Send test email` and input an email address. [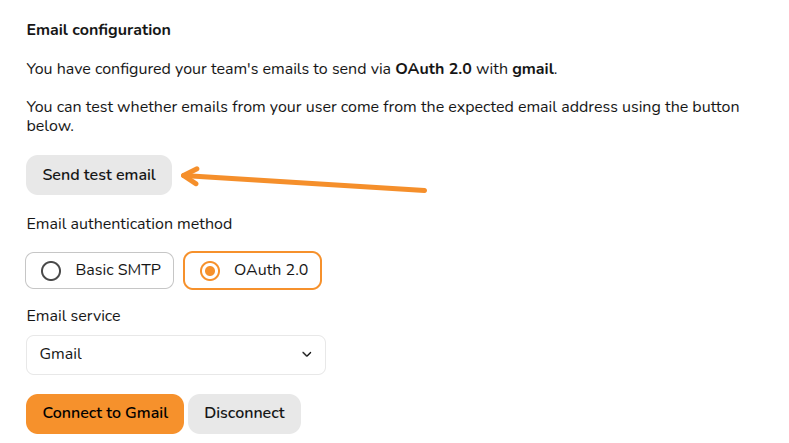](https://help.easy-pv.co.uk/uploads/images/gallery/2026-06/sG2Tkh4gZFtHTgjI-image.png) --- ## Still Need Help? - **Related FAQs:** Check out our [Pro FAQs](https://help.easy-pv.co.uk/books/faqs/chapter/pro "Pro") for answers to common questions - **Related guides**: Read more about [Sending Emails within Easy PV](https://help.easy-pv.co.uk/books/reports-documents-and-emails/page/pro-sending-emails-from-easy-pv) - **Live training:** [Book onto a live demo session](https://cal.com/easy-pv/pro-training) to see this feature in action **Contact Support:** If you've got further questions, get in touch with our support team at **help@easy-pv.co.uk** (UK) or **help@easy-pv.ie** (IE). *If you are having trouble setting up your credentials, please let us know what provider you are using, a screenshot of the email page with your inputs (do not share your password) and a screenshot of any errors that appear when you try to send emails.* # Pro: Customer Proposal Customisation With Easy PV Pro, you are able to customise the proposal document that you send to your customers. This can help you stand out and align the proposal more with your branding. --- ## **What can I customise?** You have the option to: - Add a custom cover page - Customise colours to match your brand - Add an 'About us' section to the contents page - Configure a branded footer to appear on all pages of the proposal document with your logo and company information - Add your terms and conditions and the scope of work sections to the proposal --- ## **Set up** Navigate to **Pro account setting** > **Proposal**. There will also be an **Documents** section in your Pro account settings where you can manage all the images you upload. [](https://help.easy-pv.co.uk/uploads/images/gallery/2025-06/8UOyKJ1aaPi7Iyby-image.png) ### Colours Select the colour you would like **headers** to appear in the proposal document. You can precisely match this with your branding colours by typing in directly the RGB, HSL or HEX code, use the arrows to navigate between these options. [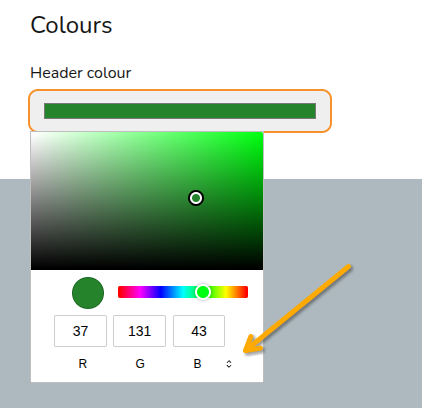](https://help.easy-pv.co.uk/uploads/images/gallery/2025-06/1lCXsQxNOfKDlsBw-image.png) ### Cover page Select whether you would like to include a custom cover page and whether you would like the customer name and address overlaid on your cover page and what colour you'd like this text to be. [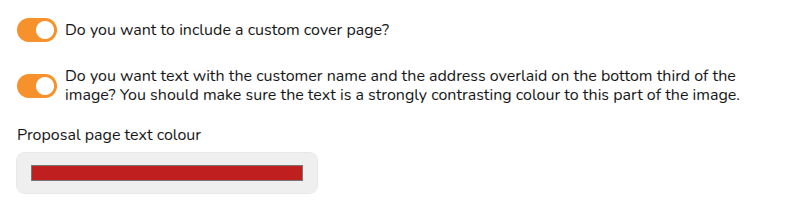](https://help.easy-pv.co.uk/uploads/images/gallery/2025-06/6QpukFx1FbJWXCCr-image.png)**Cover page template**: If you don't already have a preferred way of making a cover page, you might find [Canva](https://www.canva.com/) useful. We have created a [template](https://www.canva.com/design/DAGR2EHVTWs/Uni6BIDf_8DWncEe3QOehw/view?utm_content=DAGR2EHVTWs&utm_campaign=designshare&utm_medium=link&utm_source=publishsharelink&mode=preview) with some additional instructions that you can use to create your own cover page design in Canva. When you are finished, click Share > Download > Change the file type to PNG or JPG > Download.
Once you have your custom cover page, either add it in the **Uploads** tab or in the cover page section click **Select from uploaded image** > **Add images**. After uploading you will be able to select your cover page. You also have the option to use an image from a URL. [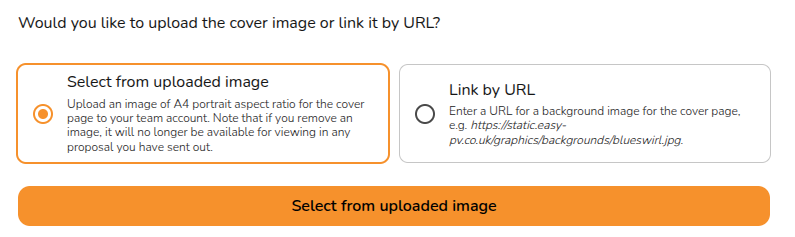](https://help.easy-pv.co.uk/uploads/images/gallery/2025-06/nDrk2Z3tuL3ce0eT-image.png) ### Footer In your custom footer you can input a phone number, address and website. You can also select the footer background and text colour and upload a logo. [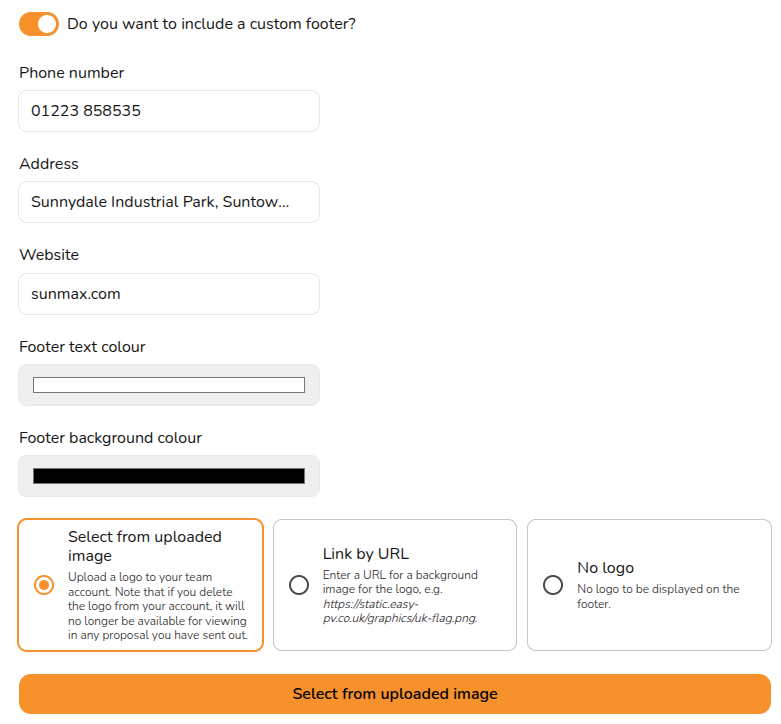](https://help.easy-pv.co.uk/uploads/images/gallery/2025-06/goirAJCBxZC5CtJu-image.png) Make sure the footer text does not overflow onto a second line when you generate the proposal or this will cause formatting errors. ### Contents page In this section you can add a custom cover letter with a custom header and contents. This can be overridden on a per-project basis. [](https://help.easy-pv.co.uk/uploads/images/gallery/2025-06/7Ht4bYacphXobsKN-image.png) You can also include an 'About us' section with an optional custom image. The 'About us' section should be a short description, make sure it does not overflow onto the next page of the proposal. [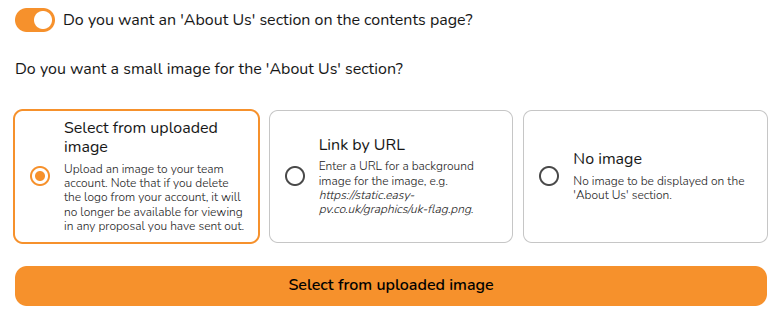](https://help.easy-pv.co.uk/uploads/images/gallery/2025-06/dJKPv2RqYb7Fb6de-image.png) ### Terms and conditions and scope of work Here you can input your terms and conditions and scope of work. In each case you can use the options at the bottom of the text box to format the text: [](https://help.easy-pv.co.uk/uploads/images/gallery/2025-06/EmRj4aVeginFVOHH-image.png) Both these options can be overridden on a project by project basis.**Warning**: Pasting formatted text from a different text editor will likely lead to formatting issues in a generated proposal.
**Note**: Changes made to the contents page, terms and conditions and scope of work will **not** automatically refresh in projects where you've already opened the customer proposal task. Click the refresh icon next to where it says 'Customer proposal' to reset those fields to what you've got in your settings.
--- ## Still Need Help? - **Related FAQs:** Check out our [Pro FAQs](https://help.easy-pv.co.uk/books/faqs/chapter/pro "Pro") or [Customer Proposal FAQs](https://help.easy-pv.co.uk/books/faqs/chapter/customer-proposal "Customer proposal") for answers to common questions - **Live training:** [Book onto a live demo session](https://cal.com/easy-pv/pro-training) to see this feature in action - **Want further customisation?** Contact us about our Enterprise package **Contact Support:** If you've got further questions, get in touch with our support team at **help@easy-pv.co.uk** (UK) or **help@easy-pv.ie** (IE). *If you are experiencing a bug, to help us look into your issue faster, please include the email address of your account, the name of the project and screenshots of any unexpected behaviour.*